

-
Welcome to Tundras.com!
You are currently viewing as a guest! To get full-access, you need to register for a FREE account.
As a registered member, you’ll be able to:- Participate in all Tundra discussion topics
- Transfer over your build thread from a different forum to this one
- Communicate privately with other Tundra owners from around the world
- Post your own photos in our Members Gallery
- Access all special features of the site
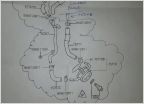 I'm trying to install a zero start 1500w coolant heater to my 05 tundra,
 Is it normal for my AC to take 10 minutes to finally cool off the inside of the truck?
 2002 Tundra RS 3000 remote alarm system
 Tailgate handle
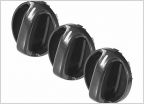 "Fancy" climate control knobs for Gen 1?
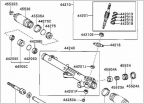 Steering rack play
Pickup bed lean…bad leaf bushing, shock?
Discussion in '1st Gen Tundras (2000-2006)' started by Jack McCarthy, May 8, 2022.
Page 3 of 5
Page 3 of 5

