1. Welcome to Tundras.com!

    You are currently viewing as a guest! To get full-access, you need to register for a FREE account.

    As a registered member, you’ll be able to:
    • Participate in all Tundra discussion topics
    • Transfer over your build thread from a different forum to this one
    • Communicate privately with other Tundra owners from around the world
    • Post your own photos in our Members Gallery
    • Access all special features of the site

Front axle leak/front diff

Discussion in '1st Gen Tundras (2000-2006)' started by Voss, Nov 1, 2021.

  1. Jan 1, 2022 at 8:18 PM
    #31
    Aerindel

    Aerindel New Member

    Joined:
    Jan 31, 2019
    Member:
    #25399
    Messages:
    1,811
    Gender:
    Male
    Montana
    Vehicle:
    2000 Tundra AC, SR5, 4.7 V8 4WD, 325,00ish miles.
    They come with a metal tube that you use with a hammer to press to tap them on. They are sized some very small amount smaller than the shaft so they 'stretch' over it and hold in place just from tension.

    When I needed one, I bought it from Napa. The brand is called "SKF Speedi-Sleeve" and they come in almost every size you could want.
     
  2. Jul 22, 2023 at 11:19 AM
    #32
    rtemis

    rtemis New Member

    Joined:
    Jul 22, 2023
    Member:
    #100718
    Messages:
    2
    Gender:
    Male
    Vehicle:
    2003 Tundra SR5 4x4
    If the seal is in too far is there any reason you can’t reuse it? Rebooted my axles a couple of months ago and started getting a noise at 20 mph. Got under her to check her out and found my left axle is leaking. Both seals were replaced. Not a daily driver so it probably only has a few hundred miles on it since doing the front end. Can I just pull the axle and reseat the seal and reinstall the axle?
     
  3. Jul 22, 2023 at 1:51 PM
    #33
    FirstGenVol

    FirstGenVol Recovering mangler

    Joined:
    Dec 13, 2018
    Member:
    #22934
    Messages:
    14,387
    East TN
    Vehicle:
    2002 AC TRD 4x4 V8
    You can try but you may mangle it in the process. It's a cheap part so I would probably just buy a new one.
     
    bfunke likes this.
  4. Jul 23, 2023 at 7:15 PM
    #34
    NickB_01TRD

    NickB_01TRD You don't need less cars, just more driveway.

    Joined:
    Jun 16, 2021
    Member:
    #64346
    Messages:
    2,785
    Gender:
    Male
    First Name:
    Nick
    KY
    Vehicle:
    01 Tundra V8 4X4 AC SR5 TRD
    Left axle as in drivers side then? That one goes in till it stops there is no measured depth for that one AFAIK. Passenger is a different story. I set mine to the wrong depth and had to buy new. Messed it up trying to remove.
     
  5. Jul 24, 2023 at 8:57 PM
    #35
    rtemis

    rtemis New Member

    Joined:
    Jul 22, 2023
    Member:
    #100718
    Messages:
    2
    Gender:
    Male
    Vehicle:
    2003 Tundra SR5 4x4
    I meant right side. Local dealer had to order one. Supposed to be here tomorrow.
     
    NickB_01TRD likes this.
  6. Jan 18, 2024 at 12:26 AM
    #36
    ToyotaDude

    ToyotaDude Member

    Joined:
    Jul 8, 2023
    Member:
    #99955
    Messages:
    1,038
    Vehicle:
    2003 Tundra AC V8 4x4
    3" Front Eibach Pro-Truck Sport Ride Height Adjustable shocks with OE springs Rear Wheeler AALs Pathfinder AT 275/70/R18 (33.2") tires on 9” wide XD778 Monster wheels with 4.53 backspacing / -12 offset
    How this turn out for you and what part numbers did you use for the breather plugs? It seems the larger diff breather tube has a replacement plug from Toyota (part #90930-03136) for about $6 but the plug for the diff actuator that is on the smaller tube next to it only comes with the entire tube (part #41507-34021) for about $25? Cleaned mine and they didn't seem plugged and also seem to work but don't want to swap the seal a third time so thought it might just be worth the PM to replace with the seal.
     
  7. Sep 13, 2025 at 11:16 PM
    #37
    Anima

    Anima New Member

    Joined:
    Jan 24, 2025
    Member:
    #129323
    Messages:
    44
    Gender:
    Male
    Vehicle:
    2000 TRD Tundra V8 4x4
    How did your leak end up going? I tried twice yesterday and it's still leaking. I cant locate the front diff breather either. Does anyone have a photo of it? Also, any tips on the seal?

    I just spent $150.00 and I'm getting ready to just take this to a mechanic. Im on the passenger side seal. I bought the seals from Toyota ($25 each) and bought them twice - still leaks (part #90311-47013). I bought diff fluid twice ($34 for 2 liters) and was a waste. I used a 2 1/2 cuppling from a ball joint press, but I think i might have bent the 2nd one from banging it in too hard. Would a piece of PVC pipe work better or is there is a specific tool for this?

    Any help would be greatly appreciated. This damn job has got me feeling pretty defeated. I'm losing my patience with this stupid seal. The speedy sleeve sounds like it might be a good idea, but the seal was already pretty tight when I was trying to get it in there.

    Please help!
     
    Mr Badwrench likes this.
  8. Sep 14, 2025 at 8:24 AM
    #38
    Anima

    Anima New Member

    Joined:
    Jan 24, 2025
    Member:
    #129323
    Messages:
    44
    Gender:
    Male
    Vehicle:
    2000 TRD Tundra V8 4x4
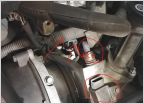
    I located the front differential tubes. They go up from the actuator on top of the differential to the engine area. I guess seeing things the daylight helps.

    Here are some photos of the front differential breather tubes on a 2000 Tundra, in case anyone needs help identifying them in the future.


    IMG_7592.jpg

    IMG_7594.jpg
     
  9. Sep 14, 2025 at 8:36 AM
    #39
    Anima

    Anima New Member

    Joined:
    Jan 24, 2025
    Member:
    #129323
    Messages:
    44
    Gender:
    Male
    Vehicle:
    2000 TRD Tundra V8 4x4
    Another question for you guys on here. I bought this truck used and the old seal i pulled off looked like this (see photo below). I'm not sure about the size difference on these two, but since the old one isnt completely rubber, I'm wondering if maybe the old one is larger? The old one appears to be OEM as well, but it looks like its more of a universal seal? The part number from the old one i pulled off is 90311-35032. I'm wondering if i should just buy one of these and push it back on? Any advice from someone who has been in this situation would be greatly appreciated.


    upload_2025-9-14_8-33-22.png
     
  10. Sep 14, 2025 at 9:24 AM
    #40
    Mr Badwrench

    Mr Badwrench New Member

    Joined:
    Jul 20, 2018
    Member:
    #17205
    Messages:
    1,548
    Gender:
    Male
    300 hectares on single tank of kerosene
    Getting this seal in is a little difficult. I tried a seal seating tool, but the seal always ended up a little crooked in the differential causing it to leak. I've done this job three times on two different Toyota trucks, I finally just bought an extra seal because I assumed I would get one wrong... now the seal is in my toolbox because I got it on the first try (go figure).

    The last two successful times I've done this, I have used a non-pointed, about 1/4" diameter brass punch and tapped the seal in (radially, around the outer perimeter). If the seal goes in too deep, you really can't get it back out without destroying it (my experience). I took my time with the brass punch and was able to get it to seal. Small, light taps around the outer perimeter of the seal, making sure not to drive it too deep or get it crooked in its seat seem to be the trick. I put a very, very light coat of RTV on the outer perimeter of the seal just to keep it lubed as I tapped it in.

    If your CV's are old, you might have lost enough metal on the sealing interface to cause a leak, but I would think this would be visible if it were that bad.

    I'm rambling here, but hopefully some of this makes sense. The Toyota brand seal I bought was just rubber coated metal.

    Drain your gear oil into a clean bucket if you get it wrong so you don't have to waste money on new stuff each time.
     
  11. Sep 14, 2025 at 9:35 AM
    #41
    Mr Badwrench

    Mr Badwrench New Member

    Joined:
    Jul 20, 2018
    Member:
    #17205
    Messages:
    1,548
    Gender:
    Male
    300 hectares on single tank of kerosene
    The seal(s) that I purchased look exactly like this except rubberized on the exposed metal area. The rubberized part probably does not make a difference.

    And yes, if your breather tube is plugged you WILL get a leak regardless of how perfectly you get the seal seated.
     
  12. Sep 14, 2025 at 9:46 AM
    #42
    Anima

    Anima New Member

    Joined:
    Jan 24, 2025
    Member:
    #129323
    Messages:
    44
    Gender:
    Male
    Vehicle:
    2000 TRD Tundra V8 4x4
    Thanks for the great advice!

    I thought it might be the CV as well, so I returned my old one (under warranty) so I have a new CV Axle in there. 1st seal attempt was without much care (oil can and sockets to drive it in). 2nd seal attempt was with a little more care (2 1/2 ball joint sleeve, tapping around the edge). I'll give the brass punch a try. That sounds like a pretty good technique.

    How did you know it was far enough in? I have a cheap Vernier Caliper that I was trying to use to measure the depth but it was a little difficult to get it in there. Any suggestions on how to gauge the depth?
     
    Mr Badwrench[QUOTED] likes this.
  13. Sep 14, 2025 at 9:57 AM
    #43
    Mr Badwrench

    Mr Badwrench New Member

    Joined:
    Jul 20, 2018
    Member:
    #17205
    Messages:
    1,548
    Gender:
    Male
    300 hectares on single tank of kerosene
    A dial caliper is perfect. I used a ruler with small graduations on it. You can adjust the depth slightly (in or out) if you have a groove worn into your CV shaft...it sounds like you are in good shape on that though. Assuming you don't have a lift, get comfortable on the ground where you are working so you don't rush it. I padded some towels underneath me so I wouldn't get impatient and rush it.

    There is a really fine spring that goes around the lip on the seal, as long as you don't screw that up, it will seal just fine with no leaks. Once that springs is bent, just toss the seal and start over. You can really only screw that up if you try to pull the seal out with a seal puller or screw driver. As long as you are with +/-1/4" of where the seal was, depth is not too critical.

    It takes some finesse, for lack of better words.

    And when you stab the CV shaft back through the seal, put a lot of gear oil on the seal and the mating surface on the CV.
     
    ToyotaDude likes this.
  14. Sep 14, 2025 at 10:01 AM
    #44
    ToyotaDude

    ToyotaDude Member

    Joined:
    Jul 8, 2023
    Member:
    #99955
    Messages:
    1,038
    Vehicle:
    2003 Tundra AC V8 4x4
    3" Front Eibach Pro-Truck Sport Ride Height Adjustable shocks with OE springs Rear Wheeler AALs Pathfinder AT 275/70/R18 (33.2") tires on 9” wide XD778 Monster wheels with 4.53 backspacing / -12 offset
    The end of the gauge can have a little ruler tip that extends out to measure the depth of the seal, instead of trying to measure using the two beaks of the caliper.

    Yes, found using PVC coupling and a 5 lb. hammer carefully was best for seating the seal so pressure is evenly applied.

    If using aftermarket or older CV can measure the OD of the axle and ID of the seal lip to verify within spec.

    Seal depth on right (passenger) side is crucial. IIRC FSM specifies .5mm +/-.3mm from axle tube end. It is not driven in until it seats.

    FSM also calls for new CV retaining clip (they're not expensive).

    These threads with associated links regarding the seals, part numbers, video of the procedure, and breather maintenance might help.

    https://www.tundras.com/threads/a-f...ly-vs-front-ubj-assembly.147553/#post-3697642

    https://www.tundras.com/threads/front-diff-actuator-breather.136767/#post-3587499

    https://www.tundras.com/threads/cv-...out-to-get-cotter-pin-in.147945/#post-3705080
     
    Last edited: Sep 14, 2025 at 10:09 AM
    Anima likes this.
  15. Sep 14, 2025 at 10:30 AM
    #45
    Anima

    Anima New Member

    Joined:
    Jan 24, 2025
    Member:
    #129323
    Messages:
    44
    Gender:
    Male
    Vehicle:
    2000 TRD Tundra V8 4x4
    This is an image of my CV Axle. The end of the axle doesn't mate directly to the rubber lip on the seal. Is there a dust cover or another seal that I am missing? From my research it seems that the gap or "daylight gap" is normal but the image the start of this thread looks different than mine.

    IMG_7597.jpg

    IMG_7599.jpg
     

    Attached Files:

    Last edited: Sep 14, 2025 at 10:56 AM
  16. Sep 14, 2025 at 11:11 AM
    #46
    ToyotaDude

    ToyotaDude Member

    Joined:
    Jul 8, 2023
    Member:
    #99955
    Messages:
    1,038
    Vehicle:
    2003 Tundra AC V8 4x4
    3" Front Eibach Pro-Truck Sport Ride Height Adjustable shocks with OE springs Rear Wheeler AALs Pathfinder AT 275/70/R18 (33.2") tires on 9” wide XD778 Monster wheels with 4.53 backspacing / -12 offset
    Looks like it is missing the dust shield.
     
  17. Sep 14, 2025 at 11:15 AM
    #47
    Anima

    Anima New Member

    Joined:
    Jan 24, 2025
    Member:
    #129323
    Messages:
    44
    Gender:
    Male
    Vehicle:
    2000 TRD Tundra V8 4x4
    Any idea what the part number is?
     
  18. Sep 14, 2025 at 11:19 AM
    #48
    ToyotaDude

    ToyotaDude Member

    Joined:
    Jul 8, 2023
    Member:
    #99955
    Messages:
    1,038
    Vehicle:
    2003 Tundra AC V8 4x4
    3" Front Eibach Pro-Truck Sport Ride Height Adjustable shocks with OE springs Rear Wheeler AALs Pathfinder AT 275/70/R18 (33.2") tires on 9” wide XD778 Monster wheels with 4.53 backspacing / -12 offset
    Last edited: Sep 14, 2025 at 11:34 AM
  19. Sep 14, 2025 at 11:20 AM
    #49
    Mr Badwrench

    Mr Badwrench New Member

    Joined:
    Jul 20, 2018
    Member:
    #17205
    Messages:
    1,548
    Gender:
    Male
    300 hectares on single tank of kerosene
    I purchased NAPA brand CV's at one point and they did not have a dust shield either.

    Even with a dust shield I have a little gap (Toyota CV's).

    As far as oil at the mating surface, I meant where the oil seal rides on the CV shaft. The inner lip on the seal you pictured above.

    20250914_121453.jpg
     
    Anima and ToyotaDude like this.
  20. Sep 14, 2025 at 11:40 AM
    #50
    Mr Badwrench

    Mr Badwrench New Member

    Joined:
    Jul 20, 2018
    Member:
    #17205
    Messages:
    1,548
    Gender:
    Male
    300 hectares on single tank of kerosene
    NAPA brand...

    20250914_122717.jpg
     
    Anima likes this.
  21. Sep 14, 2025 at 11:45 AM
    #51
    ToyotaDude

    ToyotaDude Member

    Joined:
    Jul 8, 2023
    Member:
    #99955
    Messages:
    1,038
    Vehicle:
    2003 Tundra AC V8 4x4
    3" Front Eibach Pro-Truck Sport Ride Height Adjustable shocks with OE springs Rear Wheeler AALs Pathfinder AT 275/70/R18 (33.2") tires on 9” wide XD778 Monster wheels with 4.53 backspacing / -12 offset
    Anima likes this.
  22. Sep 14, 2025 at 1:34 PM
    #52
    Anima

    Anima New Member

    Joined:
    Jan 24, 2025
    Member:
    #129323
    Messages:
    44
    Gender:
    Male
    Vehicle:
    2000 TRD Tundra V8 4x4
    Thanks you guys.

    @Mr Badwrench Mine is a NAPA CV Axle. I'll have to get ahold of a dust boot or just get an OEM later. REALLY appreciate the advice on everything. Gonna get started on taking everything apart now and starting this whole darn process over again.

    Thanks @ToyotaDude as well.

    I'm feeling a better about this go around after receiving the info on here.
     
    Mr Badwrench likes this.
  23. Sep 14, 2025 at 1:54 PM
    #53
    Mr Badwrench

    Mr Badwrench New Member

    Joined:
    Jul 20, 2018
    Member:
    #17205
    Messages:
    1,548
    Gender:
    Male
    300 hectares on single tank of kerosene
    Well before you tear into it again... I used napa CV's for 30,000 miles with no dust covers whatsoever. Not sure it was the correct way, but I never had any issues as a result. If you are not a dedicated off roader and you have a lot of pavement miles, you might be able to do without them.

    They aren't exactly dust proof even with the covers.
     
  24. Sep 14, 2025 at 2:13 PM
    #54
    Anima

    Anima New Member

    Joined:
    Jan 24, 2025
    Member:
    #129323
    Messages:
    44
    Gender:
    Male
    Vehicle:
    2000 TRD Tundra V8 4x4
    I don’t do a lot of off-roading. Some mountain trails here and there when we go camping with the family and some snowboarding trips in the winter. I’m in Southern California so that should give you an idea. I do have a quick question though—do you let the seal sit before you fill it with fluid? Or do you fill it with fluid right away? The last two times I’ve immediately filled it with fluid and I was wondering if I should give it time for the seal to set up?
     
    Mr Badwrench[QUOTED] likes this.
  25. Sep 14, 2025 at 3:54 PM
    #55
    Mr Badwrench

    Mr Badwrench New Member

    Joined:
    Jul 20, 2018
    Member:
    #17205
    Messages:
    1,548
    Gender:
    Male
    300 hectares on single tank of kerosene
    I've just added the oil and driven it. I've left the splash pan off for a couple days just for inspection, personal preference. It if you got the seal straight, you'll be in great shape. :thumbsup:
     
    Anima[QUOTED] likes this.
  26. Sep 15, 2025 at 12:45 PM
    #56
    Anima

    Anima New Member

    Joined:
    Jan 24, 2025
    Member:
    #129323
    Messages:
    44
    Gender:
    Male
    Vehicle:
    2000 TRD Tundra V8 4x4
    Just wanted to provide a successful update. I was able to set the seal with no fluid leaking. @Mr Badwrench technique with the 1/4 punch was by far the best way. Timmy the tool man has a great video on it (that I should have watched on 1st shot) and he uses a sleeve, but the punch was better because you can feel and hear the edge of the lip when the flat tide of the punch makes contact, that lets you know the seal is in where it's supposed to be. A very small amount of red grease on the outside rim helped it go in.

    Thanks again Mr Badwrench.

    IMG_7631.jpg

    IMG_7655.jpg


    IMG_7602.jpg
     

Products Discussed in

To Top