1. Welcome to Tundras.com!

    You are currently viewing as a guest! To get full-access, you need to register for a FREE account.

    As a registered member, you’ll be able to:
    • Participate in all Tundra discussion topics
    • Transfer over your build thread from a different forum to this one
    • Communicate privately with other Tundra owners from around the world
    • Post your own photos in our Members Gallery
    • Access all special features of the site
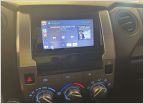
Tech 12 volts, I did it

Discussion in 'Audio & Video' started by NCHammy, Oct 29, 2020.

  1. Nov 4, 2020 at 10:17 AM
    #31
    BrandonL812

    BrandonL812 New Member

    Joined:
    Aug 5, 2018
    Member:
    #17783
    Messages:
    979
    Gender:
    Male
    First Name:
    Brandon
    Vehicle:
    2017 Sequoia LTD
    Rx350 retrofitted, Morimoto Led fogs. interior and exterior leds swap. TRD drop in filter. Carbon filter delete. Led DRL panels. TRD Shift knob.
    How much material (noico) did you purchased to do the front and rear doors?
     
  2. Nov 4, 2020 at 11:25 AM
    #32
    NCHammy

    NCHammy [OP] New Member

    Joined:
    Aug 9, 2020
    Member:
    #50551
    Messages:
    63
    Gender:
    Male
    First Name:
    Jerry
    Vehicle:
    2013 4.6L Double Cab 2WD
    None yet!
    I got 36 sqft of it, I had two pieces left over from something else. For just the doors I think that's enough from what I read.
     
  3. Nov 7, 2020 at 11:36 AM
    #33
    NCHammy

    NCHammy [OP] New Member

    Joined:
    Aug 9, 2020
    Member:
    #50551
    Messages:
    63
    Gender:
    Male
    First Name:
    Jerry
    Vehicle:
    2013 4.6L Double Cab 2WD
    None yet!
    20201107_103339.jpg 20201107_103354_HDR.jpg
    Starting the installation process. Part one : sound dampening the back wall
     
    BrandonL812 likes this.
  4. Nov 7, 2020 at 11:41 AM
    #34
    NCHammy

    NCHammy [OP] New Member

    Joined:
    Aug 9, 2020
    Member:
    #50551
    Messages:
    63
    Gender:
    Male
    First Name:
    Jerry
    Vehicle:
    2013 4.6L Double Cab 2WD
    None yet!
    Lots of rolling, removed as much as I could to make it easier to roll around brackets and screw holes.
    The previous owner was big into song birds. He must have had a bag spill if seed at one time.
    All in all it wasn't bad until my neighbor came over and said I was having a midlife crisis. 20201107_111226.jpg 20201107_111230_HDR.jpg 20201107_111248.jpg 20201107_111308.jpg 20201107_124637.jpg 20201107_135412.jpg
     
  5. Nov 7, 2020 at 11:43 AM
    #35
    NCHammy

    NCHammy [OP] New Member

    Joined:
    Aug 9, 2020
    Member:
    #50551
    Messages:
    63
    Gender:
    Male
    First Name:
    Jerry
    Vehicle:
    2013 4.6L Double Cab 2WD
    None yet!
    Oh yes! I found these two metal hooks. Don't know what they are.
     
    Rica25 likes this.
  6. Nov 7, 2020 at 11:56 AM
    #36
    cctxquicksand

    cctxquicksand IG - TRDistheWrd

    Joined:
    Jun 3, 2019
    Member:
    #31410
    Messages:
    1,262
    Gender:
    Male
    Look to be your front bumper tow hooks
     
    619Tundra likes this.
  7. Nov 8, 2020 at 3:42 PM
    #37
    NCHammy

    NCHammy [OP] New Member

    Joined:
    Aug 9, 2020
    Member:
    #50551
    Messages:
    63
    Gender:
    Male
    First Name:
    Jerry
    Vehicle:
    2013 4.6L Double Cab 2WD
    None yet!
    Got a surprise today. My speakers came in a day early! So started something then something time consuming.
    I installed the dash speakers, Kenwood.
    Then worked on the wire harness. Joining the head unit, maestro device, 9 wire from Taylor and the Toyota adapters. That was a job and a half. Soldered all the connections, shrink wrap and covered in Tessa tape.
    Still not real sure how the maestro will completely hook up but we will see.

    20201108_123412.jpg
    20201108_125258.jpg
    20201108_132537.jpg
    20201108_160336.jpg
    20201108_160343.jpg
     
    Rica25, MyActualName, MTRock and 3 others like this.
  8. Nov 8, 2020 at 4:33 PM
    #38
    Justbass

    Justbass New Member

    Joined:
    Sep 23, 2020
    Member:
    #52648
    Messages:
    164
    Gender:
    Male
    First Name:
    Steven
    Ohio
    Vehicle:
    2020 Platinum
    TRD Sway bar, Lomax Tonnueau cover, Bed rug, Havoc HS2 Steps, Tech 12 Volts stereo upgrade, Yakima bed extender, misc trim and bling,
    Sweet! And solder is the only way to go when doing this type of work if you want a strong, clean connection that won't ever shake apart. And tesa tape gives a finished look for anything exposed, plus vibration dampening. Keep us posted
     
    NCHammy[QUOTED][OP] likes this.
  9. Nov 9, 2020 at 2:04 PM
    #39
    NCHammy

    NCHammy [OP] New Member

    Joined:
    Aug 9, 2020
    Member:
    #50551
    Messages:
    63
    Gender:
    Male
    First Name:
    Jerry
    Vehicle:
    2013 4.6L Double Cab 2WD
    None yet!
    I've set aside Wednesday until the weekend to finish off this installation. Guess what though..... Rain starting Wednesday through Friday. I don't have a garage to work out of, just my driveway so this is very frustrating. Use a canopy and some tarps, right. Well it is hurricane leftovers from Eta or whatever so I doubt that will work. I also can't seem to figure out how those Hertz Tweets fit into the sail panels. Taylor said slip it from the back with a ring but beats me..... I don't know. Not there yet so maybe I'll figure it out before then.

    Now let's hope the rain dies out before it gets here.
    :rain:
     
  10. Nov 11, 2020 at 12:59 PM
    #40
    NCHammy

    NCHammy [OP] New Member

    Joined:
    Aug 9, 2020
    Member:
    #50551
    Messages:
    63
    Gender:
    Male
    First Name:
    Jerry
    Vehicle:
    2013 4.6L Double Cab 2WD
    None yet!
    Not letting rain stop me!

    20201111_101218.jpg
    20201111_101230.jpg
     
  11. Nov 11, 2020 at 2:40 PM
    #41
    BrandonL812

    BrandonL812 New Member

    Joined:
    Aug 5, 2018
    Member:
    #17783
    Messages:
    979
    Gender:
    Male
    First Name:
    Brandon
    Vehicle:
    2017 Sequoia LTD
    Rx350 retrofitted, Morimoto Led fogs. interior and exterior leds swap. TRD drop in filter. Carbon filter delete. Led DRL panels. TRD Shift knob.
    Dedication. I like it.
     
    NCHammy[OP] likes this.
  12. Nov 11, 2020 at 4:00 PM
    #42
    BrandonL812

    BrandonL812 New Member

    Joined:
    Aug 5, 2018
    Member:
    #17783
    Messages:
    979
    Gender:
    Male
    First Name:
    Brandon
    Vehicle:
    2017 Sequoia LTD
    Rx350 retrofitted, Morimoto Led fogs. interior and exterior leds swap. TRD drop in filter. Carbon filter delete. Led DRL panels. TRD Shift knob.
    Did you figure out how to snap the tweeter in place?
    Slide the tweeter into the tweeter ring. Now shove that into the hole where the factory tweeter was until it click into place. Dont break nothing.
     
  13. Nov 14, 2020 at 11:23 AM
    #43
    NCHammy

    NCHammy [OP] New Member

    Joined:
    Aug 9, 2020
    Member:
    #50551
    Messages:
    63
    Gender:
    Male
    First Name:
    Jerry
    Vehicle:
    2013 4.6L Double Cab 2WD
    None yet!

    There was no sliding. I accidentally popped the first ring on. Don't know how I did it. Broke the second one so I put it on broken, put some CA glue on the break and put a clamp on it to dry. I don't know if they are in there right but they are in there.:confused:
     
    BrandonL812[QUOTED] likes this.
  14. Nov 14, 2020 at 11:34 AM
    #44
    NCHammy

    NCHammy [OP] New Member

    Joined:
    Aug 9, 2020
    Member:
    #50551
    Messages:
    63
    Gender:
    Male
    First Name:
    Jerry
    Vehicle:
    2013 4.6L Double Cab 2WD
    None yet!
    Now that the doors are done, I'm removing the stock head unit. I prepared the harnesses ahead of time but the don't match up. I honestly don't know what to do now.
    I'm using a scosche TA02B 4 speaker connector. The speaker wires are soldered to the respective color on the 9 wire that was provided. The speaker wires from head unit are soldered to the maestro harness as per instructions. All red, yellow, black, blue Etc are soldered together as per instructions but this is what I'm left with.
    I'm literally dead in the water because I don't want to cut factory harness, that why I went with Tech22volts and crutchfield. I really hoped this would be as easy as people made it out to be.
    Oh yeah, there is a plug in the back that I have no idea what that is and have nothing that fits it.

    20201114_141626.jpg
    20201114_141644.jpg
    20201114_141720.jpg
    20201114_141920_HDR.jpg
     
    Rica25 likes this.
  15. Nov 14, 2020 at 11:41 AM
    #45
    NCHammy

    NCHammy [OP] New Member

    Joined:
    Aug 9, 2020
    Member:
    #50551
    Messages:
    63
    Gender:
    Male
    First Name:
    Jerry
    Vehicle:
    2013 4.6L Double Cab 2WD
    None yet!
    Oh yes, does anyone know what the great wire here is? It was connected to a blank in the accessories switch. I know it's for an option I don't have but for what and where does the other end go?

    20201114_143951.jpg
     
  16. Nov 14, 2020 at 12:07 PM
    #46
    preacher35

    preacher35 RIGHTEOUS MEMBER

    Joined:
    Nov 20, 2016
    Member:
    #5284
    Messages:
    557
    Gender:
    Male
    First Name:
    Adam
    Texas
    Vehicle:
    2018 MGM Platinum Crewmax 4x4
    Can you post a pic of the front of that gray wire harness? It will help me to help you identify it.
     
  17. Nov 14, 2020 at 1:00 PM
    #47
    NCHammy

    NCHammy [OP] New Member

    Joined:
    Aug 9, 2020
    Member:
    #50551
    Messages:
    63
    Gender:
    Male
    First Name:
    Jerry
    Vehicle:
    2013 4.6L Double Cab 2WD
    None yet!
    20201114_155902_HDR.jpg
    20201114_155933_HDR.jpg
     
  18. Nov 14, 2020 at 1:41 PM
    #48
    NCHammy

    NCHammy [OP] New Member

    Joined:
    Aug 9, 2020
    Member:
    #50551
    Messages:
    63
    Gender:
    Male
    First Name:
    Jerry
    Vehicle:
    2013 4.6L Double Cab 2WD
    None yet!
    Here's a view of the stock unit and stock connect.
    As you can see, the set up is different but I can not find harness that matches this.
    I have even tried to find what the different colors mean, besides the obvious black red yellow.

    20201114_163712.jpg
     
  19. Nov 15, 2020 at 6:21 AM
    #49
    NCHammy

    NCHammy [OP] New Member

    Joined:
    Aug 9, 2020
    Member:
    #50551
    Messages:
    63
    Gender:
    Male
    First Name:
    Jerry
    Vehicle:
    2013 4.6L Double Cab 2WD
    None yet!
    Well I don't know what else to say or do. I'm going to plug it in and if it blows up so be it. If nothing happens, I guess I take it to an installer because I'm completely out of ideas. I've spent 4 days working on this and I have to have the truck usable tomorrow.
    I can't find any helpful information. When someone says 'plug and play' don't believe them. This is bullshit.
    Sorry, just very frustrating to take a chance and spend so much money to be dead in the water.
     
    Last edited: Nov 15, 2020
  20. Nov 15, 2020 at 8:58 AM
    #50
    BrandonL812

    BrandonL812 New Member

    Joined:
    Aug 5, 2018
    Member:
    #17783
    Messages:
    979
    Gender:
    Male
    First Name:
    Brandon
    Vehicle:
    2017 Sequoia LTD
    Rx350 retrofitted, Morimoto Led fogs. interior and exterior leds swap. TRD drop in filter. Carbon filter delete. Led DRL panels. TRD Shift knob.
    Im wondering if that grey plug is for the microphone for the added on GBS (glass break sensor).
    I have the same plug on my 2017 sequoia and its not plug into anything but a blank .

    It's an add option. So, it wont hurt to leave it. Plug in your radio and enjoy.

    This little thing.20201030_180843.jpg
     
  21. Nov 15, 2020 at 9:14 AM
    #51
    NCHammy

    NCHammy [OP] New Member

    Joined:
    Aug 9, 2020
    Member:
    #50551
    Messages:
    63
    Gender:
    Male
    First Name:
    Jerry
    Vehicle:
    2013 4.6L Double Cab 2WD
    None yet!
    I do have that so when ever I'm back up and running, I will tell them to put it back.

    As for the radio etc I guess I have to take it to someone.
     
  22. Nov 15, 2020 at 9:14 AM
    #52
    rockmup

    rockmup New Member

    Joined:
    Oct 19, 2019
    Member:
    #37565
    Messages:
    821
    Gender:
    Male
    First Name:
    Todd
    Greenwell Springs LA.
    Vehicle:
    2019 1794
    Kings, 5:29's, E-lockers on 37's
    For anyone who searches on how to do this ..........
    It goes on from the back of the tweeter and it indexes in 2 notches @ what would be 10/2 with the wires at the bottom.

    OP- good job man, get it done
     
  23. Nov 15, 2020 at 9:17 AM
    #53
    NCHammy

    NCHammy [OP] New Member

    Joined:
    Aug 9, 2020
    Member:
    #50551
    Messages:
    63
    Gender:
    Male
    First Name:
    Jerry
    Vehicle:
    2013 4.6L Double Cab 2WD
    None yet!
    Yes I did see that but maybe I wasn't strong enough to force on properly. Anyway I did get it to work.
    Thanks
     
    rockmup[QUOTED] likes this.
  24. Nov 15, 2020 at 12:18 PM
    #54
    NCHammy

    NCHammy [OP] New Member

    Joined:
    Aug 9, 2020
    Member:
    #50551
    Messages:
    63
    Gender:
    Male
    First Name:
    Jerry
    Vehicle:
    2013 4.6L Double Cab 2WD
    None yet!
    Now that I have officially given up, I hooked the battery back up and tried to start.
    Turns over but nothing. Red light on the dash is on, one that I've only seen blinking occasionally, with a key in the middle.
    As if this build couldn't get worse, right?
    Anyhoo HELP!

    20201115_150548_HDR.jpg
     
  25. Nov 15, 2020 at 12:19 PM
    #55
    MTRock

    MTRock 1889

    Joined:
    Jan 31, 2020
    Member:
    #41972
    Messages:
    1,344
    Gender:
    Male
    Montana
    Vehicle:
    2013 Rock Warrior DC
    DC rear fold down seats, decals removed, blacked out badges, complete stereo, ceramic coating, ToyTec Boss 3/1.5, RidgeGrappler 305/70r17, blacked out rock rings and center caps, smoked tail lights, BAMUFFLER Alpharex Pro headlights, TRD PRO Sequoia Grille, DAPtune
    :annoyed:Hopefully someone here will be able to help!!

    Have you tried disconnecting the battery for 10-15mins?
     
    NCHammy[QUOTED][OP] likes this.
  26. Nov 15, 2020 at 12:24 PM
    #56
    BrandonL812

    BrandonL812 New Member

    Joined:
    Aug 5, 2018
    Member:
    #17783
    Messages:
    979
    Gender:
    Male
    First Name:
    Brandon
    Vehicle:
    2017 Sequoia LTD
    Rx350 retrofitted, Morimoto Led fogs. interior and exterior leds swap. TRD drop in filter. Carbon filter delete. Led DRL panels. TRD Shift knob.
    I did not catch what radio you are running?
    You got the maestro unit, so im assuming you are running some kind d of aftermarket radio?
     
  27. Nov 15, 2020 at 12:29 PM
    #57
    NCHammy

    NCHammy [OP] New Member

    Joined:
    Aug 9, 2020
    Member:
    #50551
    Messages:
    63
    Gender:
    Male
    First Name:
    Jerry
    Vehicle:
    2013 4.6L Double Cab 2WD
    None yet!
    Yes, it a Kenwood 8706. However none of that is hooked up now. Getting the truck to start is my first priority.
     
  28. Nov 15, 2020 at 12:35 PM
    #58
    BrandonL812

    BrandonL812 New Member

    Joined:
    Aug 5, 2018
    Member:
    #17783
    Messages:
    979
    Gender:
    Male
    First Name:
    Brandon
    Vehicle:
    2017 Sequoia LTD
    Rx350 retrofitted, Morimoto Led fogs. interior and exterior leds swap. TRD drop in filter. Carbon filter delete. Led DRL panels. TRD Shift knob.
    It look like your immobilizer system is preventing you from starting the truck.
     
  29. Nov 15, 2020 at 12:40 PM
    #59
    NCHammy

    NCHammy [OP] New Member

    Joined:
    Aug 9, 2020
    Member:
    #50551
    Messages:
    63
    Gender:
    Male
    First Name:
    Jerry
    Vehicle:
    2013 4.6L Double Cab 2WD
    None yet!
    Yes, that's what it seems. Trying to figure out how to defeat it. I only have one key and two aftermarket fobs.
    I've tried "Hold down the panic button for five seconds to reset the immobilizer. Next, push the lock button two times and wait ten feet away from the car for ten minutes."
    That didn't work.
     
  30. Nov 15, 2020 at 12:44 PM
    #60
    BrandonL812

    BrandonL812 New Member

    Joined:
    Aug 5, 2018
    Member:
    #17783
    Messages:
    979
    Gender:
    Male
    First Name:
    Brandon
    Vehicle:
    2017 Sequoia LTD
    Rx350 retrofitted, Morimoto Led fogs. interior and exterior leds swap. TRD drop in filter. Carbon filter delete. Led DRL panels. TRD Shift knob.
    Do you have aftermarket remote starter?
     

Products Discussed in

To Top