1. Welcome to Tundras.com!

    You are currently viewing as a guest! To get full-access, you need to register for a FREE account.

    As a registered member, you’ll be able to:
    • Participate in all Tundra discussion topics
    • Transfer over your build thread from a different forum to this one
    • Communicate privately with other Tundra owners from around the world
    • Post your own photos in our Members Gallery
    • Access all special features of the site

OVRLND Camper/Tundra Thread

Discussion in 'General Tundra Discussion' started by sea_weathered, Dec 10, 2024.

  1. Jan 26, 2025 at 8:04 AM
    #61
    Kinetix

    Kinetix New Member

    Joined:
    Dec 11, 2017
    Member:
    #11465
    Messages:
    20
    Gender:
    Male
    First Name:
    Steve
    Vehicle:
    2018 Toyota Tundra TRD Off Road, Limited
    Thanks! This is exactly what I was looking for. How did you access the underside of the front bolts to secure the nut and plate?

     
  2. Jan 26, 2025 at 8:05 AM
    #62
    Fergie

    Fergie New Member

    Joined:
    Jan 14, 2019
    Member:
    #24519
    Messages:
    357
    Gender:
    Male
    To access all the bolts, the factory bed rails have to come out, thats about it. I drilled from the bottom so I knew I could get a socket in there w where I placed the bolt. For the rear one, you just pull the taillight housing and drill up from there.
     
    Kinetix likes this.
  3. Feb 3, 2025 at 9:05 AM
    #63
    DavidinPhx

    DavidinPhx New Member

    Joined:
    May 2, 2020
    Member:
    #45817
    Messages:
    27
    Gender:
    Male
    Phoenix
    Vehicle:
    2021 DC Tundra SR5
    Icons, Deavers, 34s, 4.88s, F&R e-lockers, Ovrlnd Camper, & other stuff
    Bolting the camper to the rails is a great idea for a permanent mount, though FWIW, after 3 years my clamps haven’t loosened or shifted after the first 6 months and couple of re-tightenings, and I do some rough stuff with lots of side to side movement of the camper/bed.

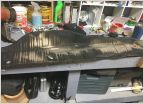
    Either way, on our trucks the plastic bed rail cap is the weak link. In @Fergie ’s first picture, you can see the camper sill pate flexing at the bolt. Mine does this too, and you can see the plastic cap on the outside (not the camper itself) gap slightly to the bedside steel in some places. (Edit: I’m not sure the clamps/bolts cause this or just the camper weight) Even with obsessive sealing of all the voids in the sheet metal bed rail under the plastic cap (I counted 30 of them, seriously, in the sealing process from underneath), and with the PPV I still got a little bit dust coming under the plastic cap in the area of one of the ripples in the plastic cap. I have carefully sealed with some black flexible caulk from the outside now.

    This is all caused by the way Toyota reinforces the underside of the plastic caps, which is not enough. This is a well known problem with Tacomas that I learned about with my previous two. So much so that KBVoodoo makes really nice solid aluminum replacement bed rail caps for Tacomas that are great under toppers/campers. Sadly, they have steadfastly refused to make them for Tundras — I asked a couple times. Not enough volume they said.

    I thought about removing mine pre-camper, but didn’t have anything better to replace them with, so settled for sealing well. Long story short, not long after finishing my camper build out in ’21, I learned about these for this exact problem, but with a heavy tonneau system:
    https://diamondbackcovers.com/products/bed-rail-cap-shims Click on the Tundra link and you can see the install illustration and where the weaknesses are in the caps.

    I can’t vouch for them, not having used them, but if I was putting a camper on now, I sure would buy a set of these and pull the plastic caps, seal the voids from the top (there’s a lot on this on Tacomaworld), and shim them. If I ever pull the camper off, I’ll do it for sure.

    If I was going to use bolts, knowing about this now, and I didn’t pull the caps for shimming, I think I’d want to use even longer backing and top plates to spread the load out. Not sure how much that would help, but worth trying, I think. YMMV!
     
    Last edited: Feb 3, 2025
    Wallygator and Kinetix like this.
  4. Feb 3, 2025 at 10:53 AM
    #64
    Fergie

    Fergie New Member

    Joined:
    Jan 14, 2019
    Member:
    #24519
    Messages:
    357
    Gender:
    Male
    I pulled the rail caps and sealed the top w foil backed tape at the recommendation of Jay, prior to the install of the camper itself. I need to seal the doors and tailgate better, as that is where most of the dust is coming in.
     
  5. Feb 3, 2025 at 11:22 AM
    #65
    frankdux

    frankdux New Member

    Joined:
    Feb 3, 2025
    Member:
    #129797
    Messages:
    2
    Gender:
    Male
    Fantastic-looking setup! Which brand flatbed/tray is your OVRLND Camper mounted on?
     
    STravis[QUOTED] likes this.
  6. Feb 3, 2025 at 11:51 AM
    #66
    STravis

    STravis SOB Fabrication Vendor

    Joined:
    Apr 28, 2020
    Member:
    #45606
    Messages:
    868
    Gender:
    Male
    First Name:
    Travis
    Ruidoso, NM
    Vehicle:
    17 TRD Pro CM, 08 Supercharged Single Cab
    It's a bed that we built here at my shop. I own SOB Fabrication here in NM and it was a project I had been wanting to do for a while.
     
  7. Feb 3, 2025 at 12:02 PM
    #67
    frankdux

    frankdux New Member

    Joined:
    Feb 3, 2025
    Member:
    #129797
    Messages:
    2
    Gender:
    Male
    Bravo -- very well done. Has a very minimalist look yet offers some nice storage niches underneath the tray area.
     
  8. Feb 3, 2025 at 3:56 PM
    #68
    DavidinPhx

    DavidinPhx New Member

    Joined:
    May 2, 2020
    Member:
    #45817
    Messages:
    27
    Gender:
    Male
    Phoenix
    Vehicle:
    2021 DC Tundra SR5
    Icons, Deavers, 34s, 4.88s, F&R e-lockers, Ovrlnd Camper, & other stuff
    Yeah, that’s the right way to do it. Do you have the gap/warpage in the of the plastic cap on the outside? I only got a slight amount of dust over a pretty long time, but I could tell it was coming under the cap and over the steel bed rail.

    Definitely agree the TG and barn doors are the place to focus for the most effect. I put a second line of bulb seal where the barn doors hit the TG cap, and then a big TG type of bulb seal on top of the tailgate cap that really made a difference (along with a lot of seal around the TG and even inside it). The downside is I have to open the barn doors to drop the TG, but I don’t mind.

    upload_2025-2-3_16-59-38.jpg
     
    Wallygator and Fergie[QUOTED] like this.
  9. Feb 3, 2025 at 4:00 PM
    #69
    STravis

    STravis SOB Fabrication Vendor

    Joined:
    Apr 28, 2020
    Member:
    #45606
    Messages:
    868
    Gender:
    Male
    First Name:
    Travis
    Ruidoso, NM
    Vehicle:
    17 TRD Pro CM, 08 Supercharged Single Cab
    Thanks! I really love the setup and it works really well for our family.
     
  10. Feb 15, 2025 at 4:40 PM
    #70
    Fergie

    Fergie New Member

    Joined:
    Jan 14, 2019
    Member:
    #24519
    Messages:
    357
    Gender:
    Male
    Alright all....coming back to the [hank hill voice]Propex and propex accessories[/hank hill voice]...


    I've got the propex test fitted in the actual truck, and my original plan had been to have a project box that I could attach the hoses too, and unfurl the hose, stored in the project box, when I need to camp. After thinking about it, and wriggling around under the truck, this isn't the way.


    I'm now using a Harbor Freight Apache box to keep the 2-stage regulator clean, but need to figure out how/where to mount the regulator and apache box.


    Looking at a QD connect, but my main goal is to keep the number of connections to a minimum inside the cabin of the camper.


    I mounted the regulator to a piece of 90* aluminum that Jay provided a while back for the awning install.

    [​IMG]


    And in the Apache box:

    [​IMG]


    What is the collective thought of mounting the box here, clearing the door, and having the hoses run through the camper shell itself.

    [​IMG]


    Please post your pics/thoughts.


    Thanks
     
  11. Feb 24, 2025 at 10:21 AM
    #71
    Fergie

    Fergie New Member

    Joined:
    Jan 14, 2019
    Member:
    #24519
    Messages:
    357
    Gender:
    Male
    Decided to go for an underbody mount; really dont like stuff hanging off the side of the camper.

    I installed some rivnuts to the bed, and I'll be able to access the regulator and connection if I need to replace any of them. All off the shelf stuff, so should be able to source parts from any ol hardware store.
    [​IMG]

    [​IMG]
     
    sea_weathered[OP] likes this.
  12. Feb 24, 2025 at 1:59 PM
    #72
    Kinetix

    Kinetix New Member

    Joined:
    Dec 11, 2017
    Member:
    #11465
    Messages:
    20
    Gender:
    Male
    First Name:
    Steve
    Vehicle:
    2018 Toyota Tundra TRD Off Road, Limited
    This was super informational! I think I will order the shims and add them at some point. I did end up bolting through the bed rail. I'm pleased with the result as far as the alignment of the camper and the assurance that it isn't going anywhere. I plan to add a larger top plate to my 4 corner bolts as there is noted deformity in the aluminum, and I'd like to distribute the pressure of the bolt a bit more.
     
    DavidinPhx[QUOTED] likes this.
  13. Feb 26, 2025 at 6:14 AM
    #73
    sea_weathered

    sea_weathered [OP] New Member

    Joined:
    Jun 18, 2019
    Member:
    #32075
    Messages:
    282
    Gender:
    Male
    Pacific Ocean
    2018 DC Adventure Chuck Wagon
    Put my truck on the scale yesterday.
    1/2 tank of gas, 1/2 full of water, and my 210lbs in the driver seat.
    The 10ply 37” Falken Wildpeaks are heavy too
    IMG_4709.jpg IMG_6048.jpg
     
    Wallygator likes this.
  14. Apr 11, 2025 at 11:10 AM
    #74
    sea_weathered

    sea_weathered [OP] New Member

    Joined:
    Jun 18, 2019
    Member:
    #32075
    Messages:
    282
    Gender:
    Male
    Pacific Ocean
    2018 DC Adventure Chuck Wagon
    Making some changes to the rig. I swapped out the 0mm offset wheels for a +25 set of those new Nomad Convoys, and ordered a custom leaf pack from Alcan springs to carry an additional 1400# of my fully loaded camper. Once the springs are mounted, I’ll take a good measurement of shock mounting points, and have Accutune custom valve a set of Fox 2.0 resi shocks to match. That should pretty well dial in my rear suspension IMG_6625.jpg IMG_6622.jpg IMG_5984.jpg
     
    Wallygator and Fergie like this.
  15. Apr 11, 2025 at 11:37 AM
    #75
    Fergie

    Fergie New Member

    Joined:
    Jan 14, 2019
    Member:
    #24519
    Messages:
    357
    Gender:
    Male
    Would you mind sharing some detailed specs on the spring packs? My OME packs are about 5 years old and starting to sag.
     
    sea_weathered[OP] likes this.
  16. Apr 11, 2025 at 12:30 PM
    #76
    Wallygator

    Wallygator Well Zippedy Da Do!

    Joined:
    Apr 7, 2020
    Member:
    #44761
    Messages:
    2,708
    Subbed!:thumbsup:
     
    sea_weathered[OP] likes this.
  17. Apr 11, 2025 at 2:18 PM
    #77
    sea_weathered

    sea_weathered [OP] New Member

    Joined:
    Jun 18, 2019
    Member:
    #32075
    Messages:
    282
    Gender:
    Male
    Pacific Ocean
    2018 DC Adventure Chuck Wagon
    I started by weighing my truck and estimating the additional weight of the camper when fully loaded, you can see my post above with the final results. This calculated out to around 1400# for my fully loaded camper. Then I just called Alcan springs and told them what I had and that I wanted 2” of lift in the back. They did the rest. I opted for a U-Bolt flip kit, upgraded bump stops, and a longer set of shackles. They suggested calling Accutune suspension to get a set of shocks that would compliment the new springs. I won’t have them on for a couple of weeks, but supposedly this is going to dramatically improve the ride quality, both on and off road. With everything done, I’ll be around $2500 in for the rear suspension to be dialed
     
    Fergie[QUOTED] and Wallygator like this.
  18. Apr 11, 2025 at 2:27 PM
    #78
    Tundra family

    Tundra family New Member

    Joined:
    Oct 23, 2024
    Member:
    #124738
    Messages:
    1,835
    Gender:
    Male
    Hot dang, that's nice! What's your total weight lookin like?
     
  19. Apr 12, 2025 at 1:49 AM
    #79
    sea_weathered

    sea_weathered [OP] New Member

    Joined:
    Jun 18, 2019
    Member:
    #32075
    Messages:
    282
    Gender:
    Male
    Pacific Ocean
    2018 DC Adventure Chuck Wagon
    7680# with me sitting in the truck
    IMG_6048.jpg
     
    Tundra family[QUOTED] likes this.
  20. Apr 12, 2025 at 5:45 AM
    #80
    Tundra family

    Tundra family New Member

    Joined:
    Oct 23, 2024
    Member:
    #124738
    Messages:
    1,835
    Gender:
    Male
    I didn't realize yours was a double, are you over max GVWR? I'm sitting at 7140 with a max of 7k. How are you liking the alcans so far? I desperately need to replace my W shaped springs.
     
  21. Apr 12, 2025 at 8:53 AM
    #81
    sea_weathered

    sea_weathered [OP] New Member

    Joined:
    Jun 18, 2019
    Member:
    #32075
    Messages:
    282
    Gender:
    Male
    Pacific Ocean
    2018 DC Adventure Chuck Wagon
    I’m definitely over GVWR. According to a quick google search, my truck had a 7200# rating. I plan to install the springs next week and will post about my initial impressions. Alcan has a solid reputation, so I’d imagine it will be good
     
    Tundra family[QUOTED] likes this.

Products Discussed in

To Top