-
Welcome to Tundras.com!
You are currently viewing as a guest! To get full-access, you need to register for a FREE account.
As a registered member, you’ll be able to:- Participate in all Tundra discussion topics
- Transfer over your build thread from a different forum to this one
- Communicate privately with other Tundra owners from around the world
- Post your own photos in our Members Gallery
- Access all special features of the site
 10% Off ICS_Fab 2014+ Dash Mount - Through 4/13
 Black Friday 2019 Deals
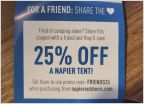 You guys are my friends right, here's the discount code Napier sent with my tent.
 Amazon Prime Day - $180 Leather Steering Wheel
 Amazon Prime Day 2020
 Tundra Pop N Lock price reduced on Amazon
Lower bumper valance removal
Discussion in 'Deals & Group Buys' started by Stocky Balboa, Oct 26, 2019.
- Thread Status:
- Not open for further replies.
Page 2 of 2
Page 2 of 2
- Thread Status:
- Not open for further replies.