1. Welcome to Tundras.com!

    You are currently viewing as a guest! To get full-access, you need to register for a FREE account.

    As a registered member, you’ll be able to:
    • Participate in all Tundra discussion topics
    • Transfer over your build thread from a different forum to this one
    • Communicate privately with other Tundra owners from around the world
    • Post your own photos in our Members Gallery
    • Access all special features of the site

HOW TO: Retrofit Install Guide (by EleDobleU)

Discussion in 'Lighting' started by eledobleu, Dec 9, 2016.

  1. Dec 15, 2016 at 12:30 PM
    #31
    iHacker

    iHacker SW TRD PRO

    Joined:
    Mar 19, 2016
    Member:
    #2962
    Messages:
    1,259
    Gender:
    Male
    Vehicle:
    TRD PRO Super White CM
    2019 TRD PRO LED Headlights, 2019 TRD PRO Rigid LED Fog lights, All LED Interior, LED Cargo Lights, Bed LED Lights, Undercover Flex, Husky Weather beater floormats, FORTIN EVO ONE remote start, TDR Cold Air Intake, Tundra tail gate inserts, Pop & Lock...
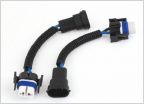
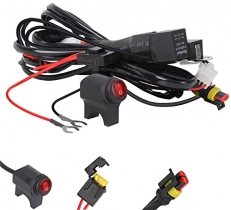
    Just find a good ground point for the black wire in the harness that @eledobleu send you and then just find which wire is the positive in your parking lights socket and tape it to the red wire in the harness and that's it, this will work as the spiders does, or the other way mentioned here for @TTU19 just find the fuse that makes your headlamps work and doing it by this method you don't have to tap/splice any of the factory wires.
     
    r4z0r51o[QUOTED] likes this.
  2. Dec 15, 2016 at 12:41 PM
    #32
    TTU19

    TTU19 Wreck 'Em

    Joined:
    Jul 19, 2016
    Member:
    #3918
    Messages:
    2,216
    Gender:
    Male
    First Name:
    Wes
    Tx
    Vehicle:
    2021 TRD Sport
    Can we use the same ground screw for the headlight projectors and the LEDs wire harness? Didn't know if that could create an issue.
     
    Last edited: Dec 15, 2016
  3. Dec 15, 2016 at 12:51 PM
    #33
    iHacker

    iHacker SW TRD PRO

    Joined:
    Mar 19, 2016
    Member:
    #2962
    Messages:
    1,259
    Gender:
    Male
    Vehicle:
    TRD PRO Super White CM
    2019 TRD PRO LED Headlights, 2019 TRD PRO Rigid LED Fog lights, All LED Interior, LED Cargo Lights, Bed LED Lights, Undercover Flex, Husky Weather beater floormats, FORTIN EVO ONE remote start, TDR Cold Air Intake, Tundra tail gate inserts, Pop & Lock...
    Yes you can, don't think this cause any issues, I always use the factory ground point when connecting HID ballasts and take the power from the fuse box positive point, I don't like to have any wires attached to my battery terminals
     
    letterman52 likes this.
  4. Dec 15, 2016 at 6:37 PM
    #34
    letterman52

    letterman52 New Member

    Joined:
    Nov 29, 2016
    Member:
    #5383
    Messages:
    37
    Gender:
    Male
    Will it be the same wire and locations for a 07 tundra with the DRL delete mod?
     
  5. Dec 15, 2016 at 6:38 PM
    #35
    letterman52

    letterman52 New Member

    Joined:
    Nov 29, 2016
    Member:
    #5383
    Messages:
    37
    Gender:
    Male
    Parking lights would be which ones?
     
  6. Dec 15, 2016 at 7:54 PM
    #36
    eledobleu

    eledobleu [OP] retrofitwholesale.com

    Joined:
    Jan 29, 2016
    Member:
    #2554
    Messages:
    643
    Orlando, FL
    Koito Bi-LED Retrofit
    You can use the "FOG" fuse tap or like stated above, the low beam fuse tap "HEAD LL" or "HEAD RL". The LED's will only come on when your headlights are on (Main headlights)

    The actual parking light fuse is in the second fuse box behind the dash.
     
    letterman52 likes this.
  7. Dec 15, 2016 at 8:16 PM
    #37
    iHacker

    iHacker SW TRD PRO

    Joined:
    Mar 19, 2016
    Member:
    #2962
    Messages:
    1,259
    Gender:
    Male
    Vehicle:
    TRD PRO Super White CM
    2019 TRD PRO LED Headlights, 2019 TRD PRO Rigid LED Fog lights, All LED Interior, LED Cargo Lights, Bed LED Lights, Undercover Flex, Husky Weather beater floormats, FORTIN EVO ONE remote start, TDR Cold Air Intake, Tundra tail gate inserts, Pop & Lock...
    The amber side markers aka parking lights 2adcded6365ad37ecf061861a1c578ab_fd85b7ed54b3faa3c349369fa6aeb55145bef0b9.jpg
     
    letterman52[QUOTED] likes this.
  8. Dec 15, 2016 at 10:05 PM
    #38
    r4z0r51o

    r4z0r51o have fallen off the forum, but I’m still alive.

    Joined:
    Apr 17, 2016
    Member:
    #3172
    Messages:
    2,000
    Gender:
    Male
    First Name:
    Dave
    Northeast San Francisco Bay Area
    Vehicle:
    2016 Silver Sky Metallic Crewmax 5.7L TRD 4x4
    22x12”HostileRage/33”NittoRidgeGrap/StealthFighter/FOX-BDS


    RX350 projectors :thumbsup:
     
    TTU19[QUOTED] likes this.
  9. Dec 16, 2016 at 3:08 PM
    #39
    TTU19

    TTU19 Wreck 'Em

    Joined:
    Jul 19, 2016
    Member:
    #3918
    Messages:
    2,216
    Gender:
    Male
    First Name:
    Wes
    Tx
    Vehicle:
    2021 TRD Sport
    Can anyone share where and how they mounted the computer ballasts for each light? Thanks!
     
  10. Dec 21, 2016 at 6:10 PM
    #40
    jtav2002

    jtav2002 Retired Adult Film Sound Man

    Joined:
    Jan 8, 2014
    Member:
    #65
    Messages:
    222
    Gender:
    Male
    First Name:
    Josh
    Reading, PA
    Vehicle:
    2019 GMC Sierra 1500 AT4 6.2
    Where did everyone run their relay harness wires? I feel like there's just enough to reach each side and not enoUgh wire length to mount any of the ballasts or relay anywhere.

    Also, I guess most of you have 3rd gens but can anyone help with the adjustment on my 2nd gen? Neither using the auto leveler or manually with a screw driver and the little gear can I get them down anywhere near as low as they need to be. Plus they're crooked.

    image1_zpshnspighu_a459f6ef242da13ec068fa3bbf233272cdad3925.jpg
     
    stefan702 likes this.
  11. Dec 21, 2016 at 6:17 PM
    #41
    eledobleu

    eledobleu [OP] retrofitwholesale.com

    Joined:
    Jan 29, 2016
    Member:
    #2554
    Messages:
    643
    Orlando, FL
    Koito Bi-LED Retrofit
    Its hard to turn that gear motor. Its best to remove it and use a 8mm socket to turn it. Much easier than the philips. Left/right adjustment is on the other side. Back up 15ft before making any adjustments. 25ft is ideal. Also, keep in mind the rx350 projectors curve like a bow, so they wont appear as straight like other projectors like Mini D2S, FX-R.
     
    stefan702 and iHacker like this.
  12. Dec 21, 2016 at 6:37 PM
    #42
    r4z0r51o

    r4z0r51o have fallen off the forum, but I’m still alive.

    Joined:
    Apr 17, 2016
    Member:
    #3172
    Messages:
    2,000
    Gender:
    Male
    First Name:
    Dave
    Northeast San Francisco Bay Area
    Vehicle:
    2016 Silver Sky Metallic Crewmax 5.7L TRD 4x4
    22x12”HostileRage/33”NittoRidgeGrap/StealthFighter/FOX-BDS
    Is that mostly the case with the Gen2? I just received my retros today (will install tomorrow during daylight hours) and I hope to God they don't bow like that ... sorry Josh, I hope it's possible for you to straighten that pattern out.
     
  13. Dec 21, 2016 at 6:40 PM
    #43
    eledobleu

    eledobleu [OP] retrofitwholesale.com

    Joined:
    Jan 29, 2016
    Member:
    #2554
    Messages:
    643
    Orlando, FL
    Koito Bi-LED Retrofit
    Its an rx350 thing. The reason for the bow is to allow tons of light on the sides without blinding oncoming traffic. Which next to the LS460, they are one of the widest beams on any projector. The Mini D2S 4.0, Mini H1, FX-R have more straight cutoffs. Which only make them good for distance and not width. RX350 have both width and distance.

    [​IMG]
     
    iHacker likes this.
  14. Dec 21, 2016 at 6:51 PM
    #44
    letterman52

    letterman52 New Member

    Joined:
    Nov 29, 2016
    Member:
    #5383
    Messages:
    37
    Gender:
    Male
    I'm going through the same thing with mine except I can't get them to go higher.

    IMG_6069.jpg
     
  15. Dec 21, 2016 at 6:52 PM
    #45
    zerch911

    zerch911 New Member

    Joined:
    Apr 14, 2016
    Member:
    #3141
    Messages:
    28
    Gender:
    Male
    San Antonio, Texas
    Vehicle:
    2016 Sky Silver Limited 4x4
    TRD Exhaust, 2018 Pro LED Lights, Bilstein Shock Leveling 6112 & 5160s, TRD Pro Color Matched Grill, Morimoto XB LED Fogs, 305/55/20 BFG KO2, Fuel Maverick Wheels
    I used 3M double sided tape and placed each computer on the side of the headlight case. I removed the orange mounting bracket first from the back of the computer. There is a flat area beside the opening the bulb opening. It has been on there for a few months now, so no concern with it coming off. Just make sure the area is clean, before you stick the tape.

    I used a photo from a previous post and added where to mount the Computer....
    Computer Mount.001.jpg
     
    Last edited: Dec 21, 2016
    Tundra_Dawg and HUTCHJ like this.
  16. Dec 21, 2016 at 6:52 PM
    #46
    r4z0r51o

    r4z0r51o have fallen off the forum, but I’m still alive.

    Joined:
    Apr 17, 2016
    Member:
    #3172
    Messages:
    2,000
    Gender:
    Male
    First Name:
    Dave
    Northeast San Francisco Bay Area
    Vehicle:
    2016 Silver Sky Metallic Crewmax 5.7L TRD 4x4
    22x12”HostileRage/33”NittoRidgeGrap/StealthFighter/FOX-BDS
    Well this pattern at least looks more level and uniformed. Josh's pattern has one side hitting about 2 bricks higher. I hope leveling will take care of that ...
     
  17. Dec 21, 2016 at 6:54 PM
    #47
    eledobleu

    eledobleu [OP] retrofitwholesale.com

    Joined:
    Jan 29, 2016
    Member:
    #2554
    Messages:
    643
    Orlando, FL
    Koito Bi-LED Retrofit
    Yes
    definaftly. He needs to level out the beams.

    All lights Gen 2 or Gen 3 will be off even if I level them before shipping. Theres only been a few times when no adjustments need to be made. . So everyone have to either lower or raise one light to make them even.
     
    r4z0r51o[QUOTED] likes this.
  18. Dec 21, 2016 at 7:24 PM
    #48
    eledobleu

    eledobleu [OP] retrofitwholesale.com

    Joined:
    Jan 29, 2016
    Member:
    #2554
    Messages:
    643
    Orlando, FL
    Koito Bi-LED Retrofit
    Alright guys, Heres how your beams should look. Keep in mind these are about 10 ft from a wall. You want to be roughly 20+ft away when aiming. The closer you are to a wall, the more crooked your beams will look. Depending on your projector, even at 25+ ft the beam might still look crooked. The best way to aim them (Height) is to have your cutoff barely visible on a flat road at 25+ft. In other words, you don't want to see your cutoff directly on the ground. A major factor is if your truck is lifted or stock level.

    MINI D2S 4.0


    [​IMG]

    RX350


    [​IMG]
     
    Last edited: Dec 21, 2016
  19. Dec 22, 2016 at 6:45 AM
    #49
    jtav2002

    jtav2002 Retired Adult Film Sound Man

    Joined:
    Jan 8, 2014
    Member:
    #65
    Messages:
    222
    Gender:
    Male
    First Name:
    Josh
    Reading, PA
    Vehicle:
    2019 GMC Sierra 1500 AT4 6.2
    I'll play with the adjusting a little more after work. I think half my problem, especially with the crooked cutoff is my headlight itself not being seated correctly on the truck. I've never looked under the hood of a 3rd gen but in the 2nd gen the HID bulb igniter touches part of the frame or wherever behind the light (will get a pic later). So with it touching when I have them in I have a feeling that the headlight housing is supposed to be in a bit more but is obviously stopping when he igniter doesn't have any more clearance but it's getting in just enough to get the mounting screws in. Looking at them this morning before work from the outside it looks like they are off a slight bit with how the light and fender are lined up.

    This likely is a non issue on 3rd gen since there is only one bulb for high and low so it's more in the center of the housing, instead of further out on 2nd gens with separate hi and low beams. May have to get a little creative and make the little bit of clearance I need behind the housing on the truck.
     
  20. Dec 22, 2016 at 6:47 AM
    #50
    letterman52

    letterman52 New Member

    Joined:
    Nov 29, 2016
    Member:
    #5383
    Messages:
    37
    Gender:
    Male
    I noticed the same thing on mine when I was trying to adjust them.
     
  21. Dec 22, 2016 at 7:08 AM
    #51
    eledobleu

    eledobleu [OP] retrofitwholesale.com

    Joined:
    Jan 29, 2016
    Member:
    #2554
    Messages:
    643
    Orlando, FL
    Koito Bi-LED Retrofit
    I think your right! I took a look at my buddys Gen 2 this morning (He has Spyder lights with Mini D2S projectors in them).The radiator bracket is right there behind the light. Though he doesnt have that problem, i believe your igniter is sitting directly on it, or more than likely under it. Either way I think thats the cause of why your driver light wont lower to the passenger side height. See if you can try to play with it to get it to sit correctly. If not, I will have to remove the projectors and seat them inside the headlights further in so they wont stick out the back as much so you can clear that bracket.

    Gen 3 dont have any bracket behind the lights. Driver side is a little tight because of the battery so I have seen people seat the driver light wrong, but it just requires for all the cables to be re positioned.
     
    stefan702 likes this.
  22. Dec 22, 2016 at 8:07 AM
    #52
    jtav2002

    jtav2002 Retired Adult Film Sound Man

    Joined:
    Jan 8, 2014
    Member:
    #65
    Messages:
    222
    Gender:
    Male
    First Name:
    Josh
    Reading, PA
    Vehicle:
    2019 GMC Sierra 1500 AT4 6.2
    Thanks. I will see what I can figure out. If I can't get them to wear right as is I'm hoping maybe I can just grind down a bit of the support enough so that that it will fit. We will see. I'd hate to have to send them back to ya and make you open them back up!
     
  23. Dec 22, 2016 at 8:37 AM
    #53
    eledobleu

    eledobleu [OP] retrofitwholesale.com

    Joined:
    Jan 29, 2016
    Member:
    #2554
    Messages:
    643
    Orlando, FL
    Koito Bi-LED Retrofit
    I prefer for you not to grind the support bracket. You dont want to weaken it. I know you wouldnt want to send them back, but if you cant get it without grinding then Its better for me to reseat the projectors. Let me know!
     
    Last edited: Dec 22, 2016
  24. Dec 22, 2016 at 8:54 AM
    #54
    jtav2002

    jtav2002 Retired Adult Film Sound Man

    Joined:
    Jan 8, 2014
    Member:
    #65
    Messages:
    222
    Gender:
    Male
    First Name:
    Josh
    Reading, PA
    Vehicle:
    2019 GMC Sierra 1500 AT4 6.2
    Thanks. I'll let you know. This is how it looks as is.

    image1_zps1w08irsw_e8b17f6732da5c1cb04310c7dbc593db10127a7a.jpg
     
  25. Dec 22, 2016 at 9:02 AM
    #55
    eledobleu

    eledobleu [OP] retrofitwholesale.com

    Joined:
    Jan 29, 2016
    Member:
    #2554
    Messages:
    643
    Orlando, FL
    Koito Bi-LED Retrofit
    Oh yes its definitely in the way. Its not going to set correctly for sure.
     
  26. Dec 22, 2016 at 12:21 PM
    #56
    jtav2002

    jtav2002 Retired Adult Film Sound Man

    Joined:
    Jan 8, 2014
    Member:
    #65
    Messages:
    222
    Gender:
    Male
    First Name:
    Josh
    Reading, PA
    Vehicle:
    2019 GMC Sierra 1500 AT4 6.2
    Forget my grinding idea....this guy with an 08 had the same problem (have to imagine many who have done these on 2nd gens have ran into this problem) and just cut out part of the inner fender to clear it lol.

    [​IMG]


    Also, where exactly has everyone ran their relay harness so that it's all nice and tidy? I was only able to get mine to JUST reach to plug everything in but not tuck the relays away or mount the ballasts on the bottom (or back depending on generation of Tundra) of the headlights. I'd prefer to, once i get teh headlights to actually fit and everything is aimed right to be able to tidy everything up and tuck away the wires as best as possible and not have them all out all willy nilly!
     
    stefan702 likes this.
  27. Dec 22, 2016 at 12:34 PM
    #57
    TTU19

    TTU19 Wreck 'Em

    Joined:
    Jul 19, 2016
    Member:
    #3918
    Messages:
    2,216
    Gender:
    Male
    First Name:
    Wes
    Tx
    Vehicle:
    2021 TRD Sport
    I ran mine through a hole to the front side of the radiator and back through the other side. Zip tied in a few places to hold it. The other side has the fan and surely didn't want to get close to that.
     
  28. Dec 22, 2016 at 5:09 PM
    #58
    Krezz

    Krezz Doesn't want to be new member

    Joined:
    Aug 8, 2016
    Member:
    #4132
    Messages:
    2,282
    Gender:
    Male
    First Name:
    Kevin
    Southern Ontario, Canada
    Vehicle:
    2022 Tundra Crewmax Hybrid TRD Pro
    Sorry to bug you here @eledobleu - I haven't heard back from my last sent email on Monday or Tuesday I think it was, just wanted to reach out in case it didn't send through properly.
    Can you let me know if you received.
    Thanks!
     
  29. Dec 22, 2016 at 5:30 PM
    #59
    eledobleu

    eledobleu [OP] retrofitwholesale.com

    Joined:
    Jan 29, 2016
    Member:
    #2554
    Messages:
    643
    Orlando, FL
    Koito Bi-LED Retrofit
    Im not sure? Send the email again just in case
     
  30. Dec 22, 2016 at 5:31 PM
    #60
    Krezz

    Krezz Doesn't want to be new member

    Joined:
    Aug 8, 2016
    Member:
    #4132
    Messages:
    2,282
    Gender:
    Male
    First Name:
    Kevin
    Southern Ontario, Canada
    Vehicle:
    2022 Tundra Crewmax Hybrid TRD Pro
    Will do!
    gmail has been giving me issues on my cell so I figured but I didn't want to resend multiple emails to harass lol.

    I'll send it again in about 1min
     

Products Discussed in

To Top