

-
Welcome to Tundras.com!
You are currently viewing as a guest! To get full-access, you need to register for a FREE account.
As a registered member, you’ll be able to:- Participate in all Tundra discussion topics
- Transfer over your build thread from a different forum to this one
- Communicate privately with other Tundra owners from around the world
- Post your own photos in our Members Gallery
- Access all special features of the site
Quick Links: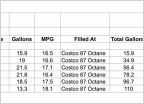 Another Useless MPG Thread....
  Any good scanner or diagnostic or code reader for 2003 sr5
 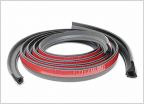 I ive on a dusty gravel road... What is everyone's favorite big storage boxes for the bed?
  Fav flashlight in your Tundra?
  Radiator Overflow
  Front end "clunk" noise on 2015 Tundra LE crew cab - ABS brakes pressurizing?
DIY low profile, light duty bed rails / rack
Discussion in 'General Tundra Discussion' started by AustinOX, Feb 22, 2020.


