1. Welcome to Tundras.com!

    You are currently viewing as a guest! To get full-access, you need to register for a FREE account.

    As a registered member, you’ll be able to:
    • Participate in all Tundra discussion topics
    • Transfer over your build thread from a different forum to this one
    • Communicate privately with other Tundra owners from around the world
    • Post your own photos in our Members Gallery
    • Access all special features of the site

Blackoutt Adventure Build: "Fundra" the Limited DC

Discussion in '2.5 Gen Builds (2014-2021)' started by blackoutt, Oct 21, 2019.

  1. Jul 2, 2020 at 11:25 AM
    #61
    blackoutt

    blackoutt [OP] YEAH BUDDY!

    Joined:
    Oct 21, 2018
    Member:
    #20805
    Messages:
    975
    Indy
    Vehicle:
    07 DC Long Bed - Old Man Tan
    OEM+
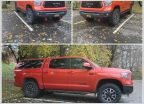
    I know tire covers aren't cool but neither is sun damage on an expensive tire! $25 Sierra Offroad universal 36-37" cover from Amazon fit the 37x12.5 perfectly.

    20200702_141258.jpg 20200702_141308.jpg
     
  2. Jul 8, 2020 at 2:29 PM
    #62
    blackoutt

    blackoutt [OP] YEAH BUDDY!

    Joined:
    Oct 21, 2018
    Member:
    #20805
    Messages:
    975
    Indy
    Vehicle:
    07 DC Long Bed - Old Man Tan
    OEM+
    Couple of easy projects knocked out, first up was the Tech12Volts remote start. It's a Fortin Evo One controller with some plug and play harnesses and already setup for the truck. I followed the YouTube video he sends and it took about 30 minutes to access the connections and hook everything up, button dance to "program" it, and it works great with the factory fob! Another 15 minutes to ziptie and button it all up. Very happy with it, thanks James!
    20200707_092802.jpg 20200707_092753.jpg 20200707_092806.jpg

    Next up I remembered I had some old Fatmat sound deadener laying around. I honestly think this is leftover rom my very first vehicle build in the early 2000s but its still very sticky and laid out perfectly. A testament to its quality? I know the audiophiles are going to tell me the doors are most important and that I need mlv to kill road noise but this was a fun free afternoon and the rear cab wall is a big flat sheet metal surface so it got covered first. We'll see tomorrow if it helped quiet the cab at all.
    20200708_131833.jpg 20200708_143104.jpg 20200708_152152.jpg
     
  3. Jul 15, 2020 at 4:08 PM
    #63
    blackoutt

    blackoutt [OP] YEAH BUDDY!

    Joined:
    Oct 21, 2018
    Member:
    #20805
    Messages:
    975
    Indy
    Vehicle:
    07 DC Long Bed - Old Man Tan
    OEM+
    Successful overnighter at a nearby National Forest primitive site with the wife and newborn! Very relaxing to have camp setup by 3pm and roll out slowly by 1pm next day. We also got to do a little "trail" clearing and drive over some limbs to sleep in the woods.
    20200713_143956.jpg 20200713_162839.jpg

    Then today I focused more on dry bed storage, more for upcoming family roadtrips than camping. Got a second layer of defense for important stuff.
    20200714_160351.jpg

    And for camping and less important stuff, more dry proofing of the bed. I realized the Fas-top zippers don't have flaps over them like the 2" overhangs on my gazelle tent, so I tried my best to re-velcro the ends and get a little more coverage. Then threw some rubber grommets and silicone over all the exposed holes in the bedwalls and bulkhead. Finally finished off with a tailgate seal. It's a Taper Seal repackaged by Lund. Following these directions, with the exception of trimming tailgate side seal around the upper latch ring bolt, it was very easy to produce a seal with no daylight shining through.
    https://tailgateseal.com/ToyotaTundra2016.html

    20200715_175345.jpg 20200715_175353.jpg
    20200715_173238.jpg

    Before and after with a shoplight in the bed
    20200715_170453.jpg 20200715_170520.jpg
     
  4. Aug 23, 2020 at 4:47 PM
    #64
    blackoutt

    blackoutt [OP] YEAH BUDDY!

    Joined:
    Oct 21, 2018
    Member:
    #20805
    Messages:
    975
    Indy
    Vehicle:
    07 DC Long Bed - Old Man Tan
    OEM+
    Since I tried to relube my coachbuilder rear shackle bushings but the sleeves were corroded and not spinning freely (they must have been assembled dry?) And they're still squeaky I ordered another set. While I was ordering from ekstrom I threw in some poly steering rack bushings to try and tighten up some of the big tire steering response. I followed the guidance of a thread on here and got the dreaded rack bushing job done easily in half a day with the great help of a huge pickle fork! It now has a crisper steering response much like my light stock tire size 2nd gen. Cheap and worth it but definitely a big job unless you know your way around under the front end and big hammers and pry bars.
    20200823_114041.jpg 20200823_123247.jpg
     
  5. Sep 4, 2020 at 9:24 AM
    #65
    blackoutt

    blackoutt [OP] YEAH BUDDY!

    Joined:
    Oct 21, 2018
    Member:
    #20805
    Messages:
    975
    Indy
    Vehicle:
    07 DC Long Bed - Old Man Tan
    OEM+
    Poly steering bushings are awesome! So much better feel and feedback on and off road.

    We also had the opportunity to knock out a few more states and pick up a used color matched Leer cap. It's got carpeted interior, framless screened windows that tilt out, thule roof rack! Love it!

    Here it is exploring Uwharrie with my brother. We did have an odd experience with the DTE computer suddenly deciding we had low fuel with a 1/4 tank indicated left. Restarted and DTE said 29 miles til empty. We were crawling for a few hours prior and getting 2mpg. After a few miles at 25mph back out on the gravel road the DTE went back up to 101 miles and the low fuel light went off? Topped the tank off and all looks normal, full on gauge, 400+ DTE, no leaks. Any one else ever experienced this offroad?

    IMG_20200904_082645_725.jpg
     
    Wallygator and Kiddnapped Tundra like this.
  6. Sep 9, 2020 at 11:36 AM
    #66
    blackoutt

    blackoutt [OP] YEAH BUDDY!

    Joined:
    Oct 21, 2018
    Member:
    #20805
    Messages:
    975
    Indy
    Vehicle:
    07 DC Long Bed - Old Man Tan
    OEM+
    Hit up Hurricane Creek and Max Patch on our way through, getting tore up pretty bad. I forsee this one getting closed for good soon. 37's crawled every obstacle with ease!

    received_835396566995794.jpg received_324490445456943.jpg
     
  7. Sep 11, 2020 at 2:14 PM
    #67
    blackoutt

    blackoutt [OP] YEAH BUDDY!

    Joined:
    Oct 21, 2018
    Member:
    #20805
    Messages:
    975
    Indy
    Vehicle:
    07 DC Long Bed - Old Man Tan
    OEM+
    Spent the afternoon tweaking the topper position, vacuuming it's carpet out, installing tailgate bed rug (baby changing station), wiring the topper 3rd brake light and cargo light, switching a thule crossbar lock over to a new foot, refitting some rubber weatherstripping, and silicone sealing the front bed corners that have open gaps from the factory, I might put some sealer tape over these from the outside too for more water ingress protection.
    20200910_170312.jpg
    20200911_105230.jpg

    This will dry clear
    20200911_161925.jpg 20200911_162151.jpg

    I also got a chance to go back and hook up the key sense wire for the remote start. Sleeping at a rest stop we flipped the truck on for some AC for 15 minutes before the auto shut off, then HONK HONK HONK we were those assholes. Sorry truckers.
    20200830_020517.jpg
     
    Wallygator likes this.
  8. Sep 26, 2020 at 9:49 PM
    #68
    Damie Street

    Damie Street New Member

    Joined:
    Feb 9, 2020
    Member:
    #42378
    Messages:
    966
    Gender:
    Male
    First Name:
    Edsel
    South Carolina
    Vehicle:
    2016 MGM CrewMax SR5 TRD OffRoad
    Any review on how the weboost is treating you?
     
  9. Sep 27, 2020 at 6:24 AM
    #69
    blackoutt

    blackoutt [OP] YEAH BUDDY!

    Joined:
    Oct 21, 2018
    Member:
    #20805
    Messages:
    975
    Indy
    Vehicle:
    07 DC Long Bed - Old Man Tan
    OEM+
    My WeBoost review is eerily similar to many other reviews of cell boosters. If there is the slightest little sliver of coverage they boost it well enough to call text email and slow browse tundras.com but if you're in a valley, chasm, canyon, crater, hole, or holler, that has 0 service there's nothing to boost and you still have 0 service. Its come in handy a couple times but I could have also driven to the next ridge and also been fine.
     
  10. Nov 19, 2020 at 6:38 AM
    #70
    blackoutt

    blackoutt [OP] YEAH BUDDY!

    Joined:
    Oct 21, 2018
    Member:
    #20805
    Messages:
    975
    Indy
    Vehicle:
    07 DC Long Bed - Old Man Tan
    OEM+
    Been a while, we've been out enjoying the Tundra. A couple local camping trips and real deal "overland" trip to complete the Georgia Traverse over the course of 3-4 days. With the topper weight I went back to RXT leaf pack option 3 and still fit in the garage. Added a slight bump stop shim and grade 8 ubolts while I was in there, very happy with the uptravel limit now for safe shock and fenderwell in the rear.

    The next update on this build is the pondering of how to make it comparable with the 4Funner in terms of: sleep inside (HVAC, platform, lights), storage system drawers, dual battery/solar/fridge. The fine details are still being mulled over but here's an initial rough platform/drawer design. No drawer slides this time around, just waxed wood with a short UHMW plastic ramp at the front to slide and also act as the latching mechanism, allowing friction to be a momentary drawer stop at any opening depth. The wings behind the wheel wells will either fold up on hinges or have finger hole cubby lids. The front two areas are for 100ah battery (strike that, decided I didn't want a battery under my head even if they are "sealed") and some electronics/wiring. I might actually only keep one of those areas and do one short drawer, one full length. Construction will be mostly 1/2" plywood mixed with some 1x dimensional lumber for stronger uprights. It will be tied down to the factory cargo hooks with simple turnbuckles at all 4 corners. The goal is to keep the weight lower at the sacrifice of some rigidity. I think 3/4" ply is overkill for the longevity of our weekender application.

    48" wide (one sheet of ply) between the wheel wells/bed stiffeners
    66" wide at the rear section over/behind wheel wells
    top of bed rib to top of wheel well is 8-3/4"
    77" long

    With platform height and bedding this leaves ~30" of headroom. Not great but actually not bad!

    drawer 1.jpg
     
    Last edited: Jan 15, 2021
    Wallygator likes this.
  11. Nov 25, 2020 at 6:21 PM
    #71
    blackoutt

    blackoutt [OP] YEAH BUDDY!

    Joined:
    Oct 21, 2018
    Member:
    #20805
    Messages:
    975
    Indy
    Vehicle:
    07 DC Long Bed - Old Man Tan
    OEM+
    On our last trip I also developed a very creaky delta joint on the driver side icon upper control arm. I didn't realize they were greasable, then I didn't realize these were the bolt on cap type so I didn't have to order more stick on rings, then I didn't realize you needed a special needle grease tool to shoot em. Then I DID realize I had bought one like 6 years ago for a project and it was the wrong thing for that but I found it! I apologize ball joints. I'll never leave you dry again.

    20201125_201822.jpg 20201125_201809.jpg

    And onto drawer progress. The base and drawers are fully assembled, glued and screwed, with UHMW front catch latch slide idea, UHMW tape as runners, and waxed with parafin (surprisingly the most helpful in friction reduction). Drawer faces with handles made, rear cubby lids cut and supports tacked on. Next up is the truck bed fitting for some minor shaping around bed bolt heads and the raised TUNDRA bulkhead. Then creation of the wings and bolting those and the tie down turnbuckles on before a test run weekend without drawer dividers or a solid finish applied.

    20201122_171830.jpg 20201124_170330.jpg 20201124_170405.jpg 20201124_210406.jpg Screenshot_20201125-164626_Instagram.jpg
     
  12. Dec 11, 2020 at 7:05 PM
    #72
    blackoutt

    blackoutt [OP] YEAH BUDDY!

    Joined:
    Oct 21, 2018
    Member:
    #20805
    Messages:
    975
    Indy
    Vehicle:
    07 DC Long Bed - Old Man Tan
    OEM+
    Got a new OEM tailgate support strut to fix my dropping tailgate problems. Hows my 2017 wore out but my 2007 still good? The new one was different too but it works.
    20201211_154442.jpg

    I also figured out a halfway decent spot to mount the treds outside the truck. Testing this setup. I can pull them quickly from here and revert to the second pair of cans if needed.
    20201211_151846.jpg
    Then onto the drawer build. Gluing to UHMW plastic is hard. The only viable option I found was a loctite brand at home depot that specifically mentioned polycarbonate. With that I got the slide locks working. Cut the wings. Glued the rest up, sanded, and coated in polyurethane. I went to load the drawers and found that organization wasn't tight enough. So after a quick search on the fancy stuff photographers use in pelican cases I was off to lowes to buy a 4x8 sheet of plaskolite corrugated plastic and a bag of landscaping staples. It was easy to slice up and poke together for a much better gear layout. This is easily adjustable and modular so it'll get tweaked along the way. I also cut some reflectix window liners and tested our existing mattress pad. I'd like to go back to trifold 4" memory foam though. I also ordered coffee table hinges for a drawer lift top.
    Screenshot_20201211-205856_Instagram.jpg
    20201211_195427.jpg
    Screenshot_20201211-205915_Instagram.jpg
     
  13. Jan 15, 2021 at 8:02 AM
    #73
    blackoutt

    blackoutt [OP] YEAH BUDDY!

    Joined:
    Oct 21, 2018
    Member:
    #20805
    Messages:
    975
    Indy
    Vehicle:
    07 DC Long Bed - Old Man Tan
    OEM+
    I added a "coffee table" lift on the front of the right side drawer and some moveable panels for stove top setup with access to cooking utensils and food underneath. This was a feature of the 4Funner drawers that was always a hit for bar height drinking/eating/cards whatever. I applied too much polyurethane, and polished it too glass like so the stove needs to be velcro'd down lol, watch your drink.
    20210115_104456.jpg
    20210115_104522.jpg

    Next up I went to work wiring up the bed power fuse panel, circuit breaker, and then made a harness to go to the switch panel at the rear left of the bed. Complete with 12V and USB outlets, as well as added another waterproof strip light on the hatch for camp/cook lighting. And another 12V/USB into the cab for always hot charging - fridge, devices etc. Still need to decide where to actually mount this but will try it out first.
    20210113_153958.jpg
    20210114_164903.jpg
    20210114_180041.jpg
    20210114_175953.jpg
    20210113_180356.jpg

    Then I cut a hole in my cap!!! That was nerve wracking but measured a ton, cut once, built a 1/2" thick wooden frame to support the inner garnish nicely and sealed the crap out of it with Dicor self leveling sealing and butyl tape just like an RV would. This low profile 4 speed fan moves 900 CFM on high!
    20210109_103842.jpg
    20210109_104716.jpg

    And next on the to do list is figure out how to attach 2x 100w solar panels to the expedition one roof rack. I think they'll actually go from side to side not front to back like this picture as that gives me a whole extra 1/4" to squeeze them down between the rails for a flush mount setup.
    20210112_171504.jpg

    After that the only thing left is all the underhood rearranging and wiring for SDHQ dual battery setup. So excited to have this rig setup similar to the 4Funner
     
    Last edited: Jan 15, 2021
  14. Jan 22, 2021 at 9:22 AM
    #74
    blackoutt

    blackoutt [OP] YEAH BUDDY!

    Joined:
    Oct 21, 2018
    Member:
    #20805
    Messages:
    975
    Indy
    Vehicle:
    07 DC Long Bed - Old Man Tan
    OEM+
    Edit 4_12_2021:
    I've made a much more in depth write up on my website at THE ULTIMATE DIY OVERLAND DUAL BATTERY SYSTEM WITH SOLAR – SIMPLE, CHEAP, AND EFFECTIVE.
    Any questions or comments please let me know!

    Finished up the SDHQ washer fluid relocation and dual battery tray install and all I can say is wow what a solid product. I was hesitant due to the price but it was worth every penny and more. The fit, rigidity, and thought out mounting and routing are awesome. So glad I didn't spend hours bolting in an ill fitting universal solution.

    I filled the tray with the largest Ah capacity AGM that I can source easily across the country at any autozone (rebrand also available at Walmart) 24F at 70Ah. Shown with a little aux wiring to the rear of the truck still needing to be shortened up and terminated, positive terminal cover missing. This battery can also swap across to the starter side if need be. Not sure why my truck came with a group 35 but it'll be a 24F soon. On top of the starter battery is a switch to allow batteries not linked, batteries linked (with Blue Sea ACR 7610 between to control auto disconnect/backflow charge from solar), winch connected to battery 1 only, and winch connected to both batteries. I chose to put together my own wiring as I already had a bit left over from other projects and the hydraulic crimper tool. I used 1/0 gauge with fuses at each battery end.

    20210118_214605.jpg
    20210118_214620.jpg

    The solar was wired into the rear aux panel for simplicity, and to keep the charge controller in the bed of the truck out of harsh elements, and allow easy viewing of the plugin display. This will technically also allow me to run devices straight off of solar without the second battery if the circuit is cut off, not a requirement but accidental cool feature. The rats nest will still get cleaned up with some fancy zip tie work and also be an area for device charging overnight. Solar mounted on the roof rack flush to not gain any height, still fits in the garage door! I've wanted to do this since the day I bought the truck, 200W total. Also shown is the buck/boost converter I got from Amazon to regulate 12V to the maxxfan, I had read complaints of them dying when receiving alternator voltage, even worse with my alt-s diode to boost charge voltage and even worse AGAIN for solar voltage. Now she gets clean regulated power high or low.

    20210120_225537.jpg
    20210121_154316.jpg


    And lastly another interior shot with the platform wings set into place. We have a 4" foam queen size mattress on the way to top it all off. All of the white sticky backed velcro strips holding wires up will get replaced with black, I just didn't have any non-sticky backed hook side velcro laying around. I would also like to make a small stainless steel table that hooks into the bed rail track as a tray table/coffee table type spot to play cards, set drinks, set the buddy heater up off of the bedding and still allow feet to go under it.

    20210121_154303.jpg
     
    Last edited: Apr 12, 2021
  15. Feb 23, 2021 at 5:16 AM
    #75
    blackoutt

    blackoutt [OP] YEAH BUDDY!

    Joined:
    Oct 21, 2018
    Member:
    #20805
    Messages:
    975
    Indy
    Vehicle:
    07 DC Long Bed - Old Man Tan
    OEM+
    Not much big progress here lately, just some small details. I had a battle with my local Toyota dealer refusing warranty due to being modified on a leaky water pump. After opening a case with Toyota 1-800 number and explaining the Magnuson Moss Act (Consumer protection act of 1975) they changed their tune and were very helpful, apologetic. Warranty is almost up so they'll never see this truck again anyway.
    20210207_110815.jpg

    Ordered seals for leaking left rear axle seal that I probably nicked while regearing.

    Installed a volt meter/dual USB into the center console where the 12V plug was, with a small i/o/i switch next to it so I can toggle between front/rear battery voltage display or off, those things are too bright some times, also why it's hidden in the console. This was surprisingly easy with tons of room to fit the ports and easy to lift the console to run wires.
    20210223_085510.jpg 20210223_085525.jpg
    Iceco fridge should show up today after a week weather delay, but Amazon already refunded me? We'll see how that one plays out.

    And lastly I stole an idea from some Jeep forums on how to add a ball valve to my Expedition One Geri water cans. I needed to used a thicker plastic washer than the gatorade cap he used in order to get the EO cap to seat/seal on it's threads as if there was a nozzle in there, but has some 1/8" UHWM left over from the drawer build. I've gotta go back through and clean and seal it but from a quick test it works great! https://www.wranglerforum.com/threads/rotopax-water-can-w-spigot-i-figured-it-out.1418106/
    20210222_220219.jpg 20210222_220403.jpg

    Oh I almost forgot, I also installed a power lock actuator on the tailgate. My brother 3d printed me a bracket and lever from thingiverse but I didn't spend the $16 on the 524N actuator and cheaped out on a pair of some other ones for $9 (both tundras!) So my actuator didn't fit on the bracket but it did make a nice flat spot to mount it, and I used some other ideas off this forum to use a small section of hacksaw blade slipped under the lock pin. Imagine that piece UNDER the steel piece marked 7822 and actually bolted to the actuator, should never pop off. Wiring was pretty simple other than it was a long run up to the passenger kick panel. 2017 wire colors large white and large blue wires on the bottom of this body control module intermediate connector shown here. I didn't test which way the wires went, I guessed and was right for once!
    20210205_121713.jpg 20210207_194932.jpg
     
    Last edited: Feb 23, 2021
  16. Feb 23, 2021 at 8:58 AM
    #76
    dittothat

    dittothat New Member

    Joined:
    Feb 23, 2019
    Member:
    #26579
    Messages:
    2,654
    First Name:
    Nick
    SD
    Vehicle:
    2016 MGM Platinum
    Love the build. Still think you got one of the best deals on a vehicle I’ve seen in years. Keep up the good work :thumbsup:

    Also, completely agree with you on not keeping electrical where you sleep. Curious why you went the blue sea route and didn’t get a dc-dc charge controller from renology/red arc? Perhaps because both batteries are under the hood and didn’t want to make those long solar wire runs? Curious to hear your logic as I’m still pondering myself and debating whether a dc-dc is better or if a simple charge controller will work since it’ll just be the fridge off the battery.
     
    blackoutt[OP] likes this.
  17. Feb 23, 2021 at 10:36 AM
    #77
    blackoutt

    blackoutt [OP] YEAH BUDDY!

    Joined:
    Oct 21, 2018
    Member:
    #20805
    Messages:
    975
    Indy
    Vehicle:
    07 DC Long Bed - Old Man Tan
    OEM+
    Thanks, especially with the price of used Tundras seeming to go up over the last year or so I think I'm still in this one really well but I plan to keep it til it's worth way less than I have into it so kind of a moot point.

    My 4runner dual battery system was the same blue sea ACR type install and I said then if I did it again I'd do dc-dc! Then I got to researching... the main advantage to dc-dc was ideal battery charging profile for many battery types, smaller gauge wiring, and "all in one" unit for solar and battery linking. The disadvantages I found were upfront cost, solar requires the use of an add on relay that shuts off the linking circuit so you can't use solar to back charge the starter battery if the house battery is full, and you can't dual charge from alternator and solar at the same time (might not be advised anyway but it works) so the only way around this is to add a second standalone solar module. They also have finicky solar voltage inputs and my roof real estate required a very specific size panel with specs that may not meet the redarc requirements. I don't really care about having many charging profile options since I know I'll always run 2x agm batteries (lifepo4 tech just isn't there yet), and the alternator with an alt-s diode is good enough for the starter battery, why not the aux battery too? Mppt solar is mppt solar, I have 200w in panels which is more than my needs so again with that extra margin I'm okay maybe losing a little efficiency on the controller. Wiring cost was like maybe $40 extra because I go overkill but the savings on the separate ACR and solar controllers over redarc more than made up for that. Mounting wasn't an issue for multiple controllers, I had room to spare. Also I only need a 4" cable to jumper the ACR to jump start myself, DC-DC I'd need to carry jumper cables.
     
    Wallygator and dittothat[QUOTED] like this.
  18. Feb 28, 2021 at 5:44 PM
    #78
    blackoutt

    blackoutt [OP] YEAH BUDDY!

    Joined:
    Oct 21, 2018
    Member:
    #20805
    Messages:
    975
    Indy
    Vehicle:
    07 DC Long Bed - Old Man Tan
    OEM+
    Pulled the super dark tint off the rear slider to try to increase visibility through the cab. I might need to redo the side windows to a lower level as well.

    The grip tape I added to the front of the sliders last year has been awesome so I added some similar strips to the rear step and kick out area.

    I also figured out that I don't need to cut up a salvage seat to delete the 40/ side of the rear 40/60. Just needed to pull it out and remove the pivot bolts then reinstall the seat brackets to support the 60 side and fridge on the under seat storage bin. Tons more room to open the fridge and get the basket in and out.

    20210228_132726.jpg 20210228_132743.jpg 20210228_134020.jpg
     
  19. Apr 12, 2021 at 6:55 AM
    #79
    blackoutt

    blackoutt [OP] YEAH BUDDY!

    Joined:
    Oct 21, 2018
    Member:
    #20805
    Messages:
    975
    Indy
    Vehicle:
    07 DC Long Bed - Old Man Tan
    OEM+
    Kiddnapped Tundra and Wallygator like this.
  20. Apr 12, 2021 at 6:58 AM
    #80
    fundra_goes_west

    fundra_goes_west I’m just a guy with a girl

    Joined:
    Jan 22, 2018
    Member:
    #12381
    Messages:
    1,073
    Gender:
    Male
    First Name:
    Evan
    Colorado
    Vehicle:
    2022 SQ8
    I like the burnt knob lookout pic in the site!
     
  21. Apr 12, 2021 at 7:03 AM
    #81
    blackoutt

    blackoutt [OP] YEAH BUDDY!

    Joined:
    Oct 21, 2018
    Member:
    #20805
    Messages:
    975
    Indy
    Vehicle:
    07 DC Long Bed - Old Man Tan
    OEM+
    Good eye! One of our top spots to visits for sure. It helped that the weather was ideal and we had it all to ourselves.
     
  22. Apr 12, 2021 at 7:05 AM
    #82
    fundra_goes_west

    fundra_goes_west I’m just a guy with a girl

    Joined:
    Jan 22, 2018
    Member:
    #12381
    Messages:
    1,073
    Gender:
    Male
    First Name:
    Evan
    Colorado
    Vehicle:
    2022 SQ8
    Yeah looks warmer than when we were there first week of October for sure. But we had it to ourselves too which is amazing!
    7B197987-086D-41FC-A8E4-A7D08D6636A7.jpg
     
  23. Apr 12, 2021 at 8:54 AM
    #83
    Wallygator

    Wallygator Well Zippedy Da Do!

    Joined:
    Apr 7, 2020
    Member:
    #44761
    Messages:
    2,539
    This is just a great build, thanks for posting your progress. :thumbsup:
     
    blackoutt[OP] likes this.
  24. May 4, 2021 at 12:45 PM
    #84
    blackoutt

    blackoutt [OP] YEAH BUDDY!

    Joined:
    Oct 21, 2018
    Member:
    #20805
    Messages:
    975
    Indy
    Vehicle:
    07 DC Long Bed - Old Man Tan
    OEM+
    Got out a couple weeks ago and really flexed the truck out and camped. I'm now happy to know where I need to trim a litttttttle bit more and she's full rub free except for the drivers side front bumper....and passenger side body mount. So some alignment tweaks will need to be made. Camping went very well with the little one and even made friends with a random back packer over a beer and fire.

    upload_2021-5-4_15-43-12.jpg

    upload_2021-5-4_15-43-32.jpg

    upload_2021-5-4_15-44-30.jpg

    I also took on a little project to figure out how to wire in my own front camera since I already had the anytime backup camera harness. I did a writeup with some diagrams to help others over on my blog DIY: 14+ Toyota Anytime Backup Camera and Front Camera Mods

    upload_2021-5-4_15-45-15.jpg
     
    Wallygator and Kiddnapped Tundra like this.
  25. May 6, 2021 at 5:34 PM
    #85
    blackoutt

    blackoutt [OP] YEAH BUDDY!

    Joined:
    Oct 21, 2018
    Member:
    #20805
    Messages:
    975
    Indy
    Vehicle:
    07 DC Long Bed - Old Man Tan
    OEM+
    Since it looked like rain and I wanted to work on fitting the rear bug screen, what better time to figure out how to setup the old kelty 16 sort of like the SJK road tarp?

    I think I need a couple of adjustable poles to make it standalone (or trees) I'm using a broomstick and a paint roller handle here. Not pretty but it's a big covered area and it rolled rain off effectively keeping the kitchen and bed dry. This will save me from hauling an ez up on the roof, or buying and mounting an awning that will prevent me from fitting in the garage.

    20210506_170529.jpg

    The house sliding door screen I used came with loop side velcro attached already and some sticky backed hook side to stick around the opening. Well hook side sticks to topper carpet, so I ended up just sewing the hook side all around the edges on the opposite side. There's even a sweet magnetic closure in the middle! Their standard width worked perfect, just trimmed the length and tucked under the mattress. Bug free-ish!
    Screenshot_20210506-202544_Instagram.jpg
     
  26. May 11, 2021 at 8:14 AM
    #86
    CoryShap09

    CoryShap09 New Member

    Joined:
    Aug 23, 2020
    Member:
    #51200
    Messages:
    87
    Gender:
    Male
    First Name:
    Cory
    Vehicle:
    2020 CM XP
    None yet
    Does the filter make any difference? Been thinking about getting one.
     
  27. May 11, 2021 at 10:43 AM
    #87
    blackoutt

    blackoutt [OP] YEAH BUDDY!

    Joined:
    Oct 21, 2018
    Member:
    #20805
    Messages:
    975
    Indy
    Vehicle:
    07 DC Long Bed - Old Man Tan
    OEM+
    I doubt it. I only run them because I like to think it makes a couple more HP and a slight growl but really the biggest benefit to me is the ability to clean and reuse. I planned on pairing it with smooth intake pipe (no elephant ear resonators) for an even better growl but haven't made it that far yet.
     
  28. Jun 28, 2021 at 10:29 AM
    #88
    blackoutt

    blackoutt [OP] YEAH BUDDY!

    Joined:
    Oct 21, 2018
    Member:
    #20805
    Messages:
    975
    Indy
    Vehicle:
    07 DC Long Bed - Old Man Tan
    OEM+
    After some hot weather stationary camping running fridge and lots of fans all day and night, we decided we wanted to add some extra battery capacity that we could easily throw in the truck for those occasions, or leave out for our normal moving everyday type trips. So now we're testing the Bluetti AC50S 500Wh pack to run the fridge in the truck, recharging only from DC power while driving or direct from solar. It does not charge well from DC dual battery system without the alternator running due to not high enough voltage to charge a lithium ion battery off of a resting AGM, no surprise there. We also used the inverter last weekend to run a projector and had a movie night at camp. Talk about glamping! Pretty slick so far.
    I also picked up a used 24F AGM battery to match my Aux battery that I will try and get a health status on. I might either keep it as a spare or swap it into the starter battery location so my batteries will match for ease of trading locations if need be.

    20210626_074507.jpg
    20210626_213425.jpg


    On the truck side, we took some tight trails with wash outs and rocky climbs last weekend and it did amazing. The latest fender liner trimming seems to have resolved my last remining rubbing, still getting full stuff. I'm still impressed by the 37s just dwarfing rock steps and giving the clearance to crawl over rocks/ruts that others were dragging belly on. There was only one sketchy off camber spot where a cut log got too close for comfort to the left bedside and I had to carefully back out to take a higher tippier line. I may consider playing with adding a sway bar back onto one end or the other to try to keep the body more flat in these situations. We broke nothing and had a blast running about 150 miles of the Kentucky Adventure Tour.

    20210626_114142.jpg
    20210626_125338.jpg
     
    Last edited: Jun 28, 2021
  29. Jul 27, 2021 at 10:39 AM
    #89
    blackoutt

    blackoutt [OP] YEAH BUDDY!

    Joined:
    Oct 21, 2018
    Member:
    #20805
    Messages:
    975
    Indy
    Vehicle:
    07 DC Long Bed - Old Man Tan
    OEM+
    Spent a week in the Adirondacks battling rain, mosquitos, and field mice that I think we picked up camping at a buddys barn on the way out! But had a great time catching up with old friends, hiking, swimming, and making the best of it. No crazy offroading, didn't even need 4wd or high clearance to do this trip, still worth it to take our home on wheels though.
    upload_2021-7-27_13-33-25.jpg
    upload_2021-7-27_13-35-56.jpg
    upload_2021-7-27_13-37-27.jpg

    Then turn and burn the following weekend for long weekend of dirtbiking in Arkansas. There was more guys than the air bnb could house so I volunteered to camp in my truck, which meant I also volunteered to get 8mpg towing the trailer full of bikes/gear. The truck did great pulling the load and the trip was epic. Time to add a few new states to the Fundra list.

    upload_2021-7-27_13-38-13.jpg
    upload_2021-7-27_13-38-52.jpg
    upload_2021-7-27_13-39-17.jpg
     
  30. Jul 27, 2021 at 10:49 AM
    #90
    Trdwillie14

    Trdwillie14 New Member

    Joined:
    Sep 23, 2018
    Member:
    #19743
    Messages:
    2,181
    Gender:
    Male
    First Name:
    Billy
    Vehicle:
    2014 trd off road
    2.5 fox 2.5 ads triple bypass T/C uppers Nfab front bumper Westin rear Bajas Rci skids All pro sliders Icon rxt leafs Stt pros Method 701s 37 Mickey Thompson
    How do you like those tires
     
To Top