

-
Welcome to Tundras.com!
You are currently viewing as a guest! To get full-access, you need to register for a FREE account.
As a registered member, you’ll be able to:- Participate in all Tundra discussion topics
- Transfer over your build thread from a different forum to this one
- Communicate privately with other Tundra owners from around the world
- Post your own photos in our Members Gallery
- Access all special features of the site
 Tranny Cooler ?
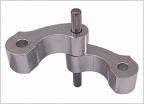 Has any one ordered ext cab side window closure bracket parts?
 Replacement catalytic converter for 2000 Tundra V6 manual 4WD SR5
 Led bulb conversion
 Drivers seat is loosing support after 17 years...
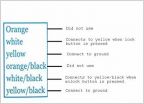 Power door locks
Is my Tundra worth fixing?
Discussion in '1st Gen Tundras (2000-2006)' started by hatman18, Apr 2, 2023.
Page 2 of 2
Page 2 of 2


