

-
Welcome to Tundras.com!
You are currently viewing as a guest! To get full-access, you need to register for a FREE account.
As a registered member, you’ll be able to:- Participate in all Tundra discussion topics
- Transfer over your build thread from a different forum to this one
- Communicate privately with other Tundra owners from around the world
- Post your own photos in our Members Gallery
- Access all special features of the site
 Fog light specific upgrades / retrofits for a 2005?
 VHF/UHF Radios
 Diagnostic tool
 Replacing timing belt&water pump, what else while I'm in there?
 2001 2UZ-FE Timing Belt
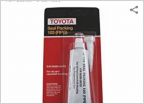 Reinstalling wate pump housing that needs FIPG
What have you done to your 1st gen Tundra today?
Discussion in '1st Gen Tundras (2000-2006)' started by T-Rex266, Sep 7, 2015.
Page 860 of 2448
Page 860 of 2448
Products Discussed in


