1. Welcome to Tundras.com!

    You are currently viewing as a guest! To get full-access, you need to register for a FREE account.

    As a registered member, you’ll be able to:
    • Participate in all Tundra discussion topics
    • Transfer over your build thread from a different forum to this one
    • Communicate privately with other Tundra owners from around the world
    • Post your own photos in our Members Gallery
    • Access all special features of the site

What have you done to your 1st gen Tundra today?

Discussion in '1st Gen Tundras (2000-2006)' started by T-Rex266, Sep 7, 2015.

  1. Jun 17, 2025 at 7:57 AM
    Dakillacore

    Dakillacore This aggression will not stand, man.

    Joined:
    Sep 24, 2023
    Member:
    #104420
    Messages:
    907
    Gender:
    Male
    Georgia
    Vehicle:
    2006 Toyota Tundra Limited DC V8 2WD
    It may seem a little.....unorthodox, BUT if you want to save some dough and you have some extra clear silicone laying around.....go ahead and hit the inside surrounding edge of the unit. It'll seal up where the seal failed.

    I did this on my cheap-o garbage CARID set that I bought a few months ago.
     
  2. Jun 17, 2025 at 7:58 AM
    sportbike37

    sportbike37 New Member

    Joined:
    Mar 28, 2021
    Member:
    #61068
    Messages:
    21
    FL
    Also wanted to mention that you have to drop the spare tire to gain access to bleed the LSPV. Others may have done it without dropping the spare tire, but this was not the case for me.
     
  3. Jun 17, 2025 at 8:40 AM
    KNABORES

    KNABORES Sarcasm incoming

    Joined:
    Jan 1, 2020
    Member:
    #40572
    Messages:
    14,278
    Gender:
    Male
    Arkansas
    Vehicle:
    2000 Limited TRD AC 4X4 Thunder Grey 278k miles. *SOLD* 2019 Limited TRD CM 4x4
    Bilstein 5100's on the forbidden notch Husky HD rear leafs 16x8 Eagle Alloy 187's with 285/75/16 MagnaFlow 3" flow through Pioneer touchscreen with backup camera Full interior and dash LED conversion Trailer brake controller with 7 pin Bedliner coat bumpers & trim ARE Mpulse topper - Rhino Vortex rack
    I’ve not had any problems bleeding mine in a 2000 AC with the spare in place.
     
  4. Jun 17, 2025 at 8:42 AM
    KNABORES

    KNABORES Sarcasm incoming

    Joined:
    Jan 1, 2020
    Member:
    #40572
    Messages:
    14,278
    Gender:
    Male
    Arkansas
    Vehicle:
    2000 Limited TRD AC 4X4 Thunder Grey 278k miles. *SOLD* 2019 Limited TRD CM 4x4
    Bilstein 5100's on the forbidden notch Husky HD rear leafs 16x8 Eagle Alloy 187's with 285/75/16 MagnaFlow 3" flow through Pioneer touchscreen with backup camera Full interior and dash LED conversion Trailer brake controller with 7 pin Bedliner coat bumpers & trim ARE Mpulse topper - Rhino Vortex rack
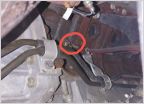
    Location as viewed from the passenger side in front of the rear axle looking towards driver rear (old picture)

    IMG_4438.jpg
     
    oscardog86 likes this.
  5. Jun 17, 2025 at 8:47 AM
    Dblock500

    Dblock500 New Member

    Joined:
    Jan 23, 2025
    Member:
    #129280
    Messages:
    324
    Gender:
    Male
    DMV
    Vehicle:
    2002 SR5 AC 4.7 V8 4WD
    Went to drive the truck today after a couple days of on-and-off rain. Looking like I have the cowl leak going on. Water pooling up in the passenger side floor board only, doesn't appear to be coming from anywhere overhead or A pillar, windshield, etc. and more likely coming around the the blower motor area above the footwell.

    Referred to the sticky already https://www.tundras.com/threads/definitive-2000-2006-cab-area-rain-water-leak-thread.70464/. I'll have to go ahead and order the parts referenced in there and get this taken care of.

    20250617_105727.jpg
    20250617_105747.jpg
     
    Voss, BroHon, Filthyphil and 2 others like this.
  6. Jun 17, 2025 at 9:21 AM
    manofsteele2003

    manofsteele2003 New Member

    Joined:
    Apr 13, 2017
    Member:
    #7224
    Messages:
    332
    Gender:
    Male
    First Name:
    Grant
    Vehicle:
    24 Sequoia TRD Pro
    Westcott designs 3"/1" lift 295/70/18 Falken Wildpeak RTs Canvasback cargo liner aFe Tow hooks
    They were $56 a piece
     
    NickB_01TRD[QUOTED] likes this.
  7. Jun 17, 2025 at 10:28 AM
    TXTundraGuy23

    TXTundraGuy23 One piece at a time

    Joined:
    Apr 7, 2023
    Member:
    #95139
    Messages:
    394
    Gender:
    Male
    Dallas
    Vehicle:
    2004 DC 4.7L 4WD
    6112s up front w/ 650 lb springs, 5160s in the rear, JBA UCAs, Suspension Maxx Links, ATS leafs w/ Wheeler's AAL and overload spring, Toyota Gloss Gunmetal TRD Wheels, Toyo Open Country AT3s 275/70/17
    Did my valve cover gaskets over the weekend (and redid the passenger side last night). Learned a lot and hopefully all is good now. No more oil leak this morning driving to work, but I do need to go to LAP and clear my check engine light and drop off old oil. I did a long write up with pics on my build thread: https://www.tundras.com/threads/2004-dc-4-7-4wd-build-log.128950/
     
    BroHon, shifty`, Filthyphil and 2 others like this.
  8. Jun 17, 2025 at 12:01 PM
    NickB_01TRD

    NickB_01TRD You don't need less cars, just more driveway.

    Joined:
    Jun 16, 2021
    Member:
    #64346
    Messages:
    2,732
    Gender:
    Male
    First Name:
    Nick
    KY
    Vehicle:
    01 Tundra V8 4X4 AC SR5 TRD
    Yeah I probably should have went that route but I was tired of it, I already drilled a hole in it a while back, which also broke off the drill bit inside the light. May just wait for another Toyota parts sale and order up some OEM units and be done with it.
     
  9. Jun 17, 2025 at 1:05 PM
    455h0le_dachshund

    455h0le_dachshund Mum stole me darts

    Joined:
    Nov 21, 2023
    Member:
    #107257
    Messages:
    7,601
    First Name:
    Rev. Hotdog
    TX...big surprise
    Vehicle:
    Dragstrip Rocketship, Death Machine
    Smart. You don't want to wait too long like I did and have to buy a new blower motor.
     
    Dblock500[QUOTED] and BroHon like this.
  10. Jun 17, 2025 at 4:04 PM
    shifty`

    shifty` Like Fred Flintstone, drivin around with bald feet

    Joined:
    Jun 20, 2020
    Member:
    #48239
    Messages:
    29,485
    ATL
    Vehicle:
    '06 AC Limited V8/4WD
    (see signature for truck info)
    Adding to @KNABORES ’ already great post here to say: The reasons bleeding the LSPV is important are many. But one big one is, it sits higher up than any other point in the brake system after the cab, so guess where air is gonna go if it enters the system anywhere after the cab, or at the rear bleeders?

    Not to say there aren’t other reasons. It acts as a limiter/pinch point for the rear drums also, and old fluid, crud that builds up in the lines, all that is more likely to get jammed up in a bottleneck like that. You really want clean juice pushed thru it.

    Really, I disagree (despite parroting this method in the past, before bleeding my own truck) with the recommendation to do the farthest wheel (rear passenger first), then LSPV, then rear driver, passenger front, and driver front. It makes more logical sense to me (note, I’m by no way the authority here!) to bleed the LSPV first, to get fresh fluid to the rear of the truck, THEN bleed the passenger rear, then the driver rear. This way, you’re pulling any bullshit out of the lines up to the LSPV, any air from the LSPV, and getting a clean supply to the farthest corner. I can’t think of a reason why this method is inferior in any way.

    If our trucks were 4-way discs with no PV at all, direct-plumbed from the ABS squid to the calipers, YES, I would do passenger rear, driver rear, passenger front, driver front. But given the bleedable LSPV back there, I don’t see the logic in doing the passenger rear before the LSPV.

    Honestly, I’m going to step out on a limb and say something maybe controversial here. I would follow the Professional Hand Model method to apply a paint-safe sealant and reinstall the two offending fasteners, because the new Toyota part simply adds a tiny piece of foam that some members, like @NickB_01TRD (I think?) found will ultimately tear again with time.

    If you do choose to order fasteners for feet of the plastic breaking, as it is old, and they do break, let me tell you:
    • Only order two, remove their foams, and use a paint safe sealant to seal them in without foams
    • Order at least half a dozen of both the black snaps and their white sockets, because you are almost assuredly going to break two or three of each when you pop the cowl.
    • Be prepared to spend 1-2 hours on the job, if working leisurely, you will probably find a lot of buildup and bullshit under the cowl that needs cleaning.

    Honestly, I hit up a 25% off sale and got new OEM housings. Hindsight being 20/20 as it tends to be, I wouldn’t do it again. This is one of those times where you’ll get as much life out of two CAPA certified housings as a single pair of OEM, and still pay less for the CAPA aftermarket’s.
     
  11. Jun 17, 2025 at 4:30 PM
    pirates712

    pirates712 New Member

    Joined:
    Nov 9, 2023
    Member:
    #106656
    Messages:
    98
    Rochester NY
    Vehicle:
    2000 V8 AC 4x4
    One reason is if you live in the rust belt. When in the rust belt, never try to remove/loosen something you don't have to.
    In related news, ban road salt.

    IMG_20250617_180703_973.jpg
    IMG_20250617_180706_564.jpg
    IMG_20250617_180708_365.jpg
     
  12. Jun 17, 2025 at 4:32 PM
    Jack McCarthy

    Jack McCarthy Working remotely from the local pub

    Joined:
    Nov 2, 2020
    Member:
    #54409
    Messages:
    10,476
    Gender:
    Male
    First Name:
    Bill
    North of Boston
    Vehicle:
    02 Tundra AC SR5 V8 4x4
    You can probably break that apart with a hammer.
     
  13. Jun 17, 2025 at 4:33 PM
    shifty`

    shifty` Like Fred Flintstone, drivin around with bald feet

    Joined:
    Jun 20, 2020
    Member:
    #48239
    Messages:
    29,485
    ATL
    Vehicle:
    '06 AC Limited V8/4WD
    (see signature for truck info)
    To be fair….

    The OEM tow package support is notorious for rusting all to fuck, even happens in California trucks.
     
  14. Jun 17, 2025 at 6:18 PM
    Dblock500

    Dblock500 New Member

    Joined:
    Jan 23, 2025
    Member:
    #129280
    Messages:
    324
    Gender:
    Male
    DMV
    Vehicle:
    2002 SR5 AC 4.7 V8 4WD
    Thank you, I will heed this advice and was already planning on just ordering exrta clips. have a knack for always breaking any type of clip/push pin that ever needs removed
     
    Bought2Pull likes this.
  15. Jun 17, 2025 at 8:10 PM
    G_unit3000

    G_unit3000 New Member

    Joined:
    Jun 25, 2024
    Member:
    #118959
    Messages:
    246
    First Name:
    Gman
    North East
    Vehicle:
    2005 Tundra DC 4x4
    Coincidentally, today I almost asked a few of the very questions about required number of cowl fasteners and other related fasteners that you just answered here but rather than wait for a reply I just ordered. I am considering using some butyl rubber rope/tape without foil backing that I already have laying around to make butyl rubber gaskets to replace the foam gaskets. So rather than tape over like PHM, the butyl rubber would be under the head of the fastener. Do you think this will work?
    I ordered 8 of the cowl fasteners because the diagram suggested I needed that many. Sounds like this may have been overkill.
    markup_1000012405.png


    Screenshot_20250617-225540.png
    Screenshot_20250617-230922.png
     
    BubbaW likes this.
  16. Jun 17, 2025 at 8:14 PM
    Bought2Pull

    Bought2Pull New Member

    Joined:
    Jul 26, 2024
    Member:
    #120430
    Messages:
    722
    Gender:
    Male
    First Name:
    Greg
    WV
    Vehicle:
    2006 Tundra 4 door
    Not a mechanic by any means but could one drill that hole out, completely removing the threads, then re-thread for a larger bolt?
     
    oscardog86 likes this.
  17. Jun 17, 2025 at 8:20 PM
    Bought2Pull

    Bought2Pull New Member

    Joined:
    Jul 26, 2024
    Member:
    #120430
    Messages:
    722
    Gender:
    Male
    First Name:
    Greg
    WV
    Vehicle:
    2006 Tundra 4 door
    Well today I did something truly substantial to my Tundra......I tore off a piece of blue painter's tape and stuck it to the driver's side of the windshield where the glass touches the roof. I couldn't find a marker but when I do I'll mark "Next oil change at: 204,000 miles."

    That's about all the free time today I had!
     
  18. Jun 17, 2025 at 8:42 PM
    BroHon

    BroHon Permanently on "Island Time"

    Joined:
    Sep 19, 2023
    Member:
    #104169
    Messages:
    2,595
    First Name:
    Bro
    Location: Bitch Mitten
    Vehicle:
    2000 SR5 AC 4x4 4.7
    Crusher bound Jalopy, to sketchy street cruiser
    thug-life-shirts-hats-beanies-and-more-wasted-kids-836239.png
    That looks like it got completely full of water and then froze... a few times over. :eek2:
    I'm with you in the battle :fistbump:
     
  19. Jun 17, 2025 at 8:45 PM
    Bought2Pull

    Bought2Pull New Member

    Joined:
    Jul 26, 2024
    Member:
    #120430
    Messages:
    722
    Gender:
    Male
    First Name:
    Greg
    WV
    Vehicle:
    2006 Tundra 4 door
    Mine is fairly rusted also but is holding fast so far.....

    I might try to remove it at some point, after I source a replacement. :)
     
  20. Jun 17, 2025 at 8:50 PM
    Jack McCarthy

    Jack McCarthy Working remotely from the local pub

    Joined:
    Nov 2, 2020
    Member:
    #54409
    Messages:
    10,476
    Gender:
    Male
    First Name:
    Bill
    North of Boston
    Vehicle:
    02 Tundra AC SR5 V8 4x4
    That tow hitch doesn’t surprise me one bit.

    Salted snow always gets caked up behind the rear bumper and rarely gets washed due to its hidden nature and not being in the direct path of an underwash spray at the car wash.

    I’m guilty of not crouching over to get the crap in behind the rear bumper myself.
     
    Bought2Pull and KNABORES like this.
  21. Jun 17, 2025 at 10:47 PM
    Hutcheson

    Hutcheson New Member

    Joined:
    Jun 12, 2024
    Member:
    #118342
    Messages:
    120
    Gender:
    Male
    First Name:
    Caleb
    Vehicle:
    2004 DC Limited
    Had a bit of free time before heading to work this morning, banged out the LBJs. Nice driving the truck now not having to worry about driving over my own wheel haha.

    IMG_3472.jpg
    IMG_3476.jpg

    Attempted to install the Timbren bumpstops this evening and couldn’t even get the nuts off the U-bolts as they’re completely seized. Soaking them overnight and I’ll try again tomorrow.
     
  22. Jun 18, 2025 at 4:01 AM
    NickB_01TRD

    NickB_01TRD You don't need less cars, just more driveway.

    Joined:
    Jun 16, 2021
    Member:
    #64346
    Messages:
    2,732
    Gender:
    Male
    First Name:
    Nick
    KY
    Vehicle:
    01 Tundra V8 4X4 AC SR5 TRD
    It was me, the new parts are junk. @Dblock500 it doesn't hurt to order more clips. I had some that were broke and some that wouldn't really tighten up and I wish the first time I pulled it that I had just replaced all of them. I now have enough to replace the rest but I'll wait till I have a reason to pull the cowl again and I'll replace.

    I'm always worried mine looks like this though I would think they would have said something during my frame replacement if it looked this bad. I probably need to pull my bumper and take a look at it since I tow fairly often.

    What's your plan to replace? Isn't this part getting hard to find?
     
    Dblock500 and G_unit3000 like this.
  23. Jun 18, 2025 at 4:04 AM
    NickB_01TRD

    NickB_01TRD You don't need less cars, just more driveway.

    Joined:
    Jun 16, 2021
    Member:
    #64346
    Messages:
    2,732
    Gender:
    Male
    First Name:
    Nick
    KY
    Vehicle:
    01 Tundra V8 4X4 AC SR5 TRD
    Missed this part on my last post. I have CAPA certified Depos, just can't seem to get my hands on a passenger side corner light that lasts more than 6 months without leaking. I just might get OEM corners, because so far the headlights have been fine.
     
    shifty`[QUOTED] likes this.
  24. Jun 18, 2025 at 4:24 AM
    Redoak

    Redoak New Member

    Joined:
    Nov 28, 2024
    Member:
    #126549
    Messages:
    77
    Gender:
    Male
    First Name:
    Dave
    Vehicle:
    2006 Toyota Tundra DC, Limited 4x4, with LSD
    none
    I was thinking along similar lines.
    is there enough room to use a helicoil?
    We kept them cause we had to use them occasionally on older truck exhaust bolt holes.
    Aluminum heads sometimes also.
    Pretty simple to use/install. Just need the tap for, and little plastic install “bolt.”
    Put some permanent loctite on in when installing. Just make sure the loctite is completely dry before installing the bolt or it’s not going to come back out.
    Never had any come backs on them.
    I’d get one with the tang break

    https://www.boellhoff.com/us-en/products/special-fasteners/helicoil-thread-inserts-for-metals/
     

    Attached Files:

    Last edited: Jun 18, 2025 at 4:31 AM
  25. Jun 18, 2025 at 6:42 AM
    pirates712

    pirates712 New Member

    Joined:
    Nov 9, 2023
    Member:
    #106656
    Messages:
    98
    Rochester NY
    Vehicle:
    2000 V8 AC 4x4

    My frame was done in 2010 and the truck hasn't seen salt since 2014, so I assume most of this damage was already done.
    The part for my truck is 52043-0C010 and it was still available. Oddly, it doesn't match what the parts diagram shows for a truck with the factory hitch - mine looks like the upper one rather than the lower.
    I wouldn't pull the bumper cover unless you're already planning to replace. The four bolts on the bottom came out ok (surprisingly), but I broke just about every other bolt.
    Not sure how much extra support it really provides since there's only the two bolts going down into the receiver (90119-A0003), maybe mostly to help support tongue weight? In any case I'm not interested in finding out.

    upload_2025-6-18_9-38-1.png
     
  26. Jun 18, 2025 at 6:50 AM
    Dblock500

    Dblock500 New Member

    Joined:
    Jan 23, 2025
    Member:
    #129280
    Messages:
    324
    Gender:
    Male
    DMV
    Vehicle:
    2002 SR5 AC 4.7 V8 4WD
    Yeah I'll order 8 of the clips too and just replace them all but only 2 of the passenger side foam fasteners causing the leak--that's the total number that's on there right? Its always hard to tell with these half-helpful Toyota diagrams smh. I haven't ever opened the cowl yet, but I suspect that would work if it is a thinner rope. I have some butyl tape laying around too when I was sealing up my camper but I believe that was 1/4 inch or maybe half? I also have some clear waterproof sealant from my 3rd brake light that I was just going to use to re-enforce the outside seal of the foam gasket clips like you and shifty mentioned (aka the PHM method apparently)

    Where'd you order from? I'll order from my local dealer just so I can get it next day but pay the premium they charge for any little part (soo irritating how expensive this dealer is with ANYTHING)--My recent orders from Serra have been taking forever to be shipped out.
     
  27. Jun 18, 2025 at 7:40 AM
    Bought2Pull

    Bought2Pull New Member

    Joined:
    Jul 26, 2024
    Member:
    #120430
    Messages:
    722
    Gender:
    Male
    First Name:
    Greg
    WV
    Vehicle:
    2006 Tundra 4 door
    I did my own, LBJ's, had my own thread on it. Ended up buying an OTC kit. Did on my back, in the grass, truck up on 6x6 blocks, with hand tools. SUCKED

    Damaged one tie rod end (threads) but replaced it. Could not get other old one off....stealership did that one.

    Good to do one's own work, as much as one can! Congrats.
     
  28. Jun 18, 2025 at 7:55 AM
    The Black Mamba

    The Black Mamba A pure specimen of TX Black Snek

    Joined:
    Sep 6, 2023
    Member:
    #103472
    Messages:
    4,516
    First Name:
    Ryan
    DFW
    Vehicle:
    Black 00 SR5 AC 5VZ PreRunner
    Imma keep it stock
  29. Jun 18, 2025 at 8:08 AM
    shifty`

    shifty` Like Fred Flintstone, drivin around with bald feet

    Joined:
    Jun 20, 2020
    Member:
    #48239
    Messages:
    29,485
    ATL
    Vehicle:
    '06 AC Limited V8/4WD
    (see signature for truck info)
    Yeah, but then you gotta remember which bolt is different out of the 5. I’m too old for that shit.

    Butyl sounds like a great idea. You’d really only need a 3/4” x 3/4” square that was 20-30 mils thick (really, 1mm thickness would work) and ideally something that’s sticky on both sides. The product you’re showing is too thick, unless you rolled it out, the clip won’t snap into place. The clips for the cowl screws have two tensioned arms that grab the cowl, pulling the fastener into the foam to seal the hole. Find a pic of the clip and you’ll see what I mean.

    Best bet is to find another truck with tow pkg and swap it over. A couple of freebies have popped up on here over the years.

    Sometimes delays are caused by them needing to order parts, to get them in-hand, to be able to ship out.

    That said, part numbers and quantities; I think, are in the definitive leak thread (sticky), as is a very clear picture from @BubbaW showing the two problem clips you want to target.
     
    G_unit3000[QUOTED] likes this.
  30. Jun 18, 2025 at 8:47 AM
    ToyotaDude

    ToyotaDude Member

    Joined:
    Jul 8, 2023
    Member:
    #99955
    Messages:
    889
    Vehicle:
    2003 Tundra AC V8 4x4
    3" Front Eibach Pro-Truck Sport Ride Height Adjustable shocks with OE springs Rear Wheeler AALs Pathfinder AT 275/70/R18 (33.2") tires on 9” wide XD778 Monster wheels with 4.53 backspacing / -12 offset

Products Discussed in

To Top