1. Welcome to Tundras.com!

    You are currently viewing as a guest! To get full-access, you need to register for a FREE account.

    As a registered member, you’ll be able to:
    • Participate in all Tundra discussion topics
    • Transfer over your build thread from a different forum to this one
    • Communicate privately with other Tundra owners from around the world
    • Post your own photos in our Members Gallery
    • Access all special features of the site

What Would You Do? Crankshaft Position Sensor Disintegration!

Discussion in '1st Gen Tundras (2000-2006)' started by jerrycrabb, May 11, 2023.

  1. May 11, 2023 at 4:53 PM
    #1
    jerrycrabb

    jerrycrabb [OP] How hard could it be?

    Joined:
    Dec 10, 2019
    Member:
    #39757
    Messages:
    14
    Gender:
    Male
    First Name:
    Jerry
    Pennsylvania
    Vehicle:
    2000; AC; 4WD; 4.7; Frame replaced 2012
    2000 Tundra 4.7.

    Went to replace crankshaft position sensor and it snapped in my hand as I was removing the wiring connection .

    I grabbed bits of it with pliers and chipped away at it with a screwdriver hoping that at some point the rest would come out.

    I'm literally digging a hole and feel like I'm now in a pretty bad situation.
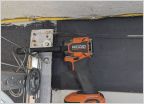
    PXL_20230511_234146497.jpgPXL_20230511_234225062.jpg PXL_20230511_234248941.MP.jpg

    Any advice? How much of the truck do I have to disassemble to get at this thing?
     
  2. May 11, 2023 at 5:41 PM
    #2
    Jack McCarthy

    Jack McCarthy Working remotely from the local pub

    Joined:
    Nov 2, 2020
    Member:
    #54409
    Messages:
    10,269
    Gender:
    Male
    First Name:
    Bill
    North of Boston
    Vehicle:
    02 Tundra AC SR5 V8 4x4
    Dammmn! Man, that sux. I’d probably be tempted to use a left handed drill bit.
     
  3. May 11, 2023 at 5:45 PM
    #3
    shifty`

    shifty` I'm having daydreams about night things

    Joined:
    Jun 20, 2020
    Member:
    #48239
    Messages:
    28,456
    ATL
    Vehicle:
    '06 AC Limited V8/4WD
    (see signature for truck info)
    This is what I'd probably try doing too ...

    Although I'd also be tempted to tap a wide flathead in there too, just 1/16" or so, and see if I could spin it out. That thing is toast!
     
  4. May 11, 2023 at 5:47 PM
    #4
    Aerindel

    Aerindel New Member

    Joined:
    Jan 31, 2019
    Member:
    #25399
    Messages:
    1,657
    Gender:
    Male
    Montana
    Vehicle:
    2000 Tundra AC, SR5, 4.7 V8 4WD, 325,00ish miles.
    This is also what I would try next.
     
    shifty`[QUOTED] likes this.
  5. May 11, 2023 at 5:57 PM
    #5
    jerrycrabb

    jerrycrabb [OP] How hard could it be?

    Joined:
    Dec 10, 2019
    Member:
    #39757
    Messages:
    14
    Gender:
    Male
    First Name:
    Jerry
    Pennsylvania
    Vehicle:
    2000; AC; 4WD; 4.7; Frame replaced 2012
    Thanks for the fast advice! I tapped a flathead in there (deeper than 1/16), it just turns chunks out.

    I'll try some reverse bits tomorrow. How worried should I be about going too deep, causing other damage?
     
  6. May 11, 2023 at 5:58 PM
    #6
    jerryallday

    jerryallday New Member

    Joined:
    Jan 4, 2021
    Member:
    #57084
    Messages:
    1,027
    Gender:
    Male
    First Name:
    Jerry
    Pasadena, Ca
    Vehicle:
    2006 DC SR5 V8 Grey
    6112 lift, Camburg UCA, 17 methods on 33inch Ko2 tires
    can you use a magnet?
     
  7. May 11, 2023 at 6:12 PM
    #7
    Jack McCarthy

    Jack McCarthy Working remotely from the local pub

    Joined:
    Nov 2, 2020
    Member:
    #54409
    Messages:
    10,269
    Gender:
    Male
    First Name:
    Bill
    North of Boston
    Vehicle:
    02 Tundra AC SR5 V8 4x4
    Be aware I'm also assuming this sensor partially unscrews by twisting it counterclockwise when using a left handed drill bit.

    If ours are the type that just pops out, it might be a better idea to do what others I read about have done and that's drilling a hole, using a large self-tapping concrete/masonary screw and yanking it out with pliers.

    Looks like 1A auto made such a video and did that same thing but used something like a slide hammer to pull it out.

    https://youtu.be/J7CMe-Hpf-Q
     
    Last edited: May 11, 2023
  8. May 11, 2023 at 7:15 PM
    #8
    jerrycrabb

    jerrycrabb [OP] How hard could it be?

    Joined:
    Dec 10, 2019
    Member:
    #39757
    Messages:
    14
    Gender:
    Male
    First Name:
    Jerry
    Pennsylvania
    Vehicle:
    2000; AC; 4WD; 4.7; Frame replaced 2012
    Great video! He's got me thinking about hitting it with torch for a while before I attack it again.
     
    Jack McCarthy[QUOTED] likes this.
  9. May 11, 2023 at 9:55 PM
    #9
    SnowB0und

    SnowB0und New Member

    Joined:
    Dec 8, 2019
    Member:
    #39683
    Messages:
    101
    Vehicle:
    2013 SR5
    I’m pretty sure that style just pulls out no turning. Look up the part on rock auto and make sure it doesn’t have threads. If it doesn’t I think I’d screw into it like the advice above.

    That style sensor usually has a o ring that gets stuck with age. You’re probably fighting that.
     
    Jack McCarthy likes this.
  10. May 11, 2023 at 11:06 PM
    #10
    jerryallday

    jerryallday New Member

    Joined:
    Jan 4, 2021
    Member:
    #57084
    Messages:
    1,027
    Gender:
    Male
    First Name:
    Jerry
    Pasadena, Ca
    Vehicle:
    2006 DC SR5 V8 Grey
    6112 lift, Camburg UCA, 17 methods on 33inch Ko2 tires
    I replaced mine last week, it just slides out. No threads. Just one bolt holding it in. Just like the ignition coil packs.
    [​IMG]
     
  11. May 12, 2023 at 5:07 AM
    #11
    Jack McCarthy

    Jack McCarthy Working remotely from the local pub

    Joined:
    Nov 2, 2020
    Member:
    #54409
    Messages:
    10,269
    Gender:
    Male
    First Name:
    Bill
    North of Boston
    Vehicle:
    02 Tundra AC SR5 V8 4x4
    Let us know how you make out and if you can post the carnage. I’m sure I’ll be facing the same scenario when I eventually need to replace mine.
     
  12. May 12, 2023 at 5:46 AM
    #12
    shifty`

    shifty` I'm having daydreams about night things

    Joined:
    Jun 20, 2020
    Member:
    #48239
    Messages:
    28,456
    ATL
    Vehicle:
    '06 AC Limited V8/4WD
    (see signature for truck info)
    Point of screwing is to ensure it's free in the boss. Then reverse-thread to pull up and out, or sink a fastener as another mentioned.
     
  13. May 12, 2023 at 6:37 AM
    #13
    jerrycrabb

    jerrycrabb [OP] How hard could it be?

    Joined:
    Dec 10, 2019
    Member:
    #39757
    Messages:
    14
    Gender:
    Male
    First Name:
    Jerry
    Pennsylvania
    Vehicle:
    2000; AC; 4WD; 4.7; Frame replaced 2012
  14. May 12, 2023 at 7:12 AM
    #14
    Jack McCarthy

    Jack McCarthy Working remotely from the local pub

    Joined:
    Nov 2, 2020
    Member:
    #54409
    Messages:
    10,269
    Gender:
    Male
    First Name:
    Bill
    North of Boston
    Vehicle:
    02 Tundra AC SR5 V8 4x4
    Is the metal lining show in @jerryallday's pic still stuck in there? Looks like most of it is out.
     
  15. May 12, 2023 at 7:46 AM
    #15
    jerryallday

    jerryallday New Member

    Joined:
    Jan 4, 2021
    Member:
    #57084
    Messages:
    1,027
    Gender:
    Male
    First Name:
    Jerry
    Pasadena, Ca
    Vehicle:
    2006 DC SR5 V8 Grey
    6112 lift, Camburg UCA, 17 methods on 33inch Ko2 tires
  16. May 12, 2023 at 8:02 AM
    #16
    jerrycrabb

    jerrycrabb [OP] How hard could it be?

    Joined:
    Dec 10, 2019
    Member:
    #39757
    Messages:
    14
    Gender:
    Male
    First Name:
    Jerry
    Pennsylvania
    Vehicle:
    2000; AC; 4WD; 4.7; Frame replaced 2012
    Whew. Truck is running. Will post details in a bit .
     
    Jack McCarthy likes this.
  17. May 12, 2023 at 8:02 AM
    #17
    shifty`

    shifty` I'm having daydreams about night things

    Joined:
    Jun 20, 2020
    Member:
    #48239
    Messages:
    28,456
    ATL
    Vehicle:
    '06 AC Limited V8/4WD
    (see signature for truck info)
    Uh oh. Where'd the tip of the fastener go?
     
  18. May 12, 2023 at 10:02 AM
    #18
    jerrycrabb

    jerrycrabb [OP] How hard could it be?

    Joined:
    Dec 10, 2019
    Member:
    #39757
    Messages:
    14
    Gender:
    Male
    First Name:
    Jerry
    Pennsylvania
    Vehicle:
    2000; AC; 4WD; 4.7; Frame replaced 2012
    This is so much funnier now, than it was two hours ago
     
  19. May 12, 2023 at 10:10 AM
    #19
    JasonC.

    JasonC. ¯\_(ツ)_/¯

    Joined:
    Jan 23, 2023
    Member:
    #90779
    Messages:
    1,116
    TX
    Vehicle:
    2001 4x4 4.7L “Best Cab”/AC Limited 50k mi
    This thread would be perfect with one more Jerry.
     
    jerrycrabb[OP] likes this.
  20. May 12, 2023 at 10:12 AM
    #20
    KNABORES

    KNABORES Sarcasm incoming

    Joined:
    Jan 1, 2020
    Member:
    #40572
    Messages:
    13,789
    Gender:
    Male
    Arkansas
    Vehicle:
    2000 Limited TRD AC 4X4 Thunder Grey 278k miles. *SOLD* 2019 Limited TRD CM 4x4
    Bilstein 5100's on the forbidden notch Husky HD rear leafs 16x8 Eagle Alloy 187's with 285/75/16 MagnaFlow 3" flow through Pioneer touchscreen with backup camera Full interior and dash LED conversion Trailer brake controller with 7 pin Bedliner coat bumpers & trim ARE Mpulse topper - Rhino Vortex rack
  21. May 12, 2023 at 10:13 AM
    #21
    jerrycrabb

    jerrycrabb [OP] How hard could it be?

    Joined:
    Dec 10, 2019
    Member:
    #39757
    Messages:
    14
    Gender:
    Male
    First Name:
    Jerry
    Pennsylvania
    Vehicle:
    2000; AC; 4WD; 4.7; Frame replaced 2012
    Okay. All buttoned up, test drove, runs great!

    I did not mean to run the screw that deep.

    I tried to make a puller using a large socket and a series of washers PXL_20230512_160838363.jpg. I did not notice that the screw had slipped the washer. It felt like it was pulling out, when it was actually just going deeper.

    Ironically I had clipped the screw because it was too long.

    With the screw in the sensor, it still wouldn't pry out. I used a small flat head and a hammer to chisel away at the plastic. It eventually came loose enough to pull out.

    Fortunately, there's a bit of room for error in there. I think the fact that the screw went through at an angle (unintentionally) saved me.
    PXL_20230512_134951608.jpg

    There's not a lot of room to work, but a long extension will allow you to run a drill bit and a a torx just past the oil filter.
    PXL_20230512_160930160.jpg

    The new sensor wouldn't fit until I sanded the corrosion in the fitting. A 1/2 dowel and some 220 grit worked well. I wrapped the end of the dowel with sandpaper ran it with a drill (also routed past the oil filter).

    Cleaned it all out with some brake cleaner on a rag, buttoned it up and it's good to go!
     
  22. May 12, 2023 at 11:06 AM
    #22
    jerrycrabb

    jerrycrabb [OP] How hard could it be?

    Joined:
    Dec 10, 2019
    Member:
    #39757
    Messages:
    14
    Gender:
    Male
    First Name:
    Jerry
    Pennsylvania
    Vehicle:
    2000; AC; 4WD; 4.7; Frame replaced 2012
    Just had a thought. I bet a little Dremel sanding wheel rigged on an extension would also work for cleaning out the fitting (instead of the dowel).
     
    Tacopashka and KNABORES like this.
  23. May 12, 2023 at 11:38 AM
    #23
    Jack McCarthy

    Jack McCarthy Working remotely from the local pub

    Joined:
    Nov 2, 2020
    Member:
    #54409
    Messages:
    10,269
    Gender:
    Male
    First Name:
    Bill
    North of Boston
    Vehicle:
    02 Tundra AC SR5 V8 4x4
     
  24. May 12, 2023 at 11:58 AM
    #24
    Mr Badwrench

    Mr Badwrench New Member

    Joined:
    Jul 20, 2018
    Member:
    #17205
    Messages:
    1,400
    Gender:
    Male
    300 hectares on single tank of kerosene
    I just replaced my timing belt. I worked around that sensor like it was a loaded mouse trap. Damn thing is too delicate.

    Do you have to calibrate anything when you replace those?
     
  25. May 12, 2023 at 12:42 PM
    #25
    jerrycrabb

    jerrycrabb [OP] How hard could it be?

    Joined:
    Dec 10, 2019
    Member:
    #39757
    Messages:
    14
    Gender:
    Male
    First Name:
    Jerry
    Pennsylvania
    Vehicle:
    2000; AC; 4WD; 4.7; Frame replaced 2012
    I sure hope not o_O
     
    Mr Badwrench[QUOTED] likes this.
  26. May 12, 2023 at 1:30 PM
    #26
    jerryallday

    jerryallday New Member

    Joined:
    Jan 4, 2021
    Member:
    #57084
    Messages:
    1,027
    Gender:
    Male
    First Name:
    Jerry
    Pasadena, Ca
    Vehicle:
    2006 DC SR5 V8 Grey
    6112 lift, Camburg UCA, 17 methods on 33inch Ko2 tires
    I didnt hahahahaha
     
  27. May 12, 2023 at 1:42 PM
    #27
    Mr Badwrench

    Mr Badwrench New Member

    Joined:
    Jul 20, 2018
    Member:
    #17205
    Messages:
    1,400
    Gender:
    Male
    300 hectares on single tank of kerosene
    I had to calibrate a throttle position sensor, was wondering if the crank sensor was the same. I looked it up, there is no calibration required on the crank sensor. I was just curious :monocle:
     
  28. May 12, 2023 at 2:34 PM
    #28
    shifty`

    shifty` I'm having daydreams about night things

    Joined:
    Jun 20, 2020
    Member:
    #48239
    Messages:
    28,456
    ATL
    Vehicle:
    '06 AC Limited V8/4WD
    (see signature for truck info)
    That's quite a rig, jerry! :rofl:

    Glad to see you got it out.
     
    FrenchToasty likes this.
  29. May 16, 2023 at 1:16 PM
    #29
    jerrycrabb

    jerrycrabb [OP] How hard could it be?

    Joined:
    Dec 10, 2019
    Member:
    #39757
    Messages:
    14
    Gender:
    Male
    First Name:
    Jerry
    Pennsylvania
    Vehicle:
    2000; AC; 4WD; 4.7; Frame replaced 2012
    Just had another thought. Before this repair I was having intermittent issues with the speedometer/odometer. Sometimes they just wouldn't work at all. Tachometer was fine.

    It's working now. Wondering what the odds are that it's related to the faulty crankshaft position sensor.

    Similarly, the battery seems to drain pretty quickly while the truck is sitting (I don't drive it everyday). It's too early to tell if that also resolved, but I'm also wondering if an inability to determine appropriate position was... I dunno, screwing w/ something that caused the battery to drain.
     

Products Discussed in

To Top