

-
Welcome to Tundras.com!
You are currently viewing as a guest! To get full-access, you need to register for a FREE account.
As a registered member, you’ll be able to:- Participate in all Tundra discussion topics
- Transfer over your build thread from a different forum to this one
- Communicate privately with other Tundra owners from around the world
- Post your own photos in our Members Gallery
- Access all special features of the site
 Leaking trans and engine oil pan 02 4.7
 Radiator replace
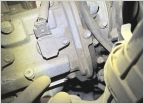 First steps for my new-to-me 05 Tundra
 How does the frame look on this 2006?
 Grease your drive shaft you lazy sods.
 Fridge/freezer setup for overlanding
What have you done to your 1st gen Tundra today?
Discussion in '1st Gen Tundras (2000-2006)' started by T-Rex266, Sep 7, 2015.
Page 881 of 2442
Page 881 of 2442
Products Discussed in


