

-
Welcome to Tundras.com!
You are currently viewing as a guest! To get full-access, you need to register for a FREE account.
As a registered member, you’ll be able to:- Participate in all Tundra discussion topics
- Transfer over your build thread from a different forum to this one
- Communicate privately with other Tundra owners from around the world
- Post your own photos in our Members Gallery
- Access all special features of the site
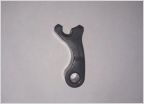 Fixing Access Cab rear side window latches
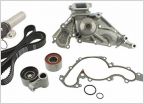 Changing timing belt on 2005 V-8, what else would you replace?
 Normal brakes are possible!
 1st Gen 4WD Issues Diagnosis/Prevention Guide
 How-to: Driver's door lock assembly replacement
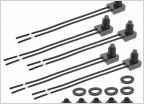 Alarm "chirp" volume adjustment
2006 Tundra PCV valve removal - got stuck??? pb blaster? any other suggestions?
Discussion in '1st Gen Tundras (2000-2006)' started by T18, Mar 9, 2020.


