1. Welcome to Tundras.com!

    You are currently viewing as a guest! To get full-access, you need to register for a FREE account.

    As a registered member, you’ll be able to:
    • Participate in all Tundra discussion topics
    • Transfer over your build thread from a different forum to this one
    • Communicate privately with other Tundra owners from around the world
    • Post your own photos in our Members Gallery
    • Access all special features of the site

Power Distribution, Firewall Pass throughs and no torn boots!

Discussion in '2.5 Gen Tundras (2014-2021)' started by Overland_Mike, Jan 13, 2018.

  1. Jan 13, 2018 at 6:50 PM
    #1
    Overland_Mike

    Overland_Mike [OP] New Member

    Joined:
    Dec 2, 2017
    Member:
    #11306
    Messages:
    28
    Gender:
    Male
    Vehicle:
    2001 Tundra, Gen2 build plan in progress
    Trying keep up with the other cool overland tundras, I started on my build. First up is getting the power sorted. I plan on tackling the dual underhood batteries next as I think I can cram a pair of dual group 35's under there.

    Anyhow, I'm not done on the power side but thought you guys might appreciate the approach.

    Goals:
    Interior Power distribution so that I don't have to run everything directly to the batteries.
    Underhood power for all the external thingies (Lights etc).
    Keep it clean so it's easy to trouble shoot.

    Todo: Finish installing my Alpine stereo with the KAC-001 module so I can have 8 switched outputs. Think SPOD without having to figure out where to mount all the switches. The outputs show up on the Alpine Headunit. I think it will be cleaner, and its that much less stuff I need to drill holes for. (should have been this weekend but thanks for nothing UPS)

    https://www.crutchfield.com/S-UpsMnioe7YX/p_500KAC001/Alpine-KAC-001-Truck-Accessory-Controller.html

    Pics!

    This is under the passenger footwell - I cut the foam and put in a 12x9x2.3inch box.
    https://smile.amazon.com/gp/product/B07177RF8T/ref=oh_aui_detailpage_o05_s00?ie=UTF8&psc=1


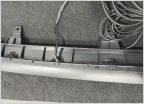
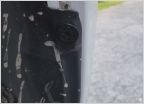
    I HATE butchering the OEM boots because they do a good job keeping all the crap out, so I instead butched the truck and drilled 3 giant holes. After I took these pics I did paint the exposed steel.


    I used proper water resistant bulkhead fittings.

    https://smile.amazon.com/gp/product/B01GJ03AUQ/ref=oh_aui_detailpage_o08_s00?ie=UTF8&psc=1


    I then ran 4 gauge power and ground to the inside box and end up with the ground going to a factory ground spot that is just under the air cleaner box. Btw, I ran 2 PG11 fittings for the 4 gauge and then a PG9 for the relay control wires that will head out to the underhood panel.


    Here is the blue seas 12 circuit with negative distro.
    https://smile.amazon.com/gp/product/B001P6FTHC/ref=oh_aui_detailpage_o04_s01?ie=UTF8&psc=1


    Don't mind the loom, the right size stuff is on the way. I drilled two holes on the drivers side inner fenderwell and used nutserts to mount my plate. That ground will be relocated to the ground point just under that spot.


    Here is where my battery isolator and the underhood power distro is going.


    Then I have another plate that is where my winch box will go. Or maybe relays' or whatever I want.
    That front plate has a tab that mounts to a nutsert in the core support.


    Here it is with the underhood blue seas stuff.


    Wondering if I should move this to builds....More Gin and Tonic required.

    -Mike
     
    Last edited: Jan 13, 2018
  2. Jan 13, 2018 at 7:04 PM
    #2
    Black Wolf

    Black Wolf Bigfoot Hunter, Sasquatch too, but not Yeti

    Joined:
    Apr 20, 2014
    Member:
    #378
    Messages:
    41,371
    Gender:
    Male
    First Name:
    Matt
    Aurora CO
    Vehicle:
    2022 Nissan Frontier SV 4X4
    TuwaPro rack, Z1 Offroad stuff, NISMO suspension stuff, FlowmasterFX Extreme exhaust, AIS, OVS, J&L can, other goodies on the way
    Well I'm certainly impressed Mike!!! The moderators may do something I'm thinking after he/they see. this...:thumbsup::thumbsup::thumbsup:
     
    Overland_Mike[OP] likes this.
  3. Jan 13, 2018 at 7:06 PM
    #3
    Overland_Mike

    Overland_Mike [OP] New Member

    Joined:
    Dec 2, 2017
    Member:
    #11306
    Messages:
    28
    Gender:
    Male
    Vehicle:
    2001 Tundra, Gen2 build plan in progress
    Thank you! I hope it's useful. I need to hit ikea tomorrow and buy some cheap cutting boards so I can line the underside of the plates to make sure that there is no way the batteries can ever arc on them. Hopefully, I'll have this all buttoned up this weekend.

    Oh I forgot to add that the holes are there so I can use zipties to groom everything.
     
    Black Wolf likes this.
  4. Jan 13, 2018 at 7:10 PM
    #4
    JMB

    JMB Not new, just a little old.

    Joined:
    Jan 20, 2014
    Member:
    #156
    Messages:
    6,942
    Gender:
    Male
    First Name:
    John
    Chesapeake, VA
    Vehicle:
    2013 Super White Tundra DC
    5100s all around, 295-70-18 Defenders, 1.25 Spidertrax spacers, BD reverse lights, de-badged, interior LEDs, footwell LEDs, reverse LEDs, ARE cap, front receiver hitch for cooler holder, cooler holder/rod rack, backup camera, Kenwood HU, Westin nerf bars, Husky floor liners, folding rear seats, remote battery posts, plastidip grill chrome, Powder coat bumpers.
    Nice, those boots are a PITA to get to. Doing your own fab work? Either way, great layout and planning.
     
    Overland_Mike[OP] likes this.
  5. Jan 13, 2018 at 7:12 PM
    #5
    Overland_Mike

    Overland_Mike [OP] New Member

    Joined:
    Dec 2, 2017
    Member:
    #11306
    Messages:
    28
    Gender:
    Male
    Vehicle:
    2001 Tundra, Gen2 build plan in progress
    Thanks! I have a friend who is a sheetmetal guy so it's easier for him to trim and cut the stainless.
     
  6. Jan 13, 2018 at 8:25 PM
    #6
    71_340

    71_340 The German

    Joined:
    Oct 22, 2017
    Member:
    #10443
    Messages:
    1,105
    Gender:
    Male
    First Name:
    Hans
    FLW, MO
    Nice and clean work, especially the two trays in the engine compartment.
     
    Overland_Mike[OP] likes this.
  7. Jan 13, 2018 at 8:38 PM
    #7
    Eclipsed & Floating

    Eclipsed & Floating Over it.........

    Joined:
    Feb 20, 2017
    Member:
    #6454
    Messages:
    12,487
    Gender:
    Male
    I’m right where I need to be
    Vehicle:
    Voluptuous Whitey
    I'm very intrigued already! I'm watching for more great work
     
    Overland_Mike[OP] likes this.
  8. Jan 13, 2018 at 8:43 PM
    #8
    Eclipsed & Floating

    Eclipsed & Floating Over it.........

    Joined:
    Feb 20, 2017
    Member:
    #6454
    Messages:
    12,487
    Gender:
    Male
    I’m right where I need to be
    Vehicle:
    Voluptuous Whitey
    Can I assume your dual battery setup will be located under this front plate??

    [​IMG]
     
  9. Jan 13, 2018 at 8:47 PM
    #9
    Overland_Mike

    Overland_Mike [OP] New Member

    Joined:
    Dec 2, 2017
    Member:
    #11306
    Messages:
    28
    Gender:
    Male
    Vehicle:
    2001 Tundra, Gen2 build plan in progress

    Yes that is the plan, with the batteries turned sideways. I mocked it up with some batteries I had from my old truck but I need to work on the bumps and waves in the corners of the battery tray to see if I can get a bit more room.
     
  10. Jan 13, 2018 at 8:55 PM
    #10
    Eclipsed & Floating

    Eclipsed & Floating Over it.........

    Joined:
    Feb 20, 2017
    Member:
    #6454
    Messages:
    12,487
    Gender:
    Male
    I’m right where I need to be
    Vehicle:
    Voluptuous Whitey
    I'm no battery expert so the next question might seem a little ridiculous; but would a battery on it's side create any issues if the fluids weren't positioned properly? Like i said, probably a dumb question.

    Also, how will your dual setup tie to your alternator? I'm assuming independently, as to charge both batteries separately.
     
  11. Jan 13, 2018 at 8:58 PM
    #11
    Overland_Mike

    Overland_Mike [OP] New Member

    Joined:
    Dec 2, 2017
    Member:
    #11306
    Messages:
    28
    Gender:
    Male
    Vehicle:
    2001 Tundra, Gen2 build plan in progress
    Oh,I meant that I will be turning them sideways so that the Pos and Neg terminals will face back to front in the engine bay instead of fender to fender. But you actually can mount AGM batteries on their actual side. Lots of the hotrod guys to that.

    I am using a Blue Seas MCR to charge and isolate the batteries. - http://assets.bluesea.com/files/resources/wiring_diagram/ML-ACRs.jpg
     
  12. Jan 13, 2018 at 9:00 PM
    #12
    71_340

    71_340 The German

    Joined:
    Oct 22, 2017
    Member:
    #10443
    Messages:
    1,105
    Gender:
    Male
    First Name:
    Hans
    FLW, MO
    You can mount a AGM (i.e. Optima) battery sideways without any problem.
     
    Eclipsed & Floating likes this.
  13. Jan 13, 2018 at 9:03 PM
    #13
    Eclipsed & Floating

    Eclipsed & Floating Over it.........

    Joined:
    Feb 20, 2017
    Member:
    #6454
    Messages:
    12,487
    Gender:
    Male
    I’m right where I need to be
    Vehicle:
    Voluptuous Whitey
    OK...that makes sense. I'm getting the picture now. Thanks for the info
     
  14. Jan 13, 2018 at 9:05 PM
    #14
    Cuzican

    Cuzican New Member

    Joined:
    Jul 14, 2017
    Member:
    #8556
    Messages:
    692
    Gender:
    Male
    First Name:
    Chris
    Louisiana
    Vehicle:
    2017 Black Platinum Crewmax Tundra
    8" Lift, 22x10 Fuel Forged FF19, 37x13.50r22 Trail Grapplers, Amp Research steps, Spyder black smoked headlights with 35w HID's, all interior lights LED, Undercover tonneau.
    Ok, just one question, do you have to unbolt all of this just to get to the factory fuse box?
     
  15. Jan 13, 2018 at 9:10 PM
    #15
    Overland_Mike

    Overland_Mike [OP] New Member

    Joined:
    Dec 2, 2017
    Member:
    #11306
    Messages:
    28
    Gender:
    Male
    Vehicle:
    2001 Tundra, Gen2 build plan in progress
    Yes, as that's the only drawback. Couple of thoughts here. Since I will have nothing added to the factory power system other than the aftermarket head unit, I can't imagine having to access the fusebox much. This is why I did a pair of seperate fuse panels that will connect to the isolated second battery. I had 178k miles on my old tundra and never blew a fuse.

    Also, all this only takes about 5 minutes to take apart, and that's why the panel is two pieces, I can just undo 5 screws total and flip panels out of the way to get to it. Since I am planning on being out in BFE I will carry tools and fuses with me, but I hope to never need them.
     
  16. Jan 18, 2018 at 7:08 AM
    #16
    smslavin

    smslavin New Member

    Joined:
    Jul 15, 2017
    Member:
    #8578
    Messages:
    7,208
    Gender:
    Male
    First Name:
    Sean
    Hudson Valley
    Vehicle:
    2016 Tundra CrewMax SR5
    Some stuff
    nice job. the bulkhead fittings are a great idea. i probably should have done that but i've only got a couple of things left to run through the firewall.
     

Products Discussed in

To Top