1. Welcome to Tundras.com!

    You are currently viewing as a guest! To get full-access, you need to register for a FREE account.

    As a registered member, you’ll be able to:
    • Participate in all Tundra discussion topics
    • Transfer over your build thread from a different forum to this one
    • Communicate privately with other Tundra owners from around the world
    • Post your own photos in our Members Gallery
    • Access all special features of the site

Another one of those don't be like me tales.

Discussion in 'Lighting' started by triharder, Sep 22, 2018.

  1. Sep 22, 2018 at 6:22 PM
    #1
    triharder

    triharder [OP] Sorry, Not Sorry

    Joined:
    Sep 19, 2017
    Member:
    #9745
    Messages:
    218
    Gender:
    Male
    First Name:
    Jake
    Southern, Maine
    Vehicle:
    2010 RWB Black
    Billstein 6112/5160's, coachbuilder spacer on driver side/ 20" rockstar wheels/ 33" nitto ridge grappers/SS Brake lines (or as most people write Break), Painted Calipers/Powercoated Tow hooks/pocket flairs/heated seats,bed leds/line-x liner/xtang trifold/tow mirrors/Stereo Work/Compustar Remote Starter/ retrofit Morimoto Minin H1 and switch back LEDs/ plenty I'm forgetting
    So i decided i needed to retrofit my stock headlights.

    I.m not one to shy away from elbow grease and the tricksters (actually well written and thought how-toos on this forum) made it look simple.

    Well grab a snack and lets get down to some serious how-not-to retrofit stories.

    Let me just say the retrofitsource.com has been wonderful and helpful.

    If you don.t read any of this at least remember this:
    1st lesson. Ask for help before starting.

    Okay so i bought the 2010 tundra kit from retrofitsource.com, check website for specifics. It is plug and play. .morimoto 35w bi xenon.
    I also bought Amazon prime headlights to use while retro my daily driver.

    Instead of asking for clarification i decided (incorrectly) to skip step one of the directions.

    Step one
    Using existing headlights, wall or garage, mark halogen bulb current set up. ****critical first step.
    (I researched and determined hid projectors don.t match halogen so this step doesn.t matter as i.ll be adjusting at completion)
    Wrong,wrong, wrong (mostly)

    This step has more to do with setting the projector height and direction more than final adjustment.
    • **i learned this as my adjustment was maxed out one my driver side light and lights were still way to low after they were sealed on my first atttempt

    Leads into my next problem, i failed to notice the ignitor hitting my inner fender as i lazily didn.t bother installing all three bolts. This is well documented on gen 2s (none issue gen 3 i believe).
    (If you haven.t read how to, you seperate clear from housing, seperate reflector bowl from housing, install projector losely, install reflector into housing, adjust on truck, tighten the expoxy, then reseal)

    I Used the threaded tube method to install projector. (This is easiest method but i would use threaded bolts in future.
    Number of reasons for this.
    the threaded tube has to support a long somewhat bulkie projector and it will bounce/vibrate when installed without proper support.
    ***as i did the threaded tube twice i dremeled a lot of the bowl housing and lost a lot of structual integrity.

    (I also strongly recommend a flat sanding surface for installing tubes as my dremel sanding also caused some alignment issues.)

    After talking with a friend i incorrectly determined that rotation of projector wasn.t critical. (Wrong again). Hid have cut offs, abrupt cut offs, screw up this step and you essentially have to start over but with dremeling epoxy and re templating.

    So in conclusion ask before you begin, questioning each step is fine, but ask before skipping or altering up front.

    Double check they are horizontal befor epoxying as you can.t fix one epoxied and sealed.

    Ensure your bulb holder threads tightly on threaded tube after installing lock nut before epoxying as mine hits the nut before it is completely tight.

    I'll post some pictures if anybody wants to see bad, incorreect techniques.

    Finally, mine are installed (2 times splitting housing).
    Wish i hadn.t skipped step one.
    I can.t fully tighten my driver side bulb, its a 1/4 from being tight.

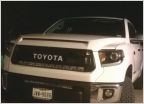
    And both my lights list to the right, if you have to cheat always list to the left as the right makes your cut off too high.20180922_195101.jpg
    Final position 2nd attempt rotated slightly to right
    20180922_194835.jpg
    Slight turning of bulbbs which means they aren.t 100% tight
    20180922_195101.jpg
    .
    20180922_195101.jpg

    20180921_223637.jpg
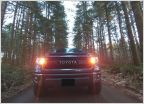
    Shrouds lit up
    20180921_223643.jpg
    Light turned on

    20180917_200025.jpg
    1st attempt, too low at 25 feet as they were maxed out on adjustment and both rotated slightly inward.
     
    Last edited: Sep 22, 2018
    NewImprovedRon and Pudge like this.
  2. Sep 22, 2018 at 6:37 PM
    #2
    triharder

    triharder [OP] Sorry, Not Sorry

    Joined:
    Sep 19, 2017
    Member:
    #9745
    Messages:
    218
    Gender:
    Male
    First Name:
    Jake
    Southern, Maine
    Vehicle:
    2010 RWB Black
    Billstein 6112/5160's, coachbuilder spacer on driver side/ 20" rockstar wheels/ 33" nitto ridge grappers/SS Brake lines (or as most people write Break), Painted Calipers/Powercoated Tow hooks/pocket flairs/heated seats,bed leds/line-x liner/xtang trifold/tow mirrors/Stereo Work/Compustar Remote Starter/ retrofit Morimoto Minin H1 and switch back LEDs/ plenty I'm forgetting
    Note on Amazon cheap headlights, they look good but there is no way to adjust them, screws appear to be just for looks.

    The kit didn.t include wire braid, would look cleaner if you could sleeve/braid high beam solenoid wires as the look kinda out of place.

    Drill hole in housing for solenoid and leds/rings as if you try to use the existing bulb reflector hole your bulb gaskers will no longer work correctly.

    Oh and never touch refector chrome if you want to keep it, look at it funny and it will fall/rubb off).

    (Lastly my wife and friends are sick of hearing about this so make sure you do it correctly first time and verify any questionables you come up with from experts not just friends).
     
    Last edited: Sep 22, 2018
    mtntop likes this.
  3. Sep 23, 2018 at 11:26 AM
    #3
    bobeast

    bobeast really old member

    Joined:
    Feb 11, 2015
    Member:
    #960
    Messages:
    1,513
    Gender:
    Male
    First Name:
    Bob
    Hollister, CA
    Vehicle:
    2008 DC
    - Bull Bar - LED Bunny Burners - AMP retractable running boards - Headlight leveling retrofit - P3 Brake Controller - 60% rear seat delete - relocation of Sub to rear wall - Bilstein 5100 x4, top setting with 2 shims per side - Coach builder +2 rear shackles w/carrier bearing drop - Firestone Air bags - on-board compressor with auto-leveling - Dual Undercover Swing Boxes. - P285/65/R20 (34.6") BFG TA KO2's - TRD Front skid plate - Pop & Lock Tailgate lock - Remote Tailgate mod - LED Headlights - Nav Bypass - iPhone integration - Serius/XM retrofit - 25% front tint - Bizon electric tonneau cover - Power folding tow mirror upgrade - 2010+ leveling Headlight mod - Auto-fold mirror mod. - one-touch lane changer mod - Flash to open garage opener mod - Rigid H/L fog light upgrade - Pushbutton / Remote start mod.
    Lessons I learned when I tried it. DON'T try and do it myself. DO purchase a retrofit from a pro.
     
  4. Sep 23, 2018 at 11:46 AM
    #4
    Darkness

    Darkness Allergic to white

    Joined:
    Jul 23, 2018
    Member:
    #17315
    Messages:
    9,976
    Gender:
    Male
    First Name:
    Luis
    All over SoCal
    Vehicle:
    The darkest
    It's really dark
    It isn't that bad of a job, and once you have the adjustment settled you'll be about the only one to notice if the rotation is a bit off. Even then you'll only see it when you drive straight at a wall.

    Good messages for any looking to tackle this, but really you learned in the process. Good job.
     
  5. Sep 24, 2018 at 2:09 PM
    #5
    Mattlikesbikes

    Mattlikesbikes New Member

    Joined:
    Sep 11, 2018
    Member:
    #19267
    Messages:
    15
    Gender:
    Male
    First Name:
    Matt
    All good notes, but also just here to say it isn't too tough of a job.

    I will say, despite cleaning the clear lenses twice before reseal I have smudges on the inside, so one day I will have to re heat and sort those out. Until then the lights look awesome and work so much better than stock.
     

Products Discussed in

To Top