1. Welcome to Tundras.com!

    You are currently viewing as a guest! To get full-access, you need to register for a FREE account.

    As a registered member, you’ll be able to:
    • Participate in all Tundra discussion topics
    • Transfer over your build thread from a different forum to this one
    • Communicate privately with other Tundra owners from around the world
    • Post your own photos in our Members Gallery
    • Access all special features of the site

Tips and Tricks for Upgrading a Base Model RCSB

Discussion in '2nd Gen Builds (2007-2013)' started by Blacklist Builds, Sep 4, 2025 at 9:25 PM.

  1. Sep 4, 2025 at 9:25 PM
    #1
    Blacklist Builds

    Blacklist Builds [OP] New Member

    Joined:
    Jul 3, 2025
    Member:
    #137411
    Messages:
    3
    Hey everyone,

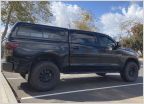
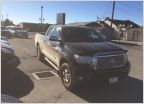
    I've been upgrading my base 2012 4x4 RCSB (with only 51k miles!) with SR5 parts from my 240k mi 2007 4.7 4x4 RCSB. Unfortunately, the previous owner of the SR5 was a masonry contractor and beat the body to hell. For my first post, I wanted to document some of my findings as I continue this build.

    To avoid confusion, I'll refer to the 2012 5.7 base model as 'Base' and the 2007 4.7 SR5 as 'SR5'.

    photo_2025-09-04_20-45-37.jpg
    photo_2025-09-05_00-05-55.jpg
    Current and Before

    Power Windows/Power Locks:

    I swapped out the door wiring harnesses, door cards, the window motor assemblies, power window/lock controls, and door lock actuators from the SR5. I found that the SR5 had an additional airbag impact sensor on each door, which I removed from the harnesses. Fortunately, the power windows were plug-and-play. The Base even had the appropriate fuse installed to run the power windows.

    photo_2025-09-04_20-42-35.jpg Screenshot 2025-09-04 205413.jpg photo_2025-09-04_22-20-27.jpg
    The additional impact sensor I didn't need for the Base

    The only two wires missing at the junction connector for each side are for the door/puddle lights--power and ground. The rest of the wiring is there for the windows/locks.

    The Base has the connector and harness ready for the door control receiver, located midway on the passenger-side pillar next to the rear window. The 2007 door control receiver had a different connector than the 2012 harness, so I had to cut and resolder. Similarly, the harness for the key buzzer was there, which is located on the driverside behind the bumper.

    After running Techstream, it seems like the wireless keys option is lacking on my Base BCM. The wireless key programming option was not in the Main Body utility tab, which only showed 'Initialize' and 'Customize'. For the SR5 it gives a fault code without the components installed.

    Now, I'll have to figure out how to program the BCM to recognize the wireless keys.

    Headliner/Trim/Sequoia Sun Visors

    For the headliner, I used Alcantara with a foam layer from Amazon, glued with 3M Super 77. After, I painted the trim with SEM 39143 Trim Black. The trim paint is satin and a bit glossier than the flat OEM trim color. I barely notice the difference, but I would go with a flat paint next time.

    In response to the "ugh, there's no mirrors" comments from my passengers, I swapped the sun visors with Sequoia ones with the second sun shade. They have built-in lights, but I had to cut out the connectors; they would not fit otherwise, and the tundra did not have a harness for them.

    Leather Seat Covers

    I purchased cardinal-colored leather seat covers with the seat heaters and gel pads from leatherseats.com. Tim from leatherseats.com walked me through the entire process and sent me a bunch of color samples; their customer service is excellent. The seat install wasn't too bad. There were a few (dozen) times I missed the rods in the foam with the hog rings, so I had to cut them out and redo them. I also had to cut up the long plastic clip of bottom cushion (at front of the seat) to match the OEM clip. For the upright seat cushion, make sure to reuse the metal rods from the original covers.

    The hardest part was covering the headrests. I had difficulty with the vinyl headrests, so I ended up using the cloth ones from the SR5 because they were easier to compress using the plastic bag and vacuum method.

    photo_2025-09-04_22-20-15.jpg

    Larger Overhead Console Upgrade

    Unfortunately, the regular cab does not have the mid-roof support that the larger overhead console mounts to in the rear. Therefore, I had to fabricate two standoffs using M4-0.7x10mm hardware and two "150lb" neodymium magnets. The total height of the standoff and the magnet is 1.5 in. The standoffs seem to be very solid and the extra lighting is great to have.

    photo_2025-09-04_20-45-17.jpg

    Clock/Temp Display

    The base Tundra has an info display that only showed the time, so I swapped that with the SR5 one with the additional temperature display. One trick to easily remove/install the display is to take out the radio and the mesh in front of the display. Then remove the two screws holding the display and maneuver the display towards the driver side, inside of the dash. There is a cavity where you can angle the display and remove it towards the opening where the radio would be. I circled the display in yellow in the following picture depicting the cavity.

    photo_2025-09-04_22-20-21.jpg

    Although, the Base has an ambient temperature sensor behind the grille, the temperature is not displaying with the SR5 info buttons. The harness to the info button stack has 8 wires, but it seems like there are a few more missing going to the gauge cluster than the SR5.

    Unfortunately, I think I fried the MOSFET behind the gauge cluster because the clock display turns off when turning on my headlights. I'm planning to remove the illumination wire from my android head unit, and upgrading to the Optitron gauge cluster.

    Exterior/Roof Rack/Lighting

    The bumpers are from eBay, and the front bumper holds the Badland Apex 12,000 lb winch perfectly. However, there's a gap between the bumper and the RCI skid plate that I have to fill. For the roof, I found that the Spider Mini Roof Rack fits perfectly. I also like the fact that I didn't have to drill into my roof to install it. The lights on my truck are Auxbeam, and I'm running their 6-gang switch panel.

    photo_2025-09-04_23-50-38.jpg

    Lastly, I'm running a Wilco offroad hitch mount tire carrier and STAPLL truck fender racks with their 48 x10 MOLLE panels. I'll grab some pictures soon.

    Next on the To-Do List

    (In no particular order)

    -Finish the power locks and the mpg/clock/temperature display.
    -Install auto headlights and auto climate control
    -Convert to floor shift. I have the parts ready to go and the center console lid is getting wrapped at leatherseats.com at the moment.
    -Install pop-up camper
    -Reinforce bed to frame
    -Install rock sliders

    I hope others find this thread useful. Thanks for reading!
     
    Last edited: Sep 5, 2025 at 5:03 PM
    This site contains affiliate links for which the site may be compensated.
    #1
    easleycrawler and kevil7 like this.
  2. Sep 5, 2025 at 2:19 PM
    #2
    Blacklist Builds

    Blacklist Builds [OP] New Member

    Joined:
    Jul 3, 2025
    Member:
    #137411
    Messages:
    3
    Power Locks Update: Seems like the wireless keys option is lacking on my Base BCM. I ran Techstream on the SR5 and it gives a fault code without the components installed.

    The only two wires missing at the junction connector for each side are for the door/puddle lights--power and ground. The rest of the wiring is there for the windows/locks.

    Now, I'll have to figure out how to program the BCM to recognize the wireless keys.

    20250905_185258.jpg 20250905_185125.jpg
     
    Last edited: Sep 5, 2025 at 4:51 PM
  3. Sep 5, 2025 at 3:01 PM
    #3
    easleycrawler

    easleycrawler TOYOTA ADDICT- SSEM #78

    Joined:
    Nov 12, 2016
    Member:
    #5176
    Messages:
    10,477
    Gender:
    Male
    First Name:
    Travis
    Easley, South Carolina
    Vehicle:
    2020 Limited DC 4X4 CEMENT
    Badass truck. Love the regular cab short beds. Nice job.
     
    This site contains affiliate links for which the site may be compensated.
    #3
  4. Sep 5, 2025 at 4:53 PM
    #4
    Blacklist Builds

    Blacklist Builds [OP] New Member

    Joined:
    Jul 3, 2025
    Member:
    #137411
    Messages:
    3
    Thanks! She's a great little truck.
     

Products Discussed in

To Top