1. Welcome to Tundras.com!

    You are currently viewing as a guest! To get full-access, you need to register for a FREE account.

    As a registered member, you’ll be able to:
    • Participate in all Tundra discussion topics
    • Transfer over your build thread from a different forum to this one
    • Communicate privately with other Tundra owners from around the world
    • Post your own photos in our Members Gallery
    • Access all special features of the site

Beat sonic and Blaupunft subwoofer install

Discussion in 'Audio & Video' started by Maverick345, May 21, 2025 at 12:52 PM.

  1. May 21, 2025 at 12:52 PM
    #1
    Maverick345

    Maverick345 [OP] New Member

    Joined:
    May 25, 2024
    Member:
    #117417
    Messages:
    10
    Gender:
    Male
    Vehicle:
    2024 SR5
    For something so inexpensive this setup sounds really nice. Figured I would do a write up of how I install them if someone else was planning to or on the fence about installing this or something similar.

    Beat-Sonic ENA-2T3 - Encore Alpha Power Amp Plug N Play Kit 2024+ used $150 (ebay)
    Beat-Sonic EAZ-C02 Power Seat Cable Harness for Active Subwoofer new $34 (ebay)
    GTHS131PRO 10-inch PRO Powered Underseat Subwoofer 350 Watts new $139 (Amazon)
    BNTECHGO 20 Gauge Silicone Wire Kit Each 30ft 20 AWG new $15.98 (amazon)
    TKDMR 446 Pcs Heat Shrink Tubing Kit - 4:1 Ratio new $11.98 (amazon)

    Install amp and harness
    My Beat-sonic amp came with the harness in the box. I assume if you buy direct or find one like I did it will come with the harness also. Lift the tray in the center of the dash. You dont need any special tools just lift from the front and it will pop up. The direction to install the harness come with the amp but it will only go in 1 way. This is really easy to install.
    Center dash tray.jpg Beat Sonic Back.jpg Beat Sonic Front.jpg

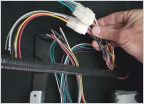
    This amp and others will come with an RCA side. This is a low frequency output. I did not use the RCA's. I used the high frequency side of the amp. This will require some spicing but its easy. On the harness side that plugs into the radio (black plug) you are gonna see 2 purple (1 solid and 1 with a black stripe) and 2 green wires (1 solid and 1 with a black stripe). These are the rear left and rear right speaker wires. Use 4 different colors wires (however you want to coordinate left from right and positive from negative). I also used a solid blue wire that connects to harness remote wire to run to the amp.

    I used 20G wire, its doesn't have to be any larger unless you just want to use larger.
    Red wire for right positive (solid Purple)
    Black wire for right negative (Purple w/black stripe)
    Green wire for left positive (solid Green)
    white wire for left negative (Green w/black stripe)
    *Give yourself about 14 feet to work with. You can always cut the excess.

    Look under the passenger side dash board and your going to see a panel with some push tabs toward the front. Push the tabs in and pull down gently. there are 4 tabs. This panel hold the small light that shines on the floor. Now go back up to area with the center tray any look to the left and there is a path that you can run the wires down to the floor area. Use a stiffer larger wire or coat hanger will make this easier. Once all 5 wires have been run to the floor secure them to the factory harness with some zip ties. If you haven't already you need to remove the plastic trim panel that runs along the bottom of the door and just under the passenger side foot well. Continue to run the wires following the factory harness along the bottom of the door.
    Under dash panel 1.jpgUnder dash panel 2.jpg


    Install the Power Seat Cable Harness (gets power to the amp)
    Look under the passenger side seat and you will see a White plug. Unplug it and plug the Seat Cable Harness into it. It will only connect 1 way. If you haven't, I would pull the fuse before continuing to run wires. Extend to yellow (hot/power) wire with a red wire. I used at least 16 gauge red wire I already had for this. Extend the black wire (ground) with a black wire. Again I used 16 gauge I already had.
    Power supply seat harness.jpgUnder seat harness power supply.jpg


    Remove the plastic trim that runs at the bottom of the back door on the passenger side. Its a little difficult but they will fit. Run the wires under the plastic trim the separates the front door and back door (B pillar). My Tundra has an under the seat storage box. On the passenger side you will see 3 little push tabs holding it in. Just push down in the center and then you can lift the tabs out. You dont need to remove the whole storage compartment just the one panel closest to the door. Continue to run the wires along the bottom of the door and just under the storage compartment.

    Front Passenger door wires.jpgRear Passenger door wires.jpg

    Tilt both back seats down and find a space you want to drill a small hole into the plastic and run you wires. I drilled a hole right behind the seat belt lock. I used a larger wire to fish the now 4 speaker wires, positive wire and ground wire, and remote wire to the amp. Mount your amp however you want and connect the wires as directed on the amp wiring diagram.

    Blaupunkt connected.jpg Blaupunkt.jpg
    Re-install all the plastics, plug in the fuse, and clean up any wires and you're all done.

     
    This site contains affiliate links for which the site may be compensated.
    #1
    Yaboy, MAC25Tundra and 1lowlife like this.
  2. May 21, 2025 at 1:06 PM
    #2
    1lowlife

    1lowlife Toxic prick and pavement princess..

    Joined:
    May 4, 2016
    Member:
    #3296
    Messages:
    10,799
    First Name:
    DADA
    THE GREAT STATE OF TEXAS
    Vehicle:
    2014 MGM DC SR5
    Nice write-up and a clean install...
    Any trouble setting the gains?
     
    Maverick345[OP] likes this.
  3. May 21, 2025 at 1:08 PM
    #3
    eddiefromcali

    eddiefromcali New Member

    Joined:
    Mar 14, 2022
    Member:
    #75818
    Messages:
    3,086
    Gender:
    Male
    First Name:
    Eddie
    Vehicle:
    2022 Tundra Platinum
    100% Stock
    Weird how it claims 350w but only has a 15A fuse. Thats not even possible. I would drop that harness fuse to a 15A as well...looks like it comes with a 20A
     
    sudobash likes this.
  4. May 21, 2025 at 1:21 PM
    #4
    Tundrum74

    Tundrum74 New Member

    Joined:
    Oct 17, 2022
    Member:
    #85036
    Messages:
    47
    Gender:
    Male
    San Diego
    Vehicle:
    2024 Tundra Limited TRD Offroad Ice Cap
    All stock
    Great write up! Thanks!
     
  5. May 21, 2025 at 1:26 PM
    #5
    Maverick345

    Maverick345 [OP] New Member

    Joined:
    May 25, 2024
    Member:
    #117417
    Messages:
    10
    Gender:
    Male
    Vehicle:
    2024 SR5
    1lowlife
    No problems, i just set everything halfway. The beat sonic pushes the factory speakers just enough that they sound louder and clearer. The 10inch sub hits just hard enough that you can feel it in the front seats. Quality is good and clear. Doesn't rattle anything inside but you can tell its not just factory.
     
    1lowlife likes this.
  6. May 21, 2025 at 1:32 PM
    #6
    Maverick345

    Maverick345 [OP] New Member

    Joined:
    May 25, 2024
    Member:
    #117417
    Messages:
    10
    Gender:
    Male
    Vehicle:
    2024 SR5
    eddiefromcali
    Good catch, I didnt even look at the fuse size. Good advise, thank you.
     
    eddiefromcali likes this.
  7. May 21, 2025 at 1:51 PM
    #7
    1lowlife

    1lowlife Toxic prick and pavement princess..

    Joined:
    May 4, 2016
    Member:
    #3296
    Messages:
    10,799
    First Name:
    DADA
    THE GREAT STATE OF TEXAS
    Vehicle:
    2014 MGM DC SR5
    Does your SR5 even have a power driver's seat? I know some of them don't.
    The seat fuse is 30 AMP.

    upload_2025-5-21_15-51-5.png

    I guess that is one way to not have to run an amp line from the battery..:thumbsup:
     
  8. May 21, 2025 at 2:15 PM
    #8
    Maverick345

    Maverick345 [OP] New Member

    Joined:
    May 25, 2024
    Member:
    #117417
    Messages:
    10
    Gender:
    Male
    Vehicle:
    2024 SR5
    1lowlife
    Yes it does, I really only wanted the harness so I didnt have to cut or splice into anything factory. If I ever have to remove any of it, its like it never happened.
     
    Last edited: May 21, 2025 at 3:15 PM
    1lowlife likes this.
  9. May 21, 2025 at 2:38 PM
    #9
    Linuxrules

    Linuxrules New Member

    Joined:
    Feb 17, 2025
    Member:
    #130526
    Messages:
    43
    Vehicle:
    2024 Tundra
    hahaha! I don't follow most of this back and forth but the idea of having to turn the stereo off to use the power seat made me laugh.

    (yes I get what you're saying it's not used but still)
     
    1lowlife likes this.
  10. May 22, 2025 at 7:56 AM
    #10
    Derfla

    Derfla MUDBATH PRO

    Joined:
    Jan 13, 2022
    Member:
    #73089
    Messages:
    96
    Vehicle:
    2025 TRD PRO
    I got the 2T3 direct and they definitely come with the required harnesses and eliminates the need for splicing. The four RCAs on the ENA-2T3 are high level inputs.

    If you want a model with RCA outputs, you’ll need the ENA-3T3 which also gives you 5 more watts per channel.

    Awesome write up though! Awesome to see more ways to improve these sound systems.
     
    Last edited: May 22, 2025 at 8:03 AM
    Maverick345[OP] and BlackNBlu like this.
  11. May 22, 2025 at 10:20 AM
    #11
    JayAreIV

    JayAreIV 1st Tundra

    Joined:
    Today
    Member:
    #135327
    Messages:
    1
    Gender:
    Male
    First Name:
    JayAre
    U.P. of Michigan
    Vehicle:
    24 SR5 TRD Off Road double cab
    7'6" Sno EX V-plow, BF Goodrich All Terrain KO3, Air bags for the rear axle, Tow mirrors, Tonneau cover, JL audio component speakers front doors & dash, JL 2 way rear doors, with Beat-Sonic 3T3 amp & Memphis Audio 10" powered subwoofer behind the rear seat, Rust proofed & Ceramic Coated.
    I also questioned the power seat harness (wire size) for a subwoofer when I upgraded. I installed a Memphis Audio 10" 180 watt powered subwoofer behind my rear seat by pulling the plastic panel off & applying some sound deadening to the back of the cab. Then ran MA's spec 8ga wire with a 25 amp fuse at the battery. There's a rubber plug by the brake booster to get through the firewall. Also installed the Beat-Sonic 3T3 amp & utilized the low outputs to run RCA's to the subwoofer. I also upgraded speakers to JL component front & 2-way in the rear. Sounds so much better just wish I had an equalizer so I could fine tune the frequencies. The Beat-Sonic amp is plug & play only having to splice the control power wire onto it for the amp. Also the driver side kick panel & rocker covers remove easily to run the wires for an easy upgrade!

    20250522_125329 (1).jpg
     
    Last edited: May 22, 2025 at 10:31 AM

Products Discussed in

To Top