1. Welcome to Tundras.com!

    You are currently viewing as a guest! To get full-access, you need to register for a FREE account.

    As a registered member, you’ll be able to:
    • Participate in all Tundra discussion topics
    • Transfer over your build thread from a different forum to this one
    • Communicate privately with other Tundra owners from around the world
    • Post your own photos in our Members Gallery
    • Access all special features of the site

Auxbeam Install

Discussion in 'Electrical' started by thealey, Feb 24, 2025.

  1. Feb 24, 2025 at 1:22 PM
    #1
    thealey

    thealey [OP] New Member

    Joined:
    Jul 11, 2023
    Member:
    #100081
    Messages:
    55
    Gender:
    Male
    First Name:
    Tyler
    Port Orange,FL
    Vehicle:
    2017 Toyota Tundra SR5 CrewMax XSP
    Build List: https://1drv.ms/b/s!Aq_KNysdW_0UmkIDSo7_prq_6418
    IMG_0116.jpg
    I wanted to go over my switch panel setup because I haven’t seen one exactly like it.
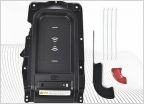
    - I opted for the Auxbeam BB80 (blue) Switch panel for my lights. At the time of install I only had rock lights, but had several other things waiting to be put on until I fixed my switch system. I couldn’t justify the price of a switch pros. I also didn’t want Bluetooth or any of the other crap(more stuff to break). I did order/buy a few different things to make it mine.
    1.Marine Grade(Tinned) Lugs/marine heat shrink(local marine store)
    2. Marine Push button Switch. Black with blue backlight(Amazon)
    3. Extra sticker sheet (Amazon)
    4.Custom 3D printed overhead mount
    Made by 3D overland:
    His profile:
    https://www.tundras.com/members/angkorstrong.51784/
    Website:
    https://www.3doverland.com/
    Mount File:
    https://cults3d.com/en/3d-model/various/aux-beam-2014-2019-tundra-overhead-mount
     
    Last edited: Feb 24, 2025
  2. Feb 24, 2025 at 1:27 PM
    #2
    thealey

    thealey [OP] New Member

    Joined:
    Jul 11, 2023
    Member:
    #100081
    Messages:
    55
    Gender:
    Male
    First Name:
    Tyler
    Port Orange,FL
    Vehicle:
    2017 Toyota Tundra SR5 CrewMax XSP
    Build List: https://1drv.ms/b/s!Aq_KNysdW_0UmkIDSo7_prq_6418
    I decided to mount my switch panel on my fuse box cover.
    1.Dry fit the switch panel and 60a fuse
    2.Mark/drill holes
    3. Silicon around the holes and fasted things in place using SS hardware and nyloc nuts
    4. Wire battery to switch panel Using marine grade terminals/wire
    IMG_0116.jpg
     
    Sleeper16plat likes this.
  3. Feb 24, 2025 at 1:39 PM
    #3
    thealey

    thealey [OP] New Member

    Joined:
    Jul 11, 2023
    Member:
    #100081
    Messages:
    55
    Gender:
    Male
    First Name:
    Tyler
    Port Orange,FL
    Vehicle:
    2017 Toyota Tundra SR5 CrewMax XSP
    Build List: https://1drv.ms/b/s!Aq_KNysdW_0UmkIDSo7_prq_6418
    Next was running things to the Cab. The switch panel comes with 2 options to power.
    1. A fuse tap(only allows power to the switch panel when vehicle is running)
    2. Direct to battery(switch panel is always on, and the backlight is constantly drawing power)
    -I didn’t like either option because I wanted to use lights when the truck was off. But didn’t want the backlight to be on all the time.
    -The solution is a push button to power the switch panel( I know a switch to power a switch) this requires a power wire from the battery to the switch, and a power from the switch back to the switch panel. I mounted the switch bottom left of the steering wheel. That way the backlight(its bright) isn’t blinding me at night or shining into my window.
    No light when off:
    IMG_1049.jpg
    Blue backlight when switch panel has power:
    IMG_1050.jpg
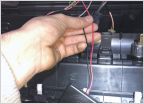
    last thing I had to do was Run the Main switch panel wire into the cab( I ran all 3 wires at once actually). This required driver side A-pillar, from corner of headliner and overhead center console to drop so I could run the wire up and over to the overhead center console.
    IMG_1051.jpg
    IMG_1052.jpg
    I had seen people use a 3D printed mount for their switch panel there, but they had to cut and it didn’t look clean. I stumbled upon this and like it. It was out of the way so I wouldn’t accidentally push things, and it removed the useless map holder above, and it could also go back to stock if i didn’t like it there. Yes I have plans to paint it and fix the headliner in the future. But I think it’s pretty clean.
     
  4. Feb 24, 2025 at 1:44 PM
    #4
    thealey

    thealey [OP] New Member

    Joined:
    Jul 11, 2023
    Member:
    #100081
    Messages:
    55
    Gender:
    Male
    First Name:
    Tyler
    Port Orange,FL
    Vehicle:
    2017 Toyota Tundra SR5 CrewMax XSP
    Build List: https://1drv.ms/b/s!Aq_KNysdW_0UmkIDSo7_prq_6418
    This is what it looks like with several things hooked up to it
    IMG_0607.jpg
    Hope this helps/gives some people ideas or inspiration for their project. If you have questions, ask!
     

Products Discussed in

To Top