1. Welcome to Tundras.com!

    You are currently viewing as a guest! To get full-access, you need to register for a FREE account.

    As a registered member, you’ll be able to:
    • Participate in all Tundra discussion topics
    • Transfer over your build thread from a different forum to this one
    • Communicate privately with other Tundra owners from around the world
    • Post your own photos in our Members Gallery
    • Access all special features of the site
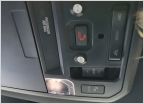
DIY Overlanding Bad Rack & Dry Fitting Ideas

Discussion in '3rd Gen Tundras (2022+)' started by uktKFzzzvxWx, Jun 25, 2024.

  1. Jun 25, 2024 at 11:59 PM
    #1
    uktKFzzzvxWx

    uktKFzzzvxWx [OP] New Member

    Joined:
    Apr 14, 2024
    Member:
    #115342
    Messages:
    5
    Figured I should share my DIY process here, hope this can help a few others, and get some feedbacks before I start ordering parts in case there're some real dumb mistakes :O

    I'm starting this DIY from CAD everything out so that I can dry fit all gears I'm planning carry. This way I can build the rack to the perfect dimensions.

    First this I plan to mount the rack on the shiny new bak x4ts tonneau cover t-rails. This seems to be the best way to mount a rack on top of a concealed bed without drilling bunch of holes.

    Here's the what everything look like altogether. I'll show a closer look on each component individually below:

    upload_2024-6-25_22-39-2.png
    upload_2024-6-25_22-39-28.png
    upload_2024-6-25_22-38-15.png

    upload_2024-6-25_22-35-50.png


    I'm designing the rack with 10-series 8020 extrusion profiles. The 10 series seems to be strong enough ( credit to https://www.mavericktruckclub.com/forum/threads/diy-custom-bed-rack.35864/ )

    I tried to make the dry fitting as realistic as possible. So I took this 2023 tundra cad model online https://carcadblocks.com/toyota-tundra and used it as reference image in my CAD design. The download button didn't work for me, but I was able to use the pics on the website with a bit help of the calibrate feature in Fusion 360.

    the parametric design approach

    I'm using fusion 360's parameters system A LOT. This way I can estimate some measurements on parts I don't yet have, like the thickness of the x4ts rails. I can plug in the accurate numbers anytime and fusion 360 will automatically refresh the whole design for me. Neat!

    Here's a screenshot on the parameters I'm using. Most of them are not accurate, and surely will change as I progress :)

    upload_2024-6-25_23-56-56.png
    upload_2024-6-25_23-57-20.png
    upload_2024-6-25_23-57-39.png


    The Rack


    upload_2024-6-25_22-45-38.png

    upload_2024-6-25_22-46-44.png
    upload_2024-6-25_22-48-50.png

    I used the 1020 profile (1"x2" aluminum beams) for the rack. The 2" wide surface makes it easier to mount accessories.

    I want the rack to low enough to sit below the roofline, and also tall enough to leave the bed light & camera usable. This leaves me with a very precise hight to work with. In the CAD it works out to be 19 103/128 as of now.

    I added 4138 and 4338 gussets for some added rigidity. Plus they look pretty good!

    I found some t slot nuts on aliexpress that MAY fit the x4ts rails. I'll give them a shot. I don't have a tap to make threads on steel plates so I really hope these will fit.

    upload_2024-6-25_23-10-23.png
    upload_2024-6-25_23-10-34.png

    Add Tonneau

    I want the rack to low enough to sit below the roofline, and tall enough to clear the tonneau cover when it's rolled up.

    The tonneau roll is about 8.7" in diameter. The whole thing will look like this from the back of the truck:

    There needed to be at least 2" gap between the rack and bulkhead to ensure the buckles on the tonneau cover are accessible.

    upload_2024-6-25_23-20-1.png


    Add Side Rails

    These rails will also help with the rigidity.

    The length of the side rails are as designed to fit some solar panels snuggly. Keep reading :)


    upload_2024-6-25_23-21-30.png
    upload_2024-6-25_23-22-7.png

    Add Solar Panels

    These are renogy RSP200D panels. But any 200W-ish panel will fit similarly.

    I plan to embedded these panels in the aluminum frame with some weather stripping, so the space beneath solar panels will be shielded from weather to some extent.

    The panels are intentionally placed off center to help with weather seal & avoid shadow if I decided to mount an awning on one side of the rack.

    upload_2024-6-25_23-25-36.png
    upload_2024-6-25_23-25-52.png
    upload_2024-6-25_23-30-48.png

    Add a fridge

    I already own a iceco VL60 so I want to make sure the fridge door can clear the rack & tonneau:

    upload_2024-6-25_23-32-5.png

    upload_2024-6-25_23-32-15.png

    upload_2024-6-25_23-32-27.png

    Add kayak racks

    I took the dimensions of a random kayak rack from Amazon this fitting.

    I often have to carry kayaks for my friends so here're 3 pairs of mounting racks.

    These racks will kill solar panel with their shadows. So the need to be removed when they're not needed.

    I might put the solar on some sliders, or lift them up with some gas structs, if I have to leave these kayak racks on there permanently.


    upload_2024-6-25_23-37-25.png
    upload_2024-6-25_23-37-37.png
    upload_2024-6-25_23-37-50.png

    Add outdoor shower

    2 scepter mwc water cans on + 20lb propane bottle + a propane water heater

    upload_2024-6-25_23-42-10.png
    upload_2024-6-25_23-42-49.png

    Add awning

    I'm not really convinced I need an awning, but this is what it'll look like with a 270 free standing awning that I found the dimensions on amazon:

    upload_2024-6-25_23-44-6.png
    upload_2024-6-25_23-46-3.png
    upload_2024-6-25_23-44-27.png
    upload_2024-6-25_23-44-54.png
     
    VCheng and Black widow TRD like this.
  2. Jun 26, 2024 at 1:28 AM
    #2
    ArcticFox

    ArcticFox New Member

    Joined:
    Mar 18, 2024
    Member:
    #113888
    Messages:
    42
    California
    Looks interesting! Now, as a fellow maker, I encourage you to build it, update the design, redo the design, rebuild the whole thing, update the design again, and finally share the photos! :)

    I have sooooo many designs that looked cool and passed computer testing but turned out to either have mistakes, not work correctly, or be nonfunctional. Designing is fun, but actually building something is often a test of character - ask me how I know ;)

    If you are going to do it for fun - go for it, but if you plan on saving money, double-check your spending with mistake buffers. Make sure you are below the cost of something commercially built—something to consider. Many parts I've done were not necessarily cheaper but fitted exactly my application. For example, 8020 profiles seem cheap, but when I was looking at it for one project, the cost quickly started adding up if I wanted to order premade tapped ends, pass through holes, etc (sure, I could drill and tap on my own, but that was a lot of parts and would take a significant amount of time).

    BTW: the awning in your design blocks the rear driver door. I would (personal preference) prefer the awning to go on the passenger side so I can access the rear seats from the driver's side without going around the truck.
     
    VCheng likes this.

Products Discussed in

To Top