1. Welcome to Tundras.com!

    You are currently viewing as a guest! To get full-access, you need to register for a FREE account.

    As a registered member, you’ll be able to:
    • Participate in all Tundra discussion topics
    • Transfer over your build thread from a different forum to this one
    • Communicate privately with other Tundra owners from around the world
    • Post your own photos in our Members Gallery
    • Access all special features of the site

4WD Actuator Repair on a Maine Tundra after 10 Winters with Photos

Discussion in '2nd Gen Tundras (2007-2013)' started by wktjr, Apr 17, 2024.

  1. Apr 17, 2024 at 4:19 PM
    #1
    wktjr

    wktjr [OP] New Member

    Joined:
    Jul 8, 2019
    Member:
    #32987
    Messages:
    66
    Gender:
    Male
    Maine by way of New Jersey
    Vehicle:
    2013 Tundra SR5, Black Crewmax
    Friends,

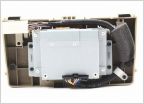
    Unlike the older threads that show a pristine actuator heres some real world examples. Despite my best efforts this is usually what you end up with in Maine. I have spent endless hours banging, heating, freezing and cursing during various repair events.

    In the photos, the screws with raised heads are good to go. It's the other screws that are worn down from corrosion that my smallest bit will not bite into because there is nothing there.The screws on the other side are the same, so I have a least two if not three to remove.

    Setting up the clock settings is not my question since there is already plenty of vids out there. I looking for suggestions on how to remove these screws while saving the plastic. Now, I do have an actuator coming Friday but my goal is to return it for my $500 refund.

    Thanks in advance for any helpful suggestions.

    IMG_7240.jpg IMG_7224.jpg
     
    Last edited: Apr 17, 2024
    FrenchToasty likes this.
  2. Apr 17, 2024 at 4:46 PM
    #2
    AZTundra

    AZTundra No Longer a New Member

    Joined:
    Feb 13, 2018
    Member:
    #12894
    Messages:
    4,406
    Gender:
    Male
    First Name:
    Paul
    Phoenix, AZ
    Vehicle:
    2017 White Crewmax Limited 5.7 FFV
    Magnuson Supercharger, TRD Goodies (Pro Suspension, Pro Grille, Exhaust, CAI, Rear Sway Bar, Oil Cap). Weather Tech Floormats, BakFlip MX4, Spray In Bedliner, AMP Research Bed Extender and Bed Step, Side Steps, B&W Adjustable Drop Hitch, AJT Designs Battery Hold Down, SDHQ Sliders.
    Not sure if you could try cutting a slit in the head of the screw with a dremel/cut off wheel and then use a flat head screwdriver to remove it?
     
  3. Apr 17, 2024 at 4:50 PM
    #3
    wktjr

    wktjr [OP] New Member

    Joined:
    Jul 8, 2019
    Member:
    #32987
    Messages:
    66
    Gender:
    Male
    Maine by way of New Jersey
    Vehicle:
    2013 Tundra SR5, Black Crewmax
    That's on the list. But for the screws against the Tcase, that's probably not an option.
    Thanks!
     
  4. Jun 25, 2024 at 8:31 PM
    #4
    Clifton23

    Clifton23 New Member

    Joined:
    Mar 25, 2023
    Member:
    #94416
    Messages:
    11
    Gender:
    Male
    First Name:
    Clifton
    Vehicle:
    2011 Toyota tundra trd
    6 inch BDS lift with 35 inch tires and rockstar wheels
    Superzilla bro soak them in it they will come off.
     

Products Discussed in

To Top