1. Welcome to Tundras.com!

    You are currently viewing as a guest! To get full-access, you need to register for a FREE account.

    As a registered member, you’ll be able to:
    • Participate in all Tundra discussion topics
    • Transfer over your build thread from a different forum to this one
    • Communicate privately with other Tundra owners from around the world
    • Post your own photos in our Members Gallery
    • Access all special features of the site

Help getting wiring into cab from rear of truck

Discussion in '2nd Gen Tundras (2007-2013)' started by Arthur Dent, Oct 26, 2022.

  1. Oct 26, 2022 at 8:32 AM
    #1
    Arthur Dent

    Arthur Dent [OP] New Member

    Joined:
    Oct 13, 2022
    Member:
    #84874
    Messages:
    27
    Gender:
    Male
    Vehicle:
    2012 Tundra 4WD Double Cab Long Bed
    I am sure this is an old topic but I have not been able to come across a good answer for it so far, so I am turning to the experts that have done this before. If there is a good thread you know of, feel free to tell me to go rtfm. :)

    I am installing a backup camera and looking for the best way to get the camera wire inside the cab. I have seen a lot of answers for getting wires in the cab from the engine compartment, but this is coming from the rear and I am hoping I don't have to route it all the way up there just to get inside.

    Also, if once it is inside I need to run it along the outer rail near the door, can someone help me understand how the plastic cover comes off? I really don't want to break any tabs trying to remove it. i have seen pics of it removed and can see that there is factory wiring underneath it, but I never see exactly how to remove it. In one video I just saw a guy grab it and pull up and it appeared to easily come off. Not sure if it was already partially off, if he has done it so many times it is just easy to do now, or if maybe he has broken tabs off and it is easy now. I am a perfectionist, and so want to make sure I am doing things as correctly as possible.

    Thanks!
     
  2. Oct 26, 2022 at 8:49 AM
    #2
    texasrho83

    texasrho83 Old Member

    Joined:
    Mar 30, 2017
    Member:
    #7025
    Messages:
    10,597
    Gender:
    Male
    First Name:
    Charles
    Conroe TX
    Vehicle:
    2016 DC MGM 4x4
    See build link
    I'm assuming you're going to plug the camera into your radio. There are body plugs under the driver and passenger front areas. If you run the wire along the frame (passenger side already has a loom there I believe), you can run it to one of those plugs and pull it through from the inside.

    Also, the door sill trim pieces easily pry up by getting your fingers to push inward and pull up from the top of the trim. I've taken mine off so much I could look at them and they come off lol
     
    NewImprovedRon and baraynavab like this.
  3. Oct 26, 2022 at 9:25 AM
    #3
    Musicmasterd12

    Musicmasterd12 New Member

    Joined:
    Jun 12, 2018
    Member:
    #16099
    Messages:
    518
    Gender:
    Male
    Southern Louisiana
    Vehicle:
    2011 4.6 Silver Sky Metallic DC
    I ran mine along the passenger side to the body plug mentioned above. I believe it comes out in the backseat area and then I just ran it along the doors sill towards the lock panel and then up towards the radio. And I believe the kicksill area is where I taped reverse signal.
     
  4. Oct 26, 2022 at 7:47 PM
    #4
    Arthur Dent

    Arthur Dent [OP] New Member

    Joined:
    Oct 13, 2022
    Member:
    #84874
    Messages:
    27
    Gender:
    Male
    Vehicle:
    2012 Tundra 4WD Double Cab Long Bed
    I was thinking the passenger side might be best after I installed the GPS antenna on the dash in the corner on the passenger side. It was pretty easy to run the wire between the radio cavity and the a-pillar when I removed the a-pillar trim. So if I can get to the passenger kick panel area, I think I will be golden.

    Can you give me a general idea of where the body plugs are? I will look again tomorrow, but I just know I didn't see anything that I thought was obvious the first time.

    When you say to push inward on the trim, do you mean to push the entire trim piece towards the inside of the truck while lifting upward? Or to squeeze the trim inward on both sides of the trim with my fingers and pull up? My hope is to avoid it getting to where it wants to come up just by looking at it. :)
     
  5. Oct 26, 2022 at 8:53 PM
    #5
    texasrho83

    texasrho83 Old Member

    Joined:
    Mar 30, 2017
    Member:
    #7025
    Messages:
    10,597
    Gender:
    Male
    First Name:
    Charles
    Conroe TX
    Vehicle:
    2016 DC MGM 4x4
    See build link
    The passenger side plug is hidden by a heat shield (I think).

    The second option you mentioned regarding the trim piece should do the trick.
     
  6. Oct 28, 2022 at 7:40 AM
    #6
    baraynavab

    baraynavab Toyo Junkie

    Joined:
    Sep 12, 2020
    Member:
    #52130
    Messages:
    402
    Gender:
    Male
    Atlanta
    Vehicle:
    2007 Tundra CrewMax 4x4 5.7L V8
  7. Oct 28, 2022 at 8:10 AM
    #7
    1lowlife

    1lowlife Toxic prick and pavement princess..

    Joined:
    May 4, 2016
    Member:
    #3296
    Messages:
    10,655
    First Name:
    DADA
    THE GREAT STATE OF TEXAS
    Vehicle:
    2014 MGM DC SR5
    baraynavab[QUOTED] likes this.
  8. Oct 29, 2022 at 7:30 PM
    #8
    Arthur Dent

    Arthur Dent [OP] New Member

    Joined:
    Oct 13, 2022
    Member:
    #84874
    Messages:
    27
    Gender:
    Male
    Vehicle:
    2012 Tundra 4WD Double Cab Long Bed

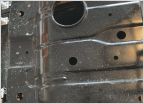
    Thanks. I have used Google...a lot. But I did not come across that post. This is a lot more work that I was initially hoping for. :) I did manage to get the plastic inner door sills pulled up without too much trouble. I also removed the plastic on the rear passenger side where the seat belt is. Unfortunately, a small piece of plastic did break off of that piece. I am a little upset about doing that. I found a large round plug in the back corner under the carpet but when I removed it, it revealed a bolt that I assume holds the cab to the frame. I was trying to get to a small grommet that I could see on the outside of the cab that is mounted on the vertical wall of the cab between the can and the bed. But I could not get to it from inside the cab.

    In the pic below, I found the bolt under the circle to the right. I think I might see a plug underneath the cab that might lead to where I have the other circle near the rear of the front passenger seat.
    body_plugs.jpg


    Funny. Now I am it would probably just be easier to run the cable to the front and come in through the firewall where other cables are already routed. But I already have a lot torn apart now, so I might as well try to get in in further back and just route it along the outer floor.

    20221029_180949.jpg
     
    baraynavab[QUOTED] likes this.
  9. Oct 29, 2022 at 7:37 PM
    #9
    texasrho83

    texasrho83 Old Member

    Joined:
    Mar 30, 2017
    Member:
    #7025
    Messages:
    10,597
    Gender:
    Male
    First Name:
    Charles
    Conroe TX
    Vehicle:
    2016 DC MGM 4x4
    See build link
    Jesus you sure went through more work than I had to do lol
     
  10. Oct 29, 2022 at 7:47 PM
    #10
    Arthur Dent

    Arthur Dent [OP] New Member

    Joined:
    Oct 13, 2022
    Member:
    #84874
    Messages:
    27
    Gender:
    Male
    Vehicle:
    2012 Tundra 4WD Double Cab Long Bed
    Well, if you are thinking the pic of the truck with all the carpet removed it mine, it isn't. That is from another post linked above. I think it is of 1lowlife's truck. :)
     
  11. Oct 29, 2022 at 7:52 PM
    #11
    texasrho83

    texasrho83 Old Member

    Joined:
    Mar 30, 2017
    Member:
    #7025
    Messages:
    10,597
    Gender:
    Male
    First Name:
    Charles
    Conroe TX
    Vehicle:
    2016 DC MGM 4x4
    See build link
    Whew.
     
  12. Nov 11, 2022 at 9:43 AM
    #12
    Arthur Dent

    Arthur Dent [OP] New Member

    Joined:
    Oct 13, 2022
    Member:
    #84874
    Messages:
    27
    Gender:
    Male
    Vehicle:
    2012 Tundra 4WD Double Cab Long Bed
    Been working on some other things, but I think I am taking this to my local body guy to do for me. I talked to him and he knows exactly what I am wanting and has done this a lot. I got the door sills off, but the carpeting is so molded and has these plastic pieces stapled to the ends and it doesn't really want to move or lift up at all. I've already broken a few clips and I am afraid if I continue that I am going to break more things and be very unhappy. I am going to have him do a few other things while it is there...fix a small dent on the top of the tailgate so that a tonneau cover will seal properly. And install my new side steps. I could do it, but it is already getting cold and I don't have a garage to work in. So I don't feel like lying on my back on the cold ground installing them.
     
    texasrho83 likes this.
  13. Nov 11, 2022 at 10:17 AM
    #13
    texasrho83

    texasrho83 Old Member

    Joined:
    Mar 30, 2017
    Member:
    #7025
    Messages:
    10,597
    Gender:
    Male
    First Name:
    Charles
    Conroe TX
    Vehicle:
    2016 DC MGM 4x4
    See build link
    Good luck. Show us finished pics.
     
  14. Nov 11, 2022 at 10:53 AM
    #14
    FuegoMCS

    FuegoMCS New Member

    Joined:
    Jan 25, 2022
    Member:
    #73671
    Messages:
    50
    Gender:
    Male
    East Texas
    Vehicle:
    2011 Crewmax 2WD
  15. Nov 12, 2022 at 6:50 AM
    #15
    COTundie

    COTundie Whoa Black Betty

    Joined:
    Jun 15, 2021
    Member:
    #64339
    Messages:
    1,063
    Gender:
    Male
    First Name:
    Trey
    Vehicle:
    Black 5.7 DC TRD 4x4
    Pretty things
    I went from tailgate handle to cab along the passenger side frame rail (inbound side) and up thru a black rubber grommet in the front passenger floor pan. I used plastic wire loom so it would seal against the grommet better, and running the wire in the loom was the largest pain in the ass of the install.

    You would have easy access to the dash for your camera hook-ups from there as well.
     
  16. Nov 12, 2022 at 6:54 AM
    #16
    dkrou

    dkrou New Member

    Joined:
    Dec 13, 2020
    Member:
    #56121
    Messages:
    434
    Gender:
    Male
    First Name:
    dan
    Vehicle:
    2019 tundra
    I had to do this to my cap on the 2ch dash cam
     
  17. Nov 14, 2022 at 1:26 PM
    #17
    Arthur Dent

    Arthur Dent [OP] New Member

    Joined:
    Oct 13, 2022
    Member:
    #84874
    Messages:
    27
    Gender:
    Male
    Vehicle:
    2012 Tundra 4WD Double Cab Long Bed
    Well that is the best documentation that I have seen yet. I have all of that trim removed. I was trying to find a floor plug in the back seat area, but the carpet is held down pretty good. I did not really look at the front carpeting, but maybe I should do that. We woke up to 7 inches of snow Saturday morning, so I have not really been out there to do anything as the truck is outside for the time being.

    This sounds similar to what the documentation above is saying to do. I am going to see if it is easier to pull the carpet back in the front passenger side rather than the back. there are still some things I need the body gut to do, but if I can do anything myself, that is one less thing he has to do. :) Thanks for the advice guys! This is turning out to be a great forum.
     
  18. Dec 7, 2022 at 4:36 PM
    #18
    Arthur Dent

    Arthur Dent [OP] New Member

    Joined:
    Oct 13, 2022
    Member:
    #84874
    Messages:
    27
    Gender:
    Male
    Vehicle:
    2012 Tundra 4WD Double Cab Long Bed
    I had a guy that does body work here in town run the ire for me. He came in using the grommet in the front passenger floorboard. From there it was easy and I have the radio installed and backup camera working. So far I am really liking the Android head unit. The camera needs to be adjusted so that it can see back further, but that is another issue. This one is resolved.
     

Products Discussed in

To Top