1. Welcome to Tundras.com!

    You are currently viewing as a guest! To get full-access, you need to register for a FREE account.

    As a registered member, you’ll be able to:
    • Participate in all Tundra discussion topics
    • Transfer over your build thread from a different forum to this one
    • Communicate privately with other Tundra owners from around the world
    • Post your own photos in our Members Gallery
    • Access all special features of the site

Just in CB +3/4 shims & Spidertrax Spacers

Discussion in '2.5 Gen TRD Pro (2014-2021)' started by jdm ctr '00, Jan 14, 2016.

  1. Jan 14, 2016 at 11:47 AM
    #1
    jdm ctr '00

    jdm ctr '00 [OP] New Member

    Joined:
    Dec 11, 2015
    Member:
    #2233
    Messages:
    257
    Gender:
    Male
    los Angeles, CA
    Vehicle:
    2016 Tundra TRD PRO
    UPDATE #3
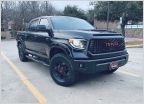
    I got my tires installed (Nitto 295/70/18 Trail Grapplers). I took off the front mud flap and it still made contact with the front plastic where the flap was. I took off the two large bolts from the bottom and used a rat tail file to give more room for the bolt to move. As I pushed the plastic forward I used the washers that were on the bolts to hold it in place. The outer bolt has some sort of aluminum round spacer inside the plastic which I also rat tailed open(like the letter C). Once i bolted it all up i used a heat gun to push forward the plastic in the area that was touching. On the large mud flap I took out the inside top Bolt/Screw and drilled a New hole right under it on the crease. Then I forced it back to the original mounting hole and tightened it. This helped clear the tire on the back side mud flap. I took a crappy night shot of the truck on my angled driveway. I will try to get a better shot soon. I wasn't able to get a flat spot to measure from the floor to the fender.

    UPDATE: #2 - 01/18/16
    Just got the rear +3 Billet Shackles/Bushings done along with the drive shaft bearing spacers. Also finished up the rear 1.25" wheel spacers. Getting the leaf bushings out took some time but eventually they came out. After greasing the bushings and bolts, putting in the new bushings was easy and only took about 1 min. I'm happy with the finished product so far. Once I get my tires on I think it will look much better. Hopefully by tomorrow I can get the tires installed. Pictures included the truck was on my driveway (uphill) so it's kind of a shitty picture. When I went to return the rented ball joint press I measured the rear from the ground up and it was at 40 1/2" on stock tires.

    UPDATE: 01/18/16
    Just had time to finish my front CB install along with my 1.25" wheel spacers. I still have my factory tires on so once i get my 295 trail grapplers it should be around 40"(ground to fender). When i started on the second side i didn't loosen the camber bolts and just wedged the bar in the end link mount and forced the arm down. I was able to get the whole strut out. Pictures Included

    Just got these BEEFY Parts in. CB +3/4 shims and Spidertrax 1.25" Spacers. Just waiting for my 295/70/18 Trail grapplers to come in. Once I install the tires I will come home and install the CB and wheel spacers. I'll upload some pictures at that time.

    Dealing with David from CB was VERY easy. He knows what he is doing and builds quality parts. He spends as much time as you need to take care of any question you may have.


    IMG_2618.jpg IMG_2617.jpg IMG_2568.jpg IMG_2565.jpg IMG_2566.jpg IMG_2567.jpg IMG_2569.jpg IMG_2570.jpg IMG_2571.jpg IMG_2575.jpg IMG_2576.jpg IMG_2543.jpg IMG_2545.jpg IMG_2581.jpg IMG_2582.jpg IMG_2583.jpg IMG_2584.jpg IMG_2585.jpg IMG_2586.jpg IMG_2590.jpg IMG_2591.jpg IMG_2592.jpg IMG_2593.jpg IMG_2594.jpg IMG_2596.jpg IMG_2606.jpg IMG_2614.jpg
     
    Last edited: Jan 20, 2016
    GarTX526, What the!?, GIJig and 5 others like this.
  2. Jan 16, 2016 at 12:32 PM
    #2
    PlatPro

    PlatPro New Member

    Joined:
    Dec 22, 2015
    Member:
    #2305
    Messages:
    79
    Gender:
    Male
    First Name:
    Randall
    Vehicle:
    A silk gloved hand with brass knuckles underneath.
    2014 Platinum, TRD Pro Suspension , Truxedo Bed Cover, Vent Shade Rain Guards, Tint match windows,TRD Exhaust, Linex, Custom Dyno Tune, TRD SwayBar, and just started.
    I can't wait to see it all together. Are you replacing UCA? During the install and after lots of pictures. Yes we are needy.
     
  3. Jan 16, 2016 at 6:13 PM
    #3
    jdm ctr '00

    jdm ctr '00 [OP] New Member

    Joined:
    Dec 11, 2015
    Member:
    #2233
    Messages:
    257
    Gender:
    Male
    los Angeles, CA
    Vehicle:
    2016 Tundra TRD PRO
    I am keeping the factory UCA for now. There are many members using the Factory UCA without any issues. I might do that and the Steering kit from CB at a later time. I will snap some install/final pics. My tires should be here Tuesday and ill make some time to get that done also.
     
    PlatPro[QUOTED] likes this.
  4. Jan 18, 2016 at 1:17 PM
    #4
    jdm ctr '00

    jdm ctr '00 [OP] New Member

    Joined:
    Dec 11, 2015
    Member:
    #2233
    Messages:
    257
    Gender:
    Male
    los Angeles, CA
    Vehicle:
    2016 Tundra TRD PRO
  5. Jan 18, 2016 at 10:19 PM
    #5
    jdm ctr '00

    jdm ctr '00 [OP] New Member

    Joined:
    Dec 11, 2015
    Member:
    #2233
    Messages:
    257
    Gender:
    Male
    los Angeles, CA
    Vehicle:
    2016 Tundra TRD PRO
    Update #2 posted
     
  6. Jan 19, 2016 at 3:15 AM
    #6
    TRON

    TRON Is LIVE on the GRID.

    Joined:
    Jan 8, 2016
    Member:
    #2398
    Messages:
    662
    Gender:
    Male
    First Name:
    Stefen
    Gilbert, Arizona
    Vehicle:
    IG: @ST3F3NS
    DUROBUMPS Use TRON10 for 10% Off & Free Shipping
    Looking good, it's nice to see what the +3 looks like in the rear on a Pro. So what exactly is up front with the TRD coilovers, 2 shims?
     
  7. Jan 19, 2016 at 11:19 AM
    #7
    jdm ctr '00

    jdm ctr '00 [OP] New Member

    Joined:
    Dec 11, 2015
    Member:
    #2233
    Messages:
    257
    Gender:
    Male
    los Angeles, CA
    Vehicle:
    2016 Tundra TRD PRO
    Thanks bud, I have 2 shims on each side on the front.
     
    TRON[QUOTED] likes this.
  8. Jan 19, 2016 at 10:13 PM
    #8
    jdm ctr '00

    jdm ctr '00 [OP] New Member

    Joined:
    Dec 11, 2015
    Member:
    #2233
    Messages:
    257
    Gender:
    Male
    los Angeles, CA
    Vehicle:
    2016 Tundra TRD PRO
    Update #3
     
  9. Jan 20, 2016 at 4:28 AM
    #9
    PlatPro

    PlatPro New Member

    Joined:
    Dec 22, 2015
    Member:
    #2305
    Messages:
    79
    Gender:
    Male
    First Name:
    Randall
    Vehicle:
    A silk gloved hand with brass knuckles underneath.
    2014 Platinum, TRD Pro Suspension , Truxedo Bed Cover, Vent Shade Rain Guards, Tint match windows,TRD Exhaust, Linex, Custom Dyno Tune, TRD SwayBar, and just started.
    Very nice. Our trucks mod up really nice. I like how most don't look like they came out of a "Mr T Starter Kit". I am taking a break from modding the truck for a little while. I am putting Cherry and Holly floors in the boat with all new Cherry doors and tables down below.
    Love the truck. Everything line up well on the rack?
     
  10. Jan 20, 2016 at 5:58 AM
    #10
    Black Wolf

    Black Wolf Bigfoot Hunter, Sasquatch too, but not Yeti

    Joined:
    Apr 20, 2014
    Member:
    #378
    Messages:
    40,012
    Gender:
    Male
    First Name:
    Matt
    Aurora CO
    Vehicle:
    2022 Nissan Frontier SV 4X4
    TuwaPro rack, Z1 Offroad stuff, NISMO suspension stuff, FlowmasterFX Extreme exhaust, AIS, OVS, J&L can, other goodies on the way
    Those CoachBuilder shackles are night and day way, way better than stock. Nice work.
     
  11. Jan 20, 2016 at 8:03 AM
    #11
    jdm ctr '00

    jdm ctr '00 [OP] New Member

    Joined:
    Dec 11, 2015
    Member:
    #2233
    Messages:
    257
    Gender:
    Male
    los Angeles, CA
    Vehicle:
    2016 Tundra TRD PRO
    IMG_2615.jpg
    The tire shop that mounted my tires had an alignment machine so i had them try. They set up the truck on the rack and it was showing +2.9 camber on the driver side and -2.8 camber on the driver side. Caster was some place in that area also. The guy was moving the adjustments to full left and right and the computer was showing only .01-.04 movement. After talking with David @CB he said he never seen that issue. After looking at the tire i told him thats noway i have +3 or -3 by the way they look. I also told him there is no way that much movement on the lower arm will only show .01 of a change. So I had him remove the truck from the rack and set up again. This time it was showing closer specs. So he did the alignment and got it at the outer limit of specs. I took the truck off the rack and drove 1 block to Just tires and they had a bad ass alignment machine. I had them put it up on the rack and the specs were off. I had them align the truck on their rack. They even hooked up the alignment tool to my OBD port to reset the steering to 0 degrees.

    Thanks bud
     
    dcsleeper408 likes this.
  12. Dec 27, 2018 at 3:17 PM
    #12
    mart1nezdaniel

    mart1nezdaniel AZ

    Joined:
    Jul 8, 2017
    Member:
    #8459
    Messages:
    593
    Gender:
    Male
    First Name:
    Dan
    Arizona
    Vehicle:
    Tundra TRD PRO 2017
    Dude, how did you install the CB Shims up front? i attempted to a few weeks ago but i wasnt able to loosen the cam bolts without removing the TRD skid plate.
     
  13. Dec 30, 2018 at 9:41 AM
    #13
    What the!?

    What the!? New Member

    Joined:
    Feb 24, 2018
    Member:
    #13121
    Messages:
    302
    Vehicle:
    2017 Pro
    I had to remove the skid plate in order to remove the sway bar. I used this video: https://youtu.be/KyloaYxFgU8

    It was a pita, but it was the only way I could get the shock out to put the shim on.
     
  14. Dec 30, 2018 at 12:11 PM
    #14
    mart1nezdaniel

    mart1nezdaniel AZ

    Joined:
    Jul 8, 2017
    Member:
    #8459
    Messages:
    593
    Gender:
    Male
    First Name:
    Dan
    Arizona
    Vehicle:
    Tundra TRD PRO 2017
    How difficult was it to remove the skid plate?
     
  15. Dec 31, 2018 at 4:54 PM
    #15
    jdm ctr '00

    jdm ctr '00 [OP] New Member

    Joined:
    Dec 11, 2015
    Member:
    #2233
    Messages:
    257
    Gender:
    Male
    los Angeles, CA
    Vehicle:
    2016 Tundra TRD PRO
    I just forced down the lower arm as shown in my pictures. I was just enough to slide out the lower part of the strut.
     
  16. Jan 3, 2019 at 8:30 AM
    #16
    jmevis

    jmevis New Member

    Joined:
    Sep 26, 2017
    Member:
    #9916
    Messages:
    501
    Gender:
    Male
    Nashville TN
    Vehicle:
    2017 Tundra Trd Pro
    Thanks for doing this, as someone who just ordered the Pro Kit from CB the pics helped a lot. I'm planning on doing it my self and would love to not have to remove the skid plate.
     
  17. Jan 3, 2019 at 9:33 AM
    #17
    scpete24

    scpete24 Duuuuuuude

    Joined:
    Feb 15, 2017
    Member:
    #6387
    Messages:
    698
    Gender:
    Male
    Orange County, CA
    Vehicle:
    2016 TRD Pro Super White
    I did the same thing, enough pressure on the LCA and you should be able to get the strut out. I used my body weight and a pry bar. Didn't say it was easy but it is possible. I've been running this setup for almost 2 years and love it.
     
  18. Jan 3, 2019 at 10:29 AM
    #18
    monaco730

    monaco730 New Member

    Joined:
    Apr 24, 2017
    Member:
    #7382
    Messages:
    948
    Gender:
    Male
    First Name:
    Mike
    Vehicle:
    16 Inferno Tundra
    Fox shocks, TRD Exhaust, TRD grill, TRD shift knob, weathertech floor/bed liners, ARE topper, FrontRunnerOutfitters cargo rack, Relentless cargo bars, color matched front bumper/side mirrors, fuel wheels, nitto RGs, K&N intake
    Nice write up. I installed the +2s on mine. I did notice that your shackle bolts/nuts were pointed "the wrong direction". @Coachbuilder1 recommends having the nut on the outside of the truck to give the most room for the spare. The nut/bolt orientation makes no difference to the shackle functionality obviously. It is only for spare tire room.
     
    jdm ctr '00[OP] likes this.
  19. Jan 3, 2019 at 10:40 AM
    #19
    mart1nezdaniel

    mart1nezdaniel AZ

    Joined:
    Jul 8, 2017
    Member:
    #8459
    Messages:
    593
    Gender:
    Male
    First Name:
    Dan
    Arizona
    Vehicle:
    Tundra TRD PRO 2017
    Are you sure this does not cause any damage? so you keep the skid plate on and un-bolt the upper control arm? i cant find a write up on this for the PRO.
     
  20. Jan 3, 2019 at 1:23 PM
    #20
    scpete24

    scpete24 Duuuuuuude

    Joined:
    Feb 15, 2017
    Member:
    #6387
    Messages:
    698
    Gender:
    Male
    Orange County, CA
    Vehicle:
    2016 TRD Pro Super White
    Didn't damage mine. If I remember correctly, I released the LCA by disconnecting the top of the spindle from UCA. UCA will remain in place and the rest of the wheel assembly (rotor, caliper, etc) will fall out and down. I know for a fact I did not remove my skid plate... It's the same process for removing any coilover really, the only difference is the pro is a bit longer to provide the lift as stock, but any write up showing you how to remove coilovers should set you in the right direction.
     
  21. Jan 3, 2019 at 3:35 PM
    #21
    jdm ctr '00

    jdm ctr '00 [OP] New Member

    Joined:
    Dec 11, 2015
    Member:
    #2233
    Messages:
    257
    Gender:
    Male
    los Angeles, CA
    Vehicle:
    2016 Tundra TRD PRO
    I forgot to mention that I did flip the bolts around.
     
  22. Dec 30, 2020 at 5:40 PM
    #22
    emdcksn

    emdcksn New Member

    Joined:
    Jul 14, 2018
    Member:
    #17038
    Messages:
    290
    Gender:
    Male
    First Name:
    Eugene
    Eugene OR
    Vehicle:
    2021 MGM Tundra Platinum CrewMax
    Did you use spacers on the front and rear or just the front?
     

Products Discussed in

To Top