1. Welcome to Tundras.com!

    You are currently viewing as a guest! To get full-access, you need to register for a FREE account.

    As a registered member, you’ll be able to:
    • Participate in all Tundra discussion topics
    • Transfer over your build thread from a different forum to this one
    • Communicate privately with other Tundra owners from around the world
    • Post your own photos in our Members Gallery
    • Access all special features of the site

3rd brake light assembly install

Discussion in '1st Gen Tundras (2000-2006)' started by Tundrick, Oct 4, 2018.

  1. Oct 4, 2018 at 4:29 AM
    #1
    Tundrick

    Tundrick [OP] New Member

    Joined:
    Oct 4, 2018
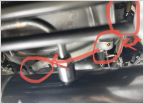
    Member:
    #20157
    Messages:
    3
    Gender:
    Male
    I'm thinking about replacing the 3rd brake light assembly on my 2000 tundra. Wondering if I need to pull the headliner down to unbolt it from the inside on a first gen. Anyone done this before?
     
  2. Oct 4, 2018 at 6:41 AM
    #2
    Professional Hand Model

    Professional Hand Model A.K.A ‘Golden Hands’

    Joined:
    Apr 29, 2018
    Member:
    #14878
    Messages:
    15,007
    Gender:
    Male
    First Name:
    Fred
    ‘Somewhere’... a State of Mind
    Vehicle:
    2002 Tundra SR5 4WD 4.7L AC Silver Metallica
    Hand Protectors
    Have never replaced, but have for grins attempted to remove 3rd light from the outside when I was in there doing preventative maintenance caulking for water leaks.

    That assembly housing is in there tight and was only able to slightly pull the unit out. Felt like it would break it I went farther with it. Have heard others here say yes the interior liner needs removing.

    Why are you taking it out?
     
  3. Oct 4, 2018 at 7:02 AM
    #3
    because_wumbo-truck

    because_wumbo-truck TTC#036 & 1st Degenerate

    Joined:
    Aug 19, 2018
    Member:
    #18314
    Messages:
    3,110
    First Name:
    Jon
    Houston, Texas
    Vehicle:
    2006 AC Tundra Limited 4x4 v8
    flowmaster 40, DDI injectors, sliders, bumper
    LED replacement?
     
  4. Oct 4, 2018 at 7:19 AM
    #4
    Darkness

    Darkness Allergic to white

    Joined:
    Jul 23, 2018
    Member:
    #17315
    Messages:
    9,976
    Gender:
    Male
    First Name:
    Luis
    All over SoCal
    Vehicle:
    The darkest
    It's really dark
    I'm considering replacing mine as well. The halogen bulbs burned holes in mine. Its leaking anyway so I need to replace the seal at minimum but swapping the burned up housing is probably a good idea.
     
  5. Oct 4, 2018 at 7:42 AM
    #5
    War Machine

    War Machine SSEM # 5 3MW

    Joined:
    Aug 7, 2017
    Member:
    #8939
    Messages:
    16,909
    Gender:
    Male
    First Name:
    Jason
    Texas
    Don’t know about the first gens, but the new ones are supposedly a bitch to change out. Headliner does have to come down.
     
  6. Oct 4, 2018 at 8:01 AM
    #6
    Professional Hand Model

    Professional Hand Model A.K.A ‘Golden Hands’

    Joined:
    Apr 29, 2018
    Member:
    #14878
    Messages:
    15,007
    Gender:
    Male
    First Name:
    Fred
    ‘Somewhere’... a State of Mind
    Vehicle:
    2002 Tundra SR5 4WD 4.7L AC Silver Metallica
    Hand Protectors
    My original assembly has holes in it on the two ‘reverse/cargo’ lights. The holes are up high where th heat from the incandescents rose and melted the plastic in close proximity. I replaced those with led’s and they have very little heat. The middle brake bulb hasn’t burned any hole so that one was left as is.

    The gasket between outer plate cover and assembly body on mine was in ok shape. I caulked it in place and the outside of the outer assembly body (where the leak occurs) was caulked as well.

    Seems like a restoration job is the best vs. tearing out the headliner.
     
  7. Oct 4, 2018 at 10:47 AM
    #7
    Darkness

    Darkness Allergic to white

    Joined:
    Jul 23, 2018
    Member:
    #17315
    Messages:
    9,976
    Gender:
    Male
    First Name:
    Luis
    All over SoCal
    Vehicle:
    The darkest
    It's really dark
    Mine is about the same except my gasket is pretty trashed. I'm gonna pull it apart when I get the time and see if there is intrusion from just the gasket or elsewhere. I'm strongly considering pulling the fuse all together but need to survey and correct the damage.
     
  8. Oct 4, 2018 at 10:51 AM
    #8
    bmf4069

    bmf4069 Yup, that's car parts in a dishwasher

    Joined:
    Sep 1, 2018
    Member:
    #18880
    Messages:
    7,273
    Gender:
    Male
    TX
    Vehicle:
    02 AC sr5 4wd v8
    If they do leak, where does it leak? When I go through car washes I get my back rest of the rear seat wet on top of the drivers side.
     
  9. Oct 4, 2018 at 10:54 AM
    #9
    Alexstundra

    Alexstundra Not a new member

    Joined:
    Mar 20, 2018
    Member:
    #13746
    Messages:
    1,381
    Gender:
    Male
    Northeast PA
    Vehicle:
    2016 MGM DC Trd
    3-1 level kit with add a leaf. 295/70/18r cooper max. Spider head light tail light and third brake light, tint, badges off, ladder racks, trd pro grill, color matched hood bulge, grab handle,coach builder +2, dv8 front bumper with winch, fender flares, bed cover....
    Most PIA mod I did to my 16 tundra honestly
     
  10. Oct 4, 2018 at 12:00 PM
    #10
    Tundrick

    Tundrick [OP] New Member

    Joined:
    Oct 4, 2018
    Member:
    #20157
    Messages:
    3
    Gender:
    Male
    I'd like to change it out because the incandescent bulbs melted it in there. But if it's going to be a bitch caulk may do with new LEDs.
     
  11. Oct 4, 2018 at 12:08 PM
    #11
    Casper421

    Casper421 Toyota RidgeTrac driver!

    Joined:
    Jul 12, 2017
    Member:
    #8530
    Messages:
    4,130
    Gender:
    Male
    First Name:
    Chris
    In the woods
    Vehicle:
    06 DC
    Changing out the housing is too much of a pain in the ass IMO. As long as the lights still work, just switch out the bulbs with leds and call it a day.
     
  12. Oct 4, 2018 at 12:15 PM
    #12
    1UPPER

    1UPPER Not A New Member

    Joined:
    Oct 20, 2016
    Member:
    #4937
    Messages:
    4,898
    Gender:
    Male
    TEXAS
    Flux capacitor!
    Any 2007-2019 Tundra will require the headliner be dropped down to remove the third brake light. You can remove the two back a pillars and mid pillar trims and drop the hoodliner on the back area only. You only need to loosen two bolts and un-clip the wire connector. The hard part is all the work to get the hood liner dropped. I believe a 2000 Tundra is bolted from the outside.
     
    rons23 likes this.
  13. Oct 4, 2018 at 12:50 PM
    #13
    rons23

    rons23 Get The Led Out!!!

    Joined:
    Sep 18, 2014
    Member:
    #625
    Messages:
    8,527
    Gender:
    Male
    First Name:
    Ron
    Kill Devil Hills
    Vehicle:
    2008 Nautical Blue TRD
    Sabm (Gtek-Fab), Blake Carbon Diamond Plate door sil protecters, and Air Dam mod, Black Rivited Grill, Devil Horns- Black Anodized(Diaz Fabrication), Hid's in Low Beams and Fogs -6000k, Piaa Extreme for High Beams. Black Rhino Step Tubes, Razir Led interior Lights (white), Low Profile Black Diamond Plate Tool Box, Trd accesories, Weather Tech Mats, Carbon Fiber Shorty Antenna, Drl's, Plasta Dipped Badges + Front Grill Surround
    This^, I will also add that it would be worthwhile to buy a 10mm magnetic deep well socket. You'll thank me later:cool:. Good luck:thumbsup:
     
    NewImprovedRon likes this.
  14. Oct 4, 2018 at 2:44 PM
    #14
    Professional Hand Model

    Professional Hand Model A.K.A ‘Golden Hands’

    Joined:
    Apr 29, 2018
    Member:
    #14878
    Messages:
    15,007
    Gender:
    Male
    First Name:
    Fred
    ‘Somewhere’... a State of Mind
    Vehicle:
    2002 Tundra SR5 4WD 4.7L AC Silver Metallica
    Hand Protectors
    Try this simple diy that will help you hands on understand. Take a phillips head and remove the two screws holding the cover and gasket in place. The cover will come off with a slight pry. This will give you access to the bulbs (2 reverse and one center brake). You will see that the body assembly recesses into the truck headliner (this is where the leak occurs).

    If you want to go farther, then you can slightly pry that assembly out and caulk it. Push the assembly back in and put another bead of caulk along the top. It will make sense once you open it up.

    Do not force the assembly out or it will crack and then you are up the creek!

    Another leak intrusion point are the two rain gutter strips on the top that terminates at the front and rear window gaskets. Clean that up and caulk it. Gently!
     
  15. Oct 5, 2018 at 8:22 AM
    #15
    Les7311

    Les7311 Look up, what do you see

    Joined:
    Dec 30, 2016
    Member:
    #5738
    Messages:
    1,215
    Gender:
    Male
    Vehicle:
    2008 Blue Tundra TRD 4x4
    Did mine just last night and am as happy as a lark!!!!

    Not as bad as they claim it to be...

    Make sure you have small hands (no pun intended), and muscles in your fingers..........
     
  16. Oct 5, 2018 at 8:34 AM
    #16
    Les7311

    Les7311 Look up, what do you see

    Joined:
    Dec 30, 2016
    Member:
    #5738
    Messages:
    1,215
    Gender:
    Male
    Vehicle:
    2008 Blue Tundra TRD 4x4
    Noooooo... Partial Drop---- if can consider a drop.

    Remove the back pillar enough so you can slide the liner by (mine was partially attached.
    Remove the clips located to the side and by the window.
    Use a plastic remover and gently pry down the headliner close to the rear window.
    Slide hand now inside the liner and ceiling and gently pry down on the two clips - - they are almost 6 inches inwards, and more towards the middle.
    Slide 10mm magnetic socket into pocket where the neck of the bolt is and undo. Be careful going back there.
    Once the 10mm are out, the pry out light from bed of truck.

    Use RTV Black Silicone and silicone the contact parts on the replacement light

    I was in noooooooo rush and it took me almost 2 hours to take out... I wanted to make sure nothing breaks etc....56039139960__23F16DBC-729E-4E62-8562-925B40973566.jpg

    took me 15 minutes putting it all back together.

    Would I do it again??? Hell yeah!!!!
     
    Last edited: Oct 5, 2018
  17. Oct 5, 2018 at 2:02 PM
    #17
    Professional Hand Model

    Professional Hand Model A.K.A ‘Golden Hands’

    Joined:
    Apr 29, 2018
    Member:
    #14878
    Messages:
    15,007
    Gender:
    Male
    First Name:
    Fred
    ‘Somewhere’... a State of Mind
    Vehicle:
    2002 Tundra SR5 4WD 4.7L AC Silver Metallica
    Hand Protectors
    Where is the after pic?
     
    Les7311 likes this.
  18. Oct 5, 2018 at 3:43 PM
    #18
    TundraCoast

    TundraCoast Member In Good Standing

    Joined:
    Feb 25, 2018
    Member:
    #13151
    Messages:
    593
    Gender:
    Male
    First Name:
    Ian
    California
    Vehicle:
    1794 4x4
    1794 on the inside - PRO on the outside
    Nice write up, I did the same on both my 2007 & 2017 and it is kind of a PITA, the magnetic 10mm deep socket is probably the game changer. I have an LED bulb burned out in my aftermarket 3rd light now (they are replaceable). I have been putting off swapping the bulb since its just a pain.
     
    Les7311[QUOTED] likes this.
  19. Oct 5, 2018 at 3:57 PM
    #19
    Alexstundra

    Alexstundra Not a new member

    Joined:
    Mar 20, 2018
    Member:
    #13746
    Messages:
    1,381
    Gender:
    Male
    Northeast PA
    Vehicle:
    2016 MGM DC Trd
    3-1 level kit with add a leaf. 295/70/18r cooper max. Spider head light tail light and third brake light, tint, badges off, ladder racks, trd pro grill, color matched hood bulge, grab handle,coach builder +2, dv8 front bumper with winch, fender flares, bed cover....
    I balanced the nut on my pointer finger. Held down the with other hand. And felt for the hole with wih my other fingers and ever so slightly got them on. Only dropped the nut once luckily it was the first one so I took light back it and retrieved it from outside. Painstaking without magnetic socket
     
    Les7311 and NewImprovedRon like this.
  20. Oct 5, 2018 at 4:05 PM
    #20
    Les7311

    Les7311 Look up, what do you see

    Joined:
    Dec 30, 2016
    Member:
    #5738
    Messages:
    1,215
    Gender:
    Male
    Vehicle:
    2008 Blue Tundra TRD 4x4
    It’s always going to be a PITA.

    Only a few of US will do this mod.....
     
  21. Oct 5, 2018 at 5:44 PM
    #21
    Darkness

    Darkness Allergic to white

    Joined:
    Jul 23, 2018
    Member:
    #17315
    Messages:
    9,976
    Gender:
    Male
    First Name:
    Luis
    All over SoCal
    Vehicle:
    The darkest
    It's really dark
    The 2nd and 3rd gen are different. OP has a first gen.
     
  22. Oct 6, 2018 at 12:47 PM
    #22
    Les7311

    Les7311 Look up, what do you see

    Joined:
    Dec 30, 2016
    Member:
    #5738
    Messages:
    1,215
    Gender:
    Male
    Vehicle:
    2008 Blue Tundra TRD 4x4
    8F61AF57-6280-4B6A-A9B9-A3296CEAD27A.jpg
    Here you go. Full Spyders in the back!

    E2E2DDA4-D905-4CFE-B09B-F991C04510A5.jpg
     
  23. Oct 6, 2018 at 2:58 PM
    #23
    Professional Hand Model

    Professional Hand Model A.K.A ‘Golden Hands’

    Joined:
    Apr 29, 2018
    Member:
    #14878
    Messages:
    15,007
    Gender:
    Male
    First Name:
    Fred
    ‘Somewhere’... a State of Mind
    Vehicle:
    2002 Tundra SR5 4WD 4.7L AC Silver Metallica
    Hand Protectors
    Nice. Wonder if its the same install technique as 1st gen? I know my assembly housing would not come out like yours did as it was connected from inside. Did not seem like yours, unless I missed something. No sweat because its not worth the effort for me. I just put in led bulbs and caulked the top.

    Good work by the way and thanks for the pics!
     
    Les7311[QUOTED] likes this.

Products Discussed in

To Top