1. Welcome to Tundras.com!

    You are currently viewing as a guest! To get full-access, you need to register for a FREE account.

    As a registered member, you’ll be able to:
    • Participate in all Tundra discussion topics
    • Transfer over your build thread from a different forum to this one
    • Communicate privately with other Tundra owners from around the world
    • Post your own photos in our Members Gallery
    • Access all special features of the site

MRS OBZ 2018 Limited Build Thread...

Discussion in '2.5 Gen Builds (2014-2021)' started by obz, Mar 10, 2018.

  1. Mar 23, 2018 at 5:55 PM
    #31
    obz

    obz [OP] Not a New Member

    Joined:
    Feb 19, 2018
    Member:
    #13015
    Messages:
    170
    Utah
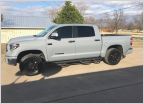
    Best pic I've got right now of the car. I'm out of town until tomorrow night, but the girl went and picked up the girl from the shop. From what I can tell she looks pretty dang good...

    IMG_3713.jpg


    - For those interested -

    7" BDS Lift with Rear Fox 2.0 Shocks
    BDS Rear Shackle
    22X10 Fuel Assault Wheels -18 Offset
    35X12.50X22 Toyo Open Country RT's

    Just heard back from my paint guy on my flares, should be done early next week! I'll bolt those on probably next weekend. Sunday I'll probably get the badges and handles swapped. It's getting there!
     
  2. Mar 23, 2018 at 6:12 PM
    #32
    gosolo

    gosolo You Don’t Know Who I Am But I Know Where You Live

    Joined:
    Nov 5, 2015
    Member:
    #2064
    Messages:
    8,360
    Gender:
    Male
    First Name:
    Ray (or maybe Dale)
    NW Oregon
    Vehicle:
    2015 DC Super Fine Super White Pro
    2"CB shackles, bushings and 1 shim, lockerdown console vault, rear folding seat back mod, snugtop shell with opening side windows, 46g fuel tank, SDHQ sliders and hidden winch, Decked Drawers, Alcan leaf springs and got rid of the interior chrome
    Good to hear you finally acknowledge the superiority of the White!
     
    Black Wolf[QUOTED] likes this.
  3. Mar 23, 2018 at 6:43 PM
    #33
    Black Wolf

    Black Wolf Chillin' in Alamosa

    Joined:
    Apr 20, 2014
    Member:
    #378
    Messages:
    42,458
    Gender:
    Male
    First Name:
    Matt
    Alamosa, CO
    Vehicle:
    2022 Nissan Frontier SV 4X4
    TuwaPro rack, Z1 Offroad stuff, NISMO suspension stuff, FlowmasterFX Extreme exhaust, AIS, OVS, J&L can, other goodies on the way
    White is right!!! Grey..a universe unto itself where no one else dare go...run with the wolf pack...
     
    gosolo[QUOTED] likes this.
  4. Mar 25, 2018 at 12:47 PM
    #34
    2010bigdog

    2010bigdog New Member

    Joined:
    Mar 10, 2018
    Member:
    #13453
    Messages:
    1,435
    Gender:
    Male
    First Name:
    Chuck
    Chicago
    Vehicle:
    2018 MGM SR5 TRD
    looks great !!!!
     
    obz[QUOTED][OP] likes this.
  5. Mar 25, 2018 at 12:51 PM
    #35
    obz

    obz [OP] Not a New Member

    Joined:
    Feb 19, 2018
    Member:
    #13015
    Messages:
    170
    Utah
    Just did the center console induction charging mod. I used JB weld as opposed to others as it sounded like there was some failure when people did it. Hot glue didn't hold up and neither did tape. The JB weld should hang on there pretty good. Steps to do it below (stole the how to from another thread):

    Unscrew all of the bolts from the underside of the armrest and remove the underpanel:

    IMG_0242.jpg IMG_0243.jpg


    Now unscrew the center section with 6 bolts:

    IMG_0244.jpg IMG_0245.jpg IMG_0246.jpg

    Now take the Dremel and start shaving down the fins so the charger fits. I removed the charger from the case as well so that it would not have to go through 2 layers of plastic. Figured it would work significantly better.

    IMG_0247.jpg

    Finally used JB weld on the corners to adhere it to the back of the plastic. I've used JB weld on sheet metal and it does a pretty good job. Not crazy hard like they make it seem, but it'll hang on to that board better than anything else you could buy.

    IMG_0249.jpg

    Now I'm just waiting for it to dry so I can install it. For a full cure it's about 24 hours, but I'll install it before then. Should be around 6 or so to be dry enough to install.

    Here's a link to the charger I bought (based on feedback from others):

    https://www.amazon.com/gp/product/B078HV3V6M/ref=oh_aui_detailpage_o03_s00?ie=UTF8&psc=1
     
    Last edited: Mar 25, 2018
  6. Mar 25, 2018 at 1:01 PM
    #36
    obz

    obz [OP] Not a New Member

    Joined:
    Feb 19, 2018
    Member:
    #13015
    Messages:
    170
    Utah
  7. Mar 30, 2018 at 4:35 PM
    #37
    obz

    obz [OP] Not a New Member

    Joined:
    Feb 19, 2018
    Member:
    #13015
    Messages:
    170
    Utah
    Next mod done - oh shiz bar installed on the driver side for the wife. I didn't really like her grabbing the steering wheel every time she got in and out. Took about 20 minutes all in. Really easy install too. Thanks @Roman for the quick shipping! I've attached the deets from another thread for anyone looking...

    Before...

    IMG_0275.jpg

    After...

    IMG_0277.jpg

    Details on how to do it below...
     

    Attached Files:

    Last edited: Mar 30, 2018
  8. Mar 31, 2018 at 5:12 PM
    #38
    obz

    obz [OP] Not a New Member

    Joined:
    Feb 19, 2018
    Member:
    #13015
    Messages:
    170
    Utah
    Got a lot done today. I washed her and added some fender flares...

    IMG_0288.jpg

    So with the flares... this is before I installed them. You can see how far those wheels and tires stick out. They have -18 offset so they're sticking out quite a bit.

    IMG_0289.jpg IMG_0290.jpg IMG_0291.jpg IMG_0292.jpg IMG_0293.jpg

    Oh forgot to mention that I put in a bed mat...

    IMG_0294.jpg

    So the steps for these flares are very straight forward and very detailed. They are Air Design flares. Frankly I think they look SIGNIFICANTLY better than Bushwackers! The Bushwackers look like they were bolted on and don't match the body, where these do. The lines actually line up perfectly to look factory. Definitely worth the purchase. They have you mock them up first and mark them to get ready for placement - that's what I'm doing here...

    IMG_0295.jpg IMG_0296.jpg

    Then you mount and go...

    IMG_0297.jpg IMG_0298.jpg IMG_0299.jpg

    Finally pulling out for proper shots of them...

    IMG_0300.jpg IMG_0301.jpg IMG_0302.jpg IMG_0303.jpg

    Took a few hours to install, but I'm a SUPER perfectionist. I have to say they look VERY nice!
     
  9. Apr 1, 2018 at 4:19 PM
    #39
    obz

    obz [OP] Not a New Member

    Joined:
    Feb 19, 2018
    Member:
    #13015
    Messages:
    170
    Utah
    Swapped over the badges and door handles. Nice and black. My wife likes them a ton better. Still got a ways to go to get rid of all the chrome, but we'll get there...

    Before:

    IMG_0305.jpg IMG_0306.jpg IMG_0308.jpg

    After:

    IMG_0309.jpg IMG_0312.jpg

    Stupid 5.7L Badge was a BI to get off. My fingers still hurt from sawing dental floss back and forth.
     
  10. Apr 1, 2018 at 4:32 PM
    #40
    Coolhardy

    Coolhardy New Member

    Joined:
    Apr 15, 2017
    Member:
    #7259
    Messages:
    1,523
    Gender:
    Male
    First Name:
    Harris
    Vehicle:
    2014 black tundra
    Too many to list
    Bad ass truck. I like your attention to detail. Will be you adding supercharger
     
  11. Apr 1, 2018 at 5:09 PM
    #41
    obz

    obz [OP] Not a New Member

    Joined:
    Feb 19, 2018
    Member:
    #13015
    Messages:
    170
    Utah
    Thanks man! I haven't decided how crazy I want to get. Super charger is definitely a possibility as well as a re-gear, but we'll see. The wife says she doesn't have any problem with the power it's putting out right now.
     
    Coolhardy[QUOTED] likes this.
  12. Apr 4, 2018 at 5:49 PM
    #42
    obz

    obz [OP] Not a New Member

    Joined:
    Feb 19, 2018
    Member:
    #13015
    Messages:
    170
    Utah
    Getting her ready for the new front end. I wasn't planning on taking it all apart today, but started into it and figured I might as well. Pretty dang easy to do considering. Much easier than my Tesla or even my Taco. 4 bolts on each side and unplug everything and yank - done. I've mocked up my wiring harness for the Rigid's and should be pretty straight forward. Tonight I'm going to try to splice everything together into the wiring harness ready for mounting and running the wires. I'm hoping it'll be easy. I've got a new bumper if anyone wants it too. Hit me up and Wish me luck!

    IMG_0323.jpg IMG_0324.jpg
     
  13. Apr 5, 2018 at 4:32 PM
    #43
    obz

    obz [OP] Not a New Member

    Joined:
    Feb 19, 2018
    Member:
    #13015
    Messages:
    170
    Utah
    Well got it all put back together. I didn't take any proper shots like I should have - unfortunately. Ended up wiring the 5 lights to the stock fog light switch, which is SUPER clean. I kept blowing fuses when I'd turn them on, not realizing that I was wiring the plug wrong. Very factory looking install if I do say so myself. I still need to get a proper shot of the truck out of the garage, but this will give you an idea. All and all, not too terrible and bolted up pretty easily.

    IMG_0327.jpg IMG_0328.jpg IMG_0329.jpg IMG_0330.jpg

    I also did the mirror backs. Super easy install...

    IMG_0333.jpg IMG_0334.jpg
     
    D3Tundra and TXRailRoadBandit73 like this.
  14. Apr 5, 2018 at 5:28 PM
    #44
    Berdine

    Berdine Voodoo Sport

    Joined:
    Aug 2, 2017
    Member:
    #8877
    Messages:
    1,901
    Gender:
    Male
    First Name:
    Frank
    Binghamton, NY
    Vehicle:
    2020 VooDoo Blue Trd Sport
    Love this build!
     
  15. Apr 5, 2018 at 6:06 PM
    #45
    obz

    obz [OP] Not a New Member

    Joined:
    Feb 19, 2018
    Member:
    #13015
    Messages:
    170
    Utah
    Thanks! It's been moving fast, that's for sure!
     
  16. Apr 5, 2018 at 9:14 PM
    #46
    obz

    obz [OP] Not a New Member

    Joined:
    Feb 19, 2018
    Member:
    #13015
    Messages:
    170
    Utah
    Thought I'd take a pic of the new lights in the dark...

    This is just the headlights:

    IMG_0335.jpg

    This is with all 5 Rigids on (floods on the 4 pods and hybrid flood/spot on the 20" bar):

    IMG_0336.jpg


    Pretty much makes the night day! HA!
     
    TXRailRoadBandit73 likes this.
  17. Apr 5, 2018 at 9:35 PM
    #47
    TXRailRoadBandit73

    TXRailRoadBandit73 YOTAS,RAILROADIN',RÖKnRÖLLN',BEER,MAX/GEMMA

    Joined:
    May 30, 2016
    Member:
    #3487
    Messages:
    50,708
    Gender:
    Male
    First Name:
    Adam
    The 956, TEXAS
    None yet
    It's looking damn good! Never heard about those decal stripes on bed
     
  18. Apr 6, 2018 at 4:18 PM
    #48
    obz

    obz [OP] Not a New Member

    Joined:
    Feb 19, 2018
    Member:
    #13015
    Messages:
    170
    Utah
    Did you hit him up on the Tacoma forum? He's normally pretty responsive.
     
  19. Apr 6, 2018 at 4:40 PM
    #49
    TXRailRoadBandit73

    TXRailRoadBandit73 YOTAS,RAILROADIN',RÖKnRÖLLN',BEER,MAX/GEMMA

    Joined:
    May 30, 2016
    Member:
    #3487
    Messages:
    50,708
    Gender:
    Male
    First Name:
    Adam
    The 956, TEXAS
    None yet
    His link again please
     
  20. Apr 6, 2018 at 4:45 PM
    #50
    obz

    obz [OP] Not a New Member

    Joined:
    Feb 19, 2018
    Member:
    #13015
    Messages:
    170
    Utah
  21. Apr 6, 2018 at 5:05 PM
    #51
    BlueBottle

    BlueBottle not a PRO

    Joined:
    Sep 17, 2016
    Member:
    #4572
    Messages:
    5,069
    Vehicle:
    '16 Platinum 4x4
    See fine print
    Damn you don’t waste any time! Truck looks good! Lights are bright AF!
     
    obz[OP] likes this.
  22. Apr 6, 2018 at 6:27 PM
    #52
    TXRailRoadBandit73

    TXRailRoadBandit73 YOTAS,RAILROADIN',RÖKnRÖLLN',BEER,MAX/GEMMA

    Joined:
    May 30, 2016
    Member:
    #3487
    Messages:
    50,708
    Gender:
    Male
    First Name:
    Adam
    The 956, TEXAS
    None yet
  23. Apr 7, 2018 at 9:15 AM
    #53
    obz

    obz [OP] Not a New Member

    Joined:
    Feb 19, 2018
    Member:
    #13015
    Messages:
    170
    Utah
    Painted the exhaust tip. Did the same thing on the Taco when I had it. Last bit of chrome to get rid off. Super easy to do too and costs all of a half can of engine enamel...

    Removed from pipe:

    IMG_0341.jpg

    Scuffed up ready for paint. Make sure to use some acetone on it - they get pretty dirty and you want to make sure everything sticks:

    IMG_0342.jpg

    First coat - nice and light:

    IMG_0343.jpg

    All done and dry. I let it cure overnight prior to putting it back on the truck. Don't want to mess it up too bad when sticking it back on there.

    IMG_0344.jpg

    And finally back on the truck. No mo chrome...

    IMG_0345.jpg
     
  24. Apr 8, 2018 at 4:30 PM
    #54
    obz

    obz [OP] Not a New Member

    Joined:
    Feb 19, 2018
    Member:
    #13015
    Messages:
    170
    Utah
    Took a couple more "proper" pics today of the Tundra. Almost looks black from the lack of sun, but I promise she hasn't changed color. :)

    IMG_0351.jpg IMG_0352.jpg IMG_0353.jpg IMG_0354.jpg IMG_0355.jpg IMG_0356.jpg
     
    J.M., D3Tundra and TXRailRoadBandit73 like this.
  25. Apr 10, 2018 at 5:04 PM
    #55
    J.M.

    J.M. New Member

    Joined:
    Feb 18, 2018
    Member:
    #12990
    Messages:
    37
    Gender:
    Male
    First Name:
    Jason
    Northeast Texas
    Vehicle:
    2018 BBP 1794 Tundra
    ARB Twin Air Compressor w/ XFAKTR Mount AMP Research Power Running Boards, Bed Step, Bed Step 2 30% Tint Front w/ 5% Tint on the back Fold-A-Cover Bed Cover w/Caddy, Line-X Spray in Bed Liner Husky Floor Mats Front/Rear Console Organizer TRD Anti-Sway Bar American Flag, 4ID, and Duck's Unlimited Decals
    I love that new front bumper. What brand is that? Did you get all the lights through them or did you get them else where? Also, I saw you wired them all into the fog light switch, how hard was that? Did you have a wiring diagram for them?

    Thanks in advance!
     
  26. Apr 10, 2018 at 6:41 PM
    #56
    obz

    obz [OP] Not a New Member

    Joined:
    Feb 19, 2018
    Member:
    #13015
    Messages:
    170
    Utah
    It's a Fab Fours Vengeance front bumper. The lights are all Rigid Industry that I picked up from AutoAnything at a 22% discount. The wiring wasn't bad because of the people on here helping. Basically I spliced all of the positive wires into the same relay. I then cut out the switch and used the fog light wiring harness to plug directly into the switch wires. Not bad at all to do and very factory and easily reversible. It's not unlike the way the Morimoto HID's work. If you check out this thread it might help:

    https://www.tundras.com/threads/question-about-wiring-dual-pods-to-fog-light-switch.22904/
     
    J.M.[QUOTED] likes this.
  27. Apr 11, 2018 at 10:04 AM
    #57
    J.M.

    J.M. New Member

    Joined:
    Feb 18, 2018
    Member:
    #12990
    Messages:
    37
    Gender:
    Male
    First Name:
    Jason
    Northeast Texas
    Vehicle:
    2018 BBP 1794 Tundra
    ARB Twin Air Compressor w/ XFAKTR Mount AMP Research Power Running Boards, Bed Step, Bed Step 2 30% Tint Front w/ 5% Tint on the back Fold-A-Cover Bed Cover w/Caddy, Line-X Spray in Bed Liner Husky Floor Mats Front/Rear Console Organizer TRD Anti-Sway Bar American Flag, 4ID, and Duck's Unlimited Decals

    Sweet. Do you remember what relay you got or did one come with the lights? What gauge wire did you end up using?
    So if I understand this correctly, the positives from the 4 pods and 1 light bar were spliced together into one wire that was then attached to the relay?
    Then from the relay you ran a fused wire to the positive battery terminal?
    You also spliced all the negative wires from the lights into 1 ground? Then did you run the ground to the battery or on the side of the body there next to the battery?
    Then run a positap into the the positive existing fog light wiring harness and ran that to the trigger part of the relay?

    Thanks!
     
    D3Tundra likes this.
  28. Apr 11, 2018 at 10:08 AM
    #58
    J.M.

    J.M. New Member

    Joined:
    Feb 18, 2018
    Member:
    #12990
    Messages:
    37
    Gender:
    Male
    First Name:
    Jason
    Northeast Texas
    Vehicle:
    2018 BBP 1794 Tundra
    ARB Twin Air Compressor w/ XFAKTR Mount AMP Research Power Running Boards, Bed Step, Bed Step 2 30% Tint Front w/ 5% Tint on the back Fold-A-Cover Bed Cover w/Caddy, Line-X Spray in Bed Liner Husky Floor Mats Front/Rear Console Organizer TRD Anti-Sway Bar American Flag, 4ID, and Duck's Unlimited Decals
    I go another question about the bumper. Do you have the parking sensors on the front of your truck and if so, how does installing this bumper affect that? I see this on their web site and I am sort of concerned that I would function of the parking sensors. "*** SENSOR FUNCTIONALITY WILL BE LOST ON TRUCKS WITH LESS THAN 6 INCHES OF LIFT. ***" I am not sure if that means actual lift or ground clearance.

    Thanks again.
     
  29. Apr 11, 2018 at 7:38 PM
    #59
    obz

    obz [OP] Not a New Member

    Joined:
    Feb 19, 2018
    Member:
    #13015
    Messages:
    170
    Utah
    I used the relay that came with the light bar. The relay is a 60A and I was putting in about 30A so had plenty left over. I didn't use any seperate wiring, just leveraged the wiring it came with - it's about 12 gauge I think. Everything else you've got exactly right except for the last part. I didn't positap anything - instead I bought a plug for the fog light bulb plug and used the positive and negative from the wires running off of that for the switch. I used this plug:

    https://www.amazon.com/gp/product/B00XP4PP6W/ref=oh_aui_detailpage_o03_s00?ie=UTF8&psc=1

    I haven't put back on the front sensors, though I think I could. I've been debating drilling out the holes for it in the bumper - I just hate to mess up a perfect bumper. I've just disabled all parking (front and back) sensors for now. Everything else works great though. No issues with the other TSS stuff.
     
    J.M.[QUOTED] likes this.
  30. Apr 11, 2018 at 7:41 PM
    #60
    obz

    obz [OP] Not a New Member

    Joined:
    Feb 19, 2018
    Member:
    #13015
    Messages:
    170
    Utah
    Couple of pictures of the work done today. Got the front 2 windows tinted, and clear bra put on. I also tinted the 3rd brake light but don't have a pic of that. Looks good though...

    IMG_0360.jpg IMG_0361.jpg IMG_0362.jpg
     
    Stroke250 and TXRailRoadBandit73 like this.
To Top