

-
Welcome to Tundras.com!
You are currently viewing as a guest! To get full-access, you need to register for a FREE account.
As a registered member, you’ll be able to:- Participate in all Tundra discussion topics
- Transfer over your build thread from a different forum to this one
- Communicate privately with other Tundra owners from around the world
- Post your own photos in our Members Gallery
- Access all special features of the site
 1st Gen 04 DC Headlight/Turn signal
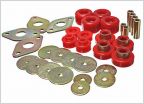 2002 Tundra Body Mount Kit
 Cutting to the Chase: No place for basic subwoofer in 2006 Gen 1 Crewmax without mod?
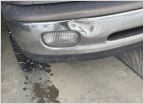 Steel Front Bumper Dent
 TRD bed decal
 Hopkins 7-way blade & 4-way flat combination receptacle question
Rotors?
Discussion in '1st Gen Tundras (2000-2006)' started by literallyme, Nov 8, 2024.
Page 1 of 3
Page 1 of 3

