1. Welcome to Tundras.com!

    You are currently viewing as a guest! To get full-access, you need to register for a FREE account.

    As a registered member, you’ll be able to:
    • Participate in all Tundra discussion topics
    • Transfer over your build thread from a different forum to this one
    • Communicate privately with other Tundra owners from around the world
    • Post your own photos in our Members Gallery
    • Access all special features of the site
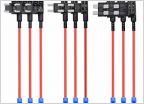
Subwoofer box build and amp install

Discussion in '3rd Gen Tundras (2022+)' started by FALQN, Oct 17, 2022.

  1. Oct 17, 2022 at 1:09 PM
    #1
    FALQN

    FALQN [OP] New Member

    Joined:
    Mar 22, 2022
    Member:
    #76206
    Messages:
    55
    Gender:
    Male
    Vehicle:
    Midnight Black, 4x4 Crew, TRD Sport
    OEM Running Boards, Wheel Locks, Hard Cover, Home-made Kicker Sub
    I have the 9-speaker stereo system ('22 TRD Sport) which lacks a little bit of ooomph, so I did some product research and went to task building a sub box and adding an amp. I did not want to spend a ton of money adding a bass system, but the sky is the limit if you feel like it. Certainly there are higher end and lower end products which can be substituted to fit your taste or wallet. I settled on a 10" Kicker CompRT which is a shallow mount sub, 400 watts RMS, 800 peak...dual 2-ohm voice coils wired to run at a 1-ohm load...with a sealed enclosure volume of 0.4 - 1.25 cu ft. I love the tight bass a sealed enclosure delivers. Vented boxes are to boomy for my tastes. Vented enslosures, for the most part, need more air volume to perform well which is not ideal in the Tundra's limited space. The small volume needed for this truck was perfect for the 0.4-1.25 cu ft specification. My box volume was about 1.1 to 1.2 cu ft, if I remember correctly. The most time consuming portion of my project was the sub box. Several trial and error steps. The box is 3/4 MDF with the terraced bottom made of 1/2 inch plywood. The bottom of the shallow mount sub sits about a half inch above the inside box bottom.

    I matched the sub to the Kicker 46CXA400.1T amp which delivers 400 watts at a 1 ohm load...the certification test included with the amp was 454 watts-tested. The amp has RCA's with variable speaker level inputs which automatically adjusts to different stereo systems and impedence levels...including the Tundra's. I also purchased an amp install kit and bass adjustment knob to mount to the dash or console area. Both of these items were purchased directly from Kicker. The sub and amp were purchased through Crutchfield.

    Here are my picks and little walk-thru:
    I did not want to use the area behind the seats. Too many angles...and I truly did not want this area to look like crap. In addition the jack is behind there as well as useable space to hang things.
    IMG_5948.jpg

    So I decided on the space underneath the rear seats, and behind the storage area...I did, however, portrude into the storage area about 3.5 inches. Remove the underseat storage bin by removing the front panels and removing all of the push pins, including the ones behind the seats. These are only accessible by removing the rear plastic panels behind the seats (the ones in the pick above). Take your time to also remove the plastic hangers that hold seatbelt wiring...behind and underneath. You will also have to contend with getting the storage bin away from the seatbelt anchors and tethers. With some work they slide through. You are left with this view when done.
    IMG_5920.jpg

    The insulation hanging down in this pic removes easily or you can tuck it out of the way. Behind this you will find an additional 4-5 inches of space that runs the entire width of the truck. Starting from the bottom of the storage area on the driver's side...to the top of the first incline, about 2.5 inches back from this edge is where the storage bin ends. The space from here to the back wall is open space.
    IMG_5922.jpg

    Here is the template I made for the entire area which is in essence a wedge. The right side of the template sits on the upper terrace against the rear seat trusses and back wall. As you will see in upcoming pics, there is a 12x12 inch space between the rear seat rails that allows you to flatten out the top housing which holds the sub. The bottom is still terraced but the top is a flat square box.
    IMG_E6102.jpg

    Run the wiring from the battery to the included fuse (if you buy the install kit everything is included). I mounted the fuse close to the battery connection as instructed, which is attached on an unused tab on the battery tray. An old wall switch plate was used to keep from penetrating the battery when I drilled the holes. The power cable which I believe is 8-gauge wraps around the battery and close to the firewall (zip-tied as needed for stability to the other side of the master brake cylinder and then into the cabin. There a rubber plug that can punched through right under the dash.
    IMG_5946.jpg

    Pull up the front and rear foot rails, remove the driver seat bolts (in order to tilt the seat to the rear to wire the amp), remove the drivers seatbelt anchor bolt, and remove the lower pillar plastic between the front and rear doors (take your time to nudge the weatherstripping that hold the tabs of the plastic).

    In order to access the right and left speaker wires (to use for inputs), I popped both rear door panels to identify the speaker wires. There is a crossover/splitter for the factory woofer and tweeter. Back track both wires to find the main before the split. As the wires leave the doors and transition into the cabin via a multi-wire connector, the wires change diameter and color. Pull the rubber back and use the tabs to disconnect. Trace the wires.
    IMG_6103.jpg

    I stripped the sheathing off of the wires and soldered wire extensions on, which terminated into 'speaker-to-RCA' connections...like these: https://www.amazon.com/CESS-064-Spe...=&hvlocphy=1024034&hvtargid=pla-1106932872677

    Repeat for the passenger side and run the wires under the carpet to the driver side seat.
    IMG_5925.jpg

    The amp was installed under the driver's seat. Plenty of room...but I still need to anchor it. There is a grounding location under the carpet in this area..with a screw already in place. Even though the amp is wired directly to the battery, it turns on and shuts off through signal sensing. No reason to worry about a drained battery or wiring to an ignition activated terminal.
    IMG_5945.jpg

    Install your new sub box and wire it all up. Don't forget to tune your amp and set the gain. Kicker provides tone sound tracks so you can use an amp/volt/meter to set the proper gain...otherwise you can damage your equipment.

    I do not have a bunch of pics for this step...but you need to modify the storage bin to accept the sub box. I made the cut just at the set of ribs that hold the storage dividers. Reinstall the bin, slide your seatbelts back in, reattach the wire hangers underneath and behind the seat, install all pushpins, and remount the plastics behind the seats to button it all up. I can slide my sub in and out through the storage bin in case it needs to be removed. Below are the final pics.

    This install provides alot of hard hitting bass. It absolutely drops!!! More than I will ever need. I can increase the bass for some of my favorites or turn it down for a particular type of music. The sound is fuller at all volume levels and you can feel it as well. don't be worried about the sub being hidden. Bass frequencies are omnidirectional and travel throughout the cabin.

    I am so glad I did this. Hopefully this inspires you...

    This box disappears into the cavity! Take note that I used homemade brass speaker terminals with wingnuts for quick disconnect. The terminals are just screws with nuts and washers to grab the wires on both sides of the MDF.
    IMG_5941.jpg

    From the other side...see the wedge transition into the square sub support.
    IMG_5942.jpg

    Square portion of sub box under the seat and between the seat supports.
    IMG_5943.jpg

    Low view...not much clearence, but enough.
    IMG_5940.jpg

    Finshed position, driver side. Plenty of storage left!!!
    IMG_5936.jpg

    Finished position, passenger side.
    IMG_5937.jpg
     
  2. Oct 17, 2022 at 1:10 PM
    #2
    Taco-Spike

    Taco-Spike Gateway from Tacoma World ~ ended up here

    Joined:
    Apr 25, 2021
    Member:
    #62293
    Messages:
    4,666
    Gender:
    Male
    512
    Vehicle:
    16 Tacoma TRD Sport DCSB / 17 Tundra 5.7L 4X4 CM
    Two Trucks
    Nice job!
     
    Tripleconpanna likes this.
  3. Oct 17, 2022 at 1:26 PM
    #3
    PwrMMA

    PwrMMA New Member

    Joined:
    Sep 9, 2022
    Member:
    #83095
    Messages:
    25
    Gender:
    Male
    Vehicle:
    2022 Toyota Tundra SR5 TRD Offroad
    Nice. I was skeptical of the position, good to know this is an option. I have been contemplating a 10" with a sealed box, would be plenty of bass for me I think as I prefer more rock and metal, don't need big bass. Maybe I missed it, but what did you tap for your remote wire?
     
  4. Oct 17, 2022 at 7:19 PM
    #4
    FALQN

    FALQN [OP] New Member

    Joined:
    Mar 22, 2022
    Member:
    #76206
    Messages:
    55
    Gender:
    Male
    Vehicle:
    Midnight Black, 4x4 Crew, TRD Sport
    OEM Running Boards, Wheel Locks, Hard Cover, Home-made Kicker Sub
    If you are referring to the ‘blue’ remote turn on wire that comes with most amps…No need for a remote wire to turn on the amp. It senses activity coming from the stereo and turns on and off automatically.
     
  5. Oct 17, 2022 at 7:57 PM
    #5
    ByeF150HelloTundra

    ByeF150HelloTundra New Member

    Joined:
    Jan 18, 2022
    Member:
    #73299
    Messages:
    267
    DFW
    Vehicle:
    2022 Tundra SR5
    This is awesome! Nice job
     
  6. Oct 17, 2022 at 10:17 PM
    #6
    dutch2112

    dutch2112 New Member

    Joined:
    Oct 16, 2022
    Member:
    #85008
    Messages:
    166
    Gender:
    Male
    Vehicle:
    2023 Limited hybrid Trd
    35” Falken Wildpeak AT3, 17x8.5 method 305 nv, trd lift kit, trd pro grill, trd exhaust
    Very nice set up! I will be swapping out stock stereo once mine comes in as I have to jam out in every vehicle I own.i probably swap out some of 14’ stereo Alpine build which sounds absolutely amazing with a similar set up.
     
  7. Oct 18, 2022 at 1:01 PM
    #7
    KRLTUNDRA22

    KRLTUNDRA22 New Member

    Joined:
    Jun 29, 2022
    Member:
    #80098
    Messages:
    8
    Gender:
    Male
    Vehicle:
    22 Tundra
    Just a question because I want to to the same thing. Do you have to wire in to both rear speakers since only one woofer was used? Did you just run all 4 RCA to the amp? Do you happen to have a pic. Great job!!! I have been waiting for someone to post a walk through of how they did the install.
     
    X42069 likes this.
  8. Oct 19, 2022 at 4:27 AM
    #8
    FALQN

    FALQN [OP] New Member

    Joined:
    Mar 22, 2022
    Member:
    #76206
    Messages:
    55
    Gender:
    Male
    Vehicle:
    Midnight Black, 4x4 Crew, TRD Sport
    OEM Running Boards, Wheel Locks, Hard Cover, Home-made Kicker Sub
    The amp runs in mono or stereo. I choose to run mine in mono mode with a single speaker wired to handle the power of both channels. If you do not include both input channels (left and right) you will lose part of your music that comes from the other channel. With my set up the amp combines both channels and outputs all signals to a single 10”.
    I do not have a pic of the amp under the seat, but it is straight forward…a speaker wire pair from the left rear…a speaker wire pair from the right…both terminating with pre-made speaker-to-rca terminals.
    You must determine what products to buy based on power handling capabilities. This step is very important. My 10” speaker has two voice coils (two inputs for power from the amp) which are 2-ohms each. This allows me to wire the speaker in series, dropping the speaker to a 1-ohm load and milking every once of power out of my amp that is stable at 1 ohm. Once this is figured out and you build the box to match the speakers needed volume, you are golden. The rest is very easy in terms of getting power and running your speaker wires to the box.
     
  9. Oct 19, 2022 at 10:11 AM
    #9
    KRLTUNDRA22

    KRLTUNDRA22 New Member

    Joined:
    Jun 29, 2022
    Member:
    #80098
    Messages:
    8
    Gender:
    Male
    Vehicle:
    22 Tundra

    Thanks for the info. Can't wait to do it myself.
     
  10. Oct 19, 2022 at 1:32 PM
    #10
    Rockgate

    Rockgate New Member

    Joined:
    Oct 6, 2017
    Member:
    #10112
    Messages:
    859
    Gender:
    Male
    First Name:
    Terry
    Middle TN
    Vehicle:
    2022 CMLB TRD OR Prem. 4X4 and 2002 RCLBV65Spd
    Great job.
     
  11. Oct 30, 2022 at 9:02 PM
    #11
    dutch2112

    dutch2112 New Member

    Joined:
    Oct 16, 2022
    Member:
    #85008
    Messages:
    166
    Gender:
    Male
    Vehicle:
    2023 Limited hybrid Trd
    35” Falken Wildpeak AT3, 17x8.5 method 305 nv, trd lift kit, trd pro grill, trd exhaust
    Anyone put an amp/sub setup in a hybrid yet?
     
    Tundr23 and skbirkholz like this.
  12. Nov 2, 2022 at 1:11 AM
    #12
    skbirkholz

    skbirkholz New Member

    Joined:
    Feb 15, 2022
    Member:
    #74627
    Messages:
    15
    Gender:
    Male
    First Name:
    Scott
    wondering the same. seems like the amp power would be even easier but wondering what snags there could be
     
  13. Dec 27, 2022 at 2:15 PM
    #13
    bearsman34

    bearsman34 New Member

    Joined:
    Aug 7, 2022
    Member:
    #81655
    Messages:
    8
    Gender:
    Male
    Vehicle:
    2022 Tundra TRD Off Road 4x4
    Nothing yet!!
    This is an awesome write up! I just picked up a Kicker HS10 sub to put in my Tundra, and I was thinking the same thing with mounting it under the seats. That being said, where did you pick up the speaker wires for the rear doors? And do you happen to know the colors I need to grab off each speaker? I'm trying to avoid removing the door panels.
     
  14. Feb 3, 2023 at 9:57 PM
    #14
    NVRsyDI

    NVRsyDI 22 TRD PRO Prerunner

    Joined:
    Sep 16, 2022
    Member:
    #83458
    Messages:
    63
    Gender:
    Male
    First Name:
    Russ
    Huntington Beach
    Vehicle:
    Tundra TRD Pro 22
    Wescott level kit KMC Bead Lock 17" (Unreleased) 37" Nitto Tires Burger 4P Tuner Burger BOV Hike It Pedal Controller Black Widow Exhaust (2) JL Audio 13.5 TWv2 subs 10% Tint Windshield 50% 8 gang switch hub 12 smart rgb rock lights
    I went with JL. 2 13.5’s and 1000 watts. I the TRD Pro so no room under seat.

    6E423F0C-1D01-4D5B-AAAD-A53AF81F5E42.jpg
     
  15. Feb 4, 2023 at 7:57 AM
    #15
    ByeF150HelloTundra

    ByeF150HelloTundra New Member

    Joined:
    Jan 18, 2022
    Member:
    #73299
    Messages:
    267
    DFW
    Vehicle:
    2022 Tundra SR5
    I added a 10 inch combined sub/amp from Kicker (Kicker 46hs10). Just put it underneath my seat. Used the taco tunes add a sub wiring harness so didn’t have to splice any wires. Have it underneath the drivers seat and fits pretty well. Will upload some pictures later. Install took like 45 mins tops.
     
    Corbeano1 likes this.
  16. Feb 5, 2023 at 10:35 PM
    #16
    Gambolified

    Gambolified New Member

    Joined:
    Dec 4, 2022
    Member:
    #87870
    Messages:
    10
    Gender:
    Male
    Vehicle:
    2023 Tundra Platinum
    Do you have a link to the adapter? Thanks.
     
  17. Mar 10, 2023 at 5:56 PM
    #17
    Tundr23

    Tundr23 New Member

    Joined:
    Apr 8, 2018
    Member:
    #14293
    Messages:
    7
    Gender:
    Male
    Same-Anyone do this?
     
  18. Mar 10, 2023 at 6:00 PM
    #18
    ArticTundra

    ArticTundra New Member

    Joined:
    Oct 30, 2021
    Member:
    #70053
    Messages:
    252
    Gender:
    Male
    First Name:
    Jason
    Cold

    I like this idea. How do you like it?
     
  19. Mar 10, 2023 at 6:20 PM
    #19
    Tundr23

    Tundr23 New Member

    Joined:
    Apr 8, 2018
    Member:
    #14293
    Messages:
    7
    Gender:
    Male
    Custom enclosure?
     
  20. Mar 10, 2023 at 6:26 PM
    #20
    Breathing Borla

    Breathing Borla I'd rather be fishing

    Joined:
    Jan 21, 2020
    Member:
    #41531
    Messages:
    4,541
    Gender:
    Male
    Vehicle:
    2023 Tundra Platinum 4x4 Crewmax
    a little spl there eh
     
  21. Mar 10, 2023 at 6:29 PM
    #21
    Black widow TRD

    Black widow TRD New Member

    Joined:
    Feb 15, 2023
    Member:
    #92108
    Messages:
    868
    Gender:
    Male
    First Name:
    Manuel
    Vehicle:
    2023 Black Tundra SR5/TRD
    Coming soon

    Sweet set up!! Did you use any sound dampening in that area?

    Any annoying vibration from the rear window, as it has been my concern.
     
  22. Mar 11, 2023 at 4:57 PM
    #22
    lesh234

    lesh234 New Member

    Joined:
    Dec 18, 2022
    Member:
    #88788
    Messages:
    45
    Gender:
    Male
  23. Apr 23, 2023 at 9:35 AM
    #23
    Ruczko

    Ruczko New Member

    Joined:
    Jul 4, 2019
    Member:
    #32822
    Messages:
    5
    Gender:
    Male
    Vehicle:
    23 Blueprint Tundra Limited TRD OR
    Yes, please! Is it just the single adapter you need? If you can provide a few details of how you did this that would be awesome.
     
  24. Jul 27, 2023 at 5:52 PM
    #24
    Gtatx

    Gtatx New Member

    Joined:
    Jul 27, 2023
    Member:
    #101060
    Messages:
    1
    Gender:
    Male
    First Name:
    Gohar
    Vehicle:
    22 TRD Pro
    35 12.5 18 RT Trails,

    I would just love to add one of these as I have HD 750/1 sitting in the garage. Any help with box specs would be appreciated.
     
  25. Jul 28, 2023 at 9:05 AM
    #25
    eddiefromcali

    eddiefromcali New Member

    Joined:
    Mar 14, 2022
    Member:
    #75818
    Messages:
    1,280
    Gender:
    Male
    First Name:
    Eddie
    Vehicle:
    2022 Tundra Platinum
    100% Stock
    I wouldn't recommend that box....look at that fat ring around the back seat fabric...thats the sub rubbing
     
    Black widow TRD likes this.
  26. Aug 6, 2023 at 2:44 PM
    #26
    Mr Smif

    Mr Smif New Member

    Joined:
    May 30, 2022
    Member:
    #78980
    Messages:
    8
    Gender:
    Male
    First Name:
    keith
    Louisiana
    Vehicle:
    2022 Tundra SR5
    Do you have any tips or info for removing the plastic behind the rear seats? Thanks!
     
    szarychelm and sulli155 like this.

Products Discussed in

To Top