1. Welcome to Tundras.com!

    You are currently viewing as a guest! To get full-access, you need to register for a FREE account.

    As a registered member, you’ll be able to:
    • Participate in all Tundra discussion topics
    • Transfer over your build thread from a different forum to this one
    • Communicate privately with other Tundra owners from around the world
    • Post your own photos in our Members Gallery
    • Access all special features of the site

Install of AJT 4x4 chrome delete shift knob without removing center dash trim

Discussion in '2.5 Gen Tundras (2014-2021)' started by LogCabins, Feb 9, 2020.

  1. Feb 9, 2020 at 9:43 AM
    #1
    LogCabins

    LogCabins [OP] Professional Procrastinator

    Joined:
    Jul 26, 2019
    Member:
    #33722
    Messages:
    257
    Gender:
    Male
    'Merica
    Vehicle:
    2017 TRD Pro
    Start by removing lower usb, 12v center panel....you do not need to remove the shift console to do this.
    Next remove AC control panel...easy peasy...plenty of videos so I don’t need to go into great detail.
    Now I did not...repeat did not want to have to remove the whole center trim piece just to get the 4x4 selector knob out, so this is my solution....choose to do it this way at your own risk, but it is a quick and easy way to gain access to the bottom tab to release the knob.

    0E3E1B8A-2543-49F7-9A55-B9E07726B1D6.jpg
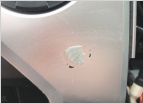
    with a drill you are going to make a hole below the already existing access point to give yourself the ability to get a small flathead screwdriver to the bottom tab on the knob.
    1DF02E7A-6AF9-497C-A24A-2C0AEA65379E.jpg
    the existing access point will allow you to release the top tab and use the new hole to release the bottom tab and pull out knob.
    6ABA6C40-80CA-46FB-B993-86273A36699C.jpg
    now follow the instructions on AJT or ME-SO website to disassemble your knob and put new trim ring..put all back together and enjoy and like me wait for the AC control trim delete to ship
    C7C1FF7B-09C4-4B68-B69F-78306D5D65EA.jpg

    AF89A133-E52E-47B7-AEE0-CDB35FA3207F.jpg
     
    Last edited: Feb 9, 2020
  2. Feb 9, 2020 at 12:16 PM
    #2
    ProtoJ

    ProtoJ New Member

    Joined:
    Oct 5, 2018
    Member:
    #20207
    Messages:
    363
    Gender:
    Male
    Vehicle:
    2018 Crewmax TRD Off-Road
    I guess I’ll be doing this too as mine just shipped!
     
    LogCabins[OP] likes this.
  3. Feb 9, 2020 at 12:19 PM
    #3
    ProtoJ

    ProtoJ New Member

    Joined:
    Oct 5, 2018
    Member:
    #20207
    Messages:
    363
    Gender:
    Male
    Vehicle:
    2018 Crewmax TRD Off-Road
    Would an offset head flat head screw driver work from the top hole?
     
    LogCabins[OP] likes this.
  4. Feb 9, 2020 at 12:35 PM
    #4
    773_eddie

    773_eddie Trd Pro

    Joined:
    Feb 17, 2019
    Member:
    #26204
    Messages:
    660
    Gender:
    Male
    First Name:
    Eddie
    Chicago
    Vehicle:
    Tundra Trd Pro
    12volt remote start, weathertec accessories, Trd Pro decals, Toyota console safe,VLEDS Puddle Lights,Frac Harness,TRD PRO front and Rear Sway Bar,NSV Hood Light Bar,ESP long box,AJT accessories,Thinkware U1000 dashcam, coachbuilder 1/3 Lift, HR LED’s,Pro comp Traction bars, JL complete System wit 2 10” subs, Kenwood DDX9907XR HU
    Good idea mine just shipped as well should get it by Monday
     
    LogCabins[OP] likes this.
  5. Feb 9, 2020 at 1:52 PM
    #5
    LogCabins

    LogCabins [OP] Professional Procrastinator

    Joined:
    Jul 26, 2019
    Member:
    #33722
    Messages:
    257
    Gender:
    Male
    'Merica
    Vehicle:
    2017 TRD Pro
    I tried and could not get it to work....once you release the top tab you “almost” have enough room to get your finger to push the bottom tab but I still couldn’t.....so instead of fighting it, I drilled a hole to make it easy and the hole will never be seen and it’s not detrimental to the trim
     
    Last edited: Feb 14, 2020
    Voyagermike likes this.
  6. Feb 9, 2020 at 2:05 PM
    #6
    Voyagermike

    Voyagermike New Member

    Joined:
    Feb 4, 2017
    Member:
    #6211
    Messages:
    685
    Gender:
    Male
    First Name:
    Mike
    California
    Nice man looks really good! Glad to see a work around on getting access to the switch. I did struggle a little while trying to remove the switch but was able to remove with a 90 degree pick. I definitely didnt want to remove the vent surround. Waiting on my ac control rings and shift gate to ship.
     
    LogCabins[OP] likes this.
  7. Feb 11, 2020 at 2:43 AM
    #7
    TundraCoast

    TundraCoast Member In Good Standing

    Joined:
    Feb 25, 2018
    Member:
    #13151
    Messages:
    593
    Gender:
    Male
    First Name:
    Ian
    California
    Vehicle:
    1794 4x4
    1794 on the inside - PRO on the outside
    Nice write up, I drilled a small hole and got the 4x4 knob out easy after that.
     
    LogCabins[OP] likes this.
  8. Feb 11, 2020 at 7:25 AM
    #8
    LogCabins

    LogCabins [OP] Professional Procrastinator

    Joined:
    Jul 26, 2019
    Member:
    #33722
    Messages:
    257
    Gender:
    Male
    'Merica
    Vehicle:
    2017 TRD Pro
    Glad it worked for you!!!
     
  9. Feb 14, 2020 at 5:36 AM
    #9
    tlpru

    tlpru New Member

    Joined:
    Aug 11, 2016
    Member:
    #4163
    Messages:
    83
    Gender:
    Male
    First Name:
    trent
    Southlake, Texas
    Vehicle:
    2016 Trd Pro
    added power mirrors, auto fold mirror, 2019 TRD head and FOG lights, FORTIN remote start, retrax tonneau cover, 18" fuel BFGK02, TRD sway bar, TRD intake
    I like it. just starting the home deletes..... bit by bit....
     
    LogCabins[OP] likes this.
  10. Feb 14, 2020 at 6:33 AM
    #10
    Hammerdog

    Hammerdog YCMTSUP

    Joined:
    Jul 20, 2018
    Member:
    #17201
    Messages:
    983
    Gender:
    Male
    First Name:
    Robbie
    Louisa VA
    Vehicle:
    2018 tundra sport crew max
    Tint Bed cover Red Tow Hooks TRD Intake 7 inch BDS 22x12’s 35 Toyo’s Rigid ditch lights RC light bar in bottom grille One bad ass stereo
    Looks nice!
     
    LogCabins[OP] likes this.
  11. Feb 14, 2020 at 8:11 AM
    #11
    TundraCoast

    TundraCoast Member In Good Standing

    Joined:
    Feb 25, 2018
    Member:
    #13151
    Messages:
    593
    Gender:
    Male
    First Name:
    Ian
    California
    Vehicle:
    1794 4x4
    1794 on the inside - PRO on the outside
    Here’s mine installed

    049B5E2E-F925-4114-BF3F-627A39F7A881.jpg
    And a couple other AJT parts to complete the look

    Overall the AJT products are nice, they take a little adjusting to get right (mainly the shifter and cupholder trim) 4x4 trim is straight forward.
    74D4EB91-788A-452C-BEAA-79A648F7FB51.jpg
     
    LogCabins[OP] and Voyagermike like this.
  12. Feb 14, 2020 at 8:36 AM
    #12
    LogCabins

    LogCabins [OP] Professional Procrastinator

    Joined:
    Jul 26, 2019
    Member:
    #33722
    Messages:
    257
    Gender:
    Male
    'Merica
    Vehicle:
    2017 TRD Pro
    Did you paint the shift gate (chrome trim closest to the shifter)...looks good
     
  13. Feb 14, 2020 at 10:16 AM
    #13
    TundraCoast

    TundraCoast Member In Good Standing

    Joined:
    Feb 25, 2018
    Member:
    #13151
    Messages:
    593
    Gender:
    Male
    First Name:
    Ian
    California
    Vehicle:
    1794 4x4
    1794 on the inside - PRO on the outside
    I did, I had a body shop paint the shift gate and cupholder surround before the AJT parts where available

    78C63298-D02F-45CD-9F59-69688FFF666C.jpg

    I added a sleeve of black shrink-wrap to the chrome shifter stem under the TRD handle. It’s a small detail but looks clean.

    EB36E385-8D16-4515-BBC4-DD39639DF0D4.jpg
     
    BLONGTX, SoCalRandy, GAknight and 5 others like this.
  14. Feb 14, 2020 at 11:22 AM
    #14
    Hammerdog

    Hammerdog YCMTSUP

    Joined:
    Jul 20, 2018
    Member:
    #17201
    Messages:
    983
    Gender:
    Male
    First Name:
    Robbie
    Louisa VA
    Vehicle:
    2018 tundra sport crew max
    Tint Bed cover Red Tow Hooks TRD Intake 7 inch BDS 22x12’s 35 Toyo’s Rigid ditch lights RC light bar in bottom grille One bad ass stereo
    Details, details details, it’s all about the little details, looks sharp!
     
  15. Feb 14, 2020 at 11:30 AM
    #15
    TundraCoast

    TundraCoast Member In Good Standing

    Joined:
    Feb 25, 2018
    Member:
    #13151
    Messages:
    593
    Gender:
    Male
    First Name:
    Ian
    California
    Vehicle:
    1794 4x4
    1794 on the inside - PRO on the outside
    True, true....all my major projects (for now) are complete so now it’s all about fine details around the truck....next is dropping the exhaust and painting it’s black with high temp paint, prob nd up being a huge PITA
     
  16. Feb 14, 2020 at 11:32 AM
    #16
    Hammerdog

    Hammerdog YCMTSUP

    Joined:
    Jul 20, 2018
    Member:
    #17201
    Messages:
    983
    Gender:
    Male
    First Name:
    Robbie
    Louisa VA
    Vehicle:
    2018 tundra sport crew max
    Tint Bed cover Red Tow Hooks TRD Intake 7 inch BDS 22x12’s 35 Toyo’s Rigid ditch lights RC light bar in bottom grille One bad ass stereo
    I did mine when I installed the TRD system. I kinda with I would have used a silver high temp paint , but it looks good black.
     
  17. Feb 14, 2020 at 2:07 PM
    #17
    TundraCoast

    TundraCoast Member In Good Standing

    Joined:
    Feb 25, 2018
    Member:
    #13151
    Messages:
    593
    Gender:
    Male
    First Name:
    Ian
    California
    Vehicle:
    1794 4x4
    1794 on the inside - PRO on the outside
    Any tips on painting? Where did you start the paint?
     
  18. Feb 14, 2020 at 2:14 PM
    #18
    Hammerdog

    Hammerdog YCMTSUP

    Joined:
    Jul 20, 2018
    Member:
    #17201
    Messages:
    983
    Gender:
    Male
    First Name:
    Robbie
    Louisa VA
    Vehicle:
    2018 tundra sport crew max
    Tint Bed cover Red Tow Hooks TRD Intake 7 inch BDS 22x12’s 35 Toyo’s Rigid ditch lights RC light bar in bottom grille One bad ass stereo
    I just painted from behind the cat. I just hung it up high, taped the tips off and painted it a bunch of times, then cured it by following the instructions on the can. It looks good, but it’s still just an exhaust. Easy job and worth the time.
     
  19. Feb 15, 2020 at 5:10 AM
    #19
    ProtoJ

    ProtoJ New Member

    Joined:
    Oct 5, 2018
    Member:
    #20207
    Messages:
    363
    Gender:
    Male
    Vehicle:
    2018 Crewmax TRD Off-Road
    I used a mirror to see where the tabs were and then used a pick and just pressed the tabs to remove. The harder part was taking the actual 4x4 knob apart.


    EB089474-465F-44FC-9E53-44F0EC759AD6.jpg EB089474-465F-44FC-9E53-44F0EC759AD6.jpg

    50A21C94-466E-4B66-99D9-4AD33776D58B.jpg
    A4E3BFDB-8181-45F7-AF53-BC4B52E42E4A.jpg
     
  20. Feb 17, 2020 at 8:31 AM
    #20
    tlpru

    tlpru New Member

    Joined:
    Aug 11, 2016
    Member:
    #4163
    Messages:
    83
    Gender:
    Male
    First Name:
    trent
    Southlake, Texas
    Vehicle:
    2016 Trd Pro
    added power mirrors, auto fold mirror, 2019 TRD head and FOG lights, FORTIN remote start, retrax tonneau cover, 18" fuel BFGK02, TRD sway bar, TRD intake
    im doing this next......
    chrome gotta go
     
  21. Feb 17, 2020 at 8:34 AM
    #21
    tlpru

    tlpru New Member

    Joined:
    Aug 11, 2016
    Member:
    #4163
    Messages:
    83
    Gender:
    Male
    First Name:
    trent
    Southlake, Texas
    Vehicle:
    2016 Trd Pro
    added power mirrors, auto fold mirror, 2019 TRD head and FOG lights, FORTIN remote start, retrax tonneau cover, 18" fuel BFGK02, TRD sway bar, TRD intake

    did you disassemble the chrome gate? or did the shop remove it?...

    or was it painted as installed?


    looks great....
     
  22. Feb 17, 2020 at 9:06 AM
    #22
    Jim LE 1301

    Jim LE 1301 Camaro Lover, SSEM # 11,TTC#179

    Joined:
    Apr 29, 2018
    Member:
    #14884
    Messages:
    27,763
    Gender:
    Male
    First Name:
    Jim
    Hudson Valley, New York
    Vehicle:
    2018 MGM Tundra TRD Sport Double Cab
    Where did you get the front/rear camera switch?
     
  23. Feb 20, 2020 at 8:18 AM
    #23
    LogCabins

    LogCabins [OP] Professional Procrastinator

    Joined:
    Jul 26, 2019
    Member:
    #33722
    Messages:
    257
    Gender:
    Male
    'Merica
    Vehicle:
    2017 TRD Pro
    20 Feb...just received shipping confirmation for my Climate Knob Trim Rings from AJT :yes:

    last piece to wait on is the shift gate trim
     
    Voyagermike likes this.
  24. Feb 20, 2020 at 8:33 AM
    #24
    Voyagermike

    Voyagermike New Member

    Joined:
    Feb 4, 2017
    Member:
    #6211
    Messages:
    685
    Gender:
    Male
    First Name:
    Mike
    California
    Placed my order January 19th on both of these. Hopefully they ship soon! :fingerscrossed:
     
    LogCabins[QUOTED][OP] likes this.
  25. Feb 22, 2020 at 10:36 AM
    #25
    GREENwithENVY

    GREENwithENVY New Member

    Joined:
    Sep 29, 2019
    Member:
    #36771
    Messages:
    268
    Gender:
    Male
    Knoxville, TN
    Vehicle:
    2020 Tundra TRD Pro
    Working on it!

    Some general installation comments on the AJT cup holder and shift trim (with the black TRD shifter and stole the heat shrink tubing idea in this thread) install today:

    1. Yes, I know the shift gate is still chrome. I've preordered the AJT trim piece.
    2. Pulling the console is easy - but a bit stressful when yanking (thinking "oh, shit, it's going to break!"). My grip was not the best, so it hit me (as a woodworker), I went grabbed a pair of nitrile glove and my grip was like Spidey and pulled the console right off.
    3. When laying the trim pieces down without screws, they are not under stress, so the coverage is good. When adding screw tension, they have a tendency to move slightly (flexing) and one can see daylight in some areas. When installed in the truck, a person really has to look to see them. I believe the screw tension has to do with the fact that drilling holes are not perfect (hard to do without a drill press). Another thought here is to use a brad-point 1/4 inch drill bit - it will create the divot to mark where to drill the holes and when removing your trim pieces, keep the drill bit from sliding. I also slowed my RPM down on the cordless drill to keep the plastic from curling up so much. And, yes, I had to use a Dremel to round out the holes.
    4. I do think it would be a good idea to use a couple of small strips of auto adhesive tape (similar to the vent rings) on the opposite side of the cup trim because it does not seat as good with just the clips.
    Overall good product and easy install
     
    Voyagermike and TundraCoast like this.
  26. Feb 23, 2020 at 8:23 AM
    #26
    TundraCoast

    TundraCoast Member In Good Standing

    Joined:
    Feb 25, 2018
    Member:
    #13151
    Messages:
    593
    Gender:
    Male
    First Name:
    Ian
    California
    Vehicle:
    1794 4x4
    1794 on the inside - PRO on the outside
    I took the chrome gate off and had it painted. It’s held in place by a few plastic welds easily drilled out, I epoxied back in place.
     
    Voyagermike likes this.
  27. Feb 28, 2020 at 9:00 AM
    #27
    ProtoJ

    ProtoJ New Member

    Joined:
    Oct 5, 2018
    Member:
    #20207
    Messages:
    363
    Gender:
    Male
    Vehicle:
    2018 Crewmax TRD Off-Road
    Chrome delete is complete! The last step was the chrome climate control rings. It was way tougher than I thought. The very first clip broke! Doh! Gently pry the clips open....they are made of a stiff plastic. Watch the AJT video on this one. For me, a larger screwdriver worked better than the smaller one.2D659CB4-8DA6-434F-B47F-98D408CB6678.jpg
     
    LogCabins[OP] likes this.
  28. Feb 28, 2020 at 9:27 AM
    #28
    TundraCoast

    TundraCoast Member In Good Standing

    Joined:
    Feb 25, 2018
    Member:
    #13151
    Messages:
    593
    Gender:
    Male
    First Name:
    Ian
    California
    Vehicle:
    1794 4x4
    1794 on the inside - PRO on the outside
    Looks really good, did you do the other AJT parts ie shifter trim and cupholder surround?
     
  29. Feb 28, 2020 at 9:29 AM
    #29
    TundraCoast

    TundraCoast Member In Good Standing

    Joined:
    Feb 25, 2018
    Member:
    #13151
    Messages:
    593
    Gender:
    Male
    First Name:
    Ian
    California
    Vehicle:
    1794 4x4
    1794 on the inside - PRO on the outside
    Here is a pull back pic of the AJT parts and my new Android screen with painted bezel (I posted elsewhere on the forum) added the all black TRD shifter recently.

    448B4B56-83DA-48BC-9309-3FA17C6BF78D.jpg
     
  30. Feb 28, 2020 at 9:31 AM
    #30
    ProtoJ

    ProtoJ New Member

    Joined:
    Oct 5, 2018
    Member:
    #20207
    Messages:
    363
    Gender:
    Male
    Vehicle:
    2018 Crewmax TRD Off-Road
    No.....I have the TRD OR with bench seat.....so nothing down there to cover up.
     

Products Discussed in

To Top