1. Welcome to Tundras.com!

    You are currently viewing as a guest! To get full-access, you need to register for a FREE account.

    As a registered member, you’ll be able to:
    • Participate in all Tundra discussion topics
    • Transfer over your build thread from a different forum to this one
    • Communicate privately with other Tundra owners from around the world
    • Post your own photos in our Members Gallery
    • Access all special features of the site

Where do i trim this.

Discussion in '2.5 Gen TRD Pro (2014-2021)' started by R-C, Mar 23, 2017.

  1. Mar 23, 2017 at 2:09 PM
    #1
    R-C

    R-C [OP] http://101financial.com

    Joined:
    Aug 9, 2016
    Member:
    #4151
    Messages:
    206
    Gender:
    Male
    First Name:
    Ryan
    Las Vega$
    Vehicle:
    2017 TRD Pro
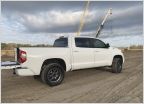
    Just got new wheels and tires.
    Some Rubbing, i know i read that i can either heat gun, dont own one, or trim. What area do I trim?
    20170323_140556.jpg
     
  2. Mar 23, 2017 at 5:15 PM
    #2
    BRNG ITT

    BRNG ITT New Member

    Joined:
    Aug 1, 2016
    Member:
    #4055
    Messages:
    197
    Gender:
    Male
    San Antonio, Texas
    Vehicle:
    2016 CrewMax TRD PRO
    Been meaning to do a write up on this at the request of a few people. I apologize because with work and buying a house, time has been short.

    Trim with a pair of shears as I have highlighted below. Leave the bottom two holes intact, but redrill them about an 1" to 1 1/2" forward. When you reattach, you should be able to simply put the studs through the new holes and it will hold it back out of the way. I then trimmed the bumper end cap extensions back flush with the liner (where the blue arrows are).

    No need for a heat gun.

    If you post a picture of the bottom of the liner, I can highlight it as well to give you a better idea.

    IMG_0103.jpg IMG_0104.jpg
    IMG_0105.jpg
     
  3. Mar 23, 2017 at 5:34 PM
    #3
    BRNG ITT

    BRNG ITT New Member

    Joined:
    Aug 1, 2016
    Member:
    #4055
    Messages:
    197
    Gender:
    Male
    San Antonio, Texas
    Vehicle:
    2016 CrewMax TRD PRO
    They are both afters.
     
  4. Mar 23, 2017 at 7:05 PM
    #4
    R-C

    R-C [OP] http://101financial.com

    Joined:
    Aug 9, 2016
    Member:
    #4151
    Messages:
    206
    Gender:
    Male
    First Name:
    Ryan
    Las Vega$
    Vehicle:
    2017 TRD Pro
    @BRNG ITT
    Thanks for the help. Ill get another pic tomorrow, i reinstalled it for the night.
     
    BRNG ITT likes this.
  5. Mar 23, 2017 at 7:06 PM
    #5
    T-Rex266

    T-Rex266 Elon approved Staff Member

    Joined:
    Jan 5, 2014
    Member:
    #6
    Messages:
    156,385
    Gender:
    Male
    Looks good dude. Some guys just do a hack job.
     
    ColoradoTJ and BRNG ITT like this.
  6. Mar 24, 2017 at 5:32 PM
    #6
    BRNG ITT

    BRNG ITT New Member

    Joined:
    Aug 1, 2016
    Member:
    #4055
    Messages:
    197
    Gender:
    Male
    San Antonio, Texas
    Vehicle:
    2016 CrewMax TRD PRO
    I drew the line to show where I cut on the bottom of my liner.
    IMG_9857.jpg

    Here's the pic you gave me. Just cut and then drill a hole where I made the blue line.

    IMG_9859.jpg
     
  7. Mar 24, 2017 at 5:40 PM
    #7
    R-C

    R-C [OP] http://101financial.com

    Joined:
    Aug 9, 2016
    Member:
    #4151
    Messages:
    206
    Gender:
    Male
    First Name:
    Ryan
    Las Vega$
    Vehicle:
    2017 TRD Pro
    Ok, so this part is going bye bye than?
    Screenshot_2017-03-24-17-39-02.jpg
     
  8. Mar 24, 2017 at 5:54 PM
    #8
    csuviper

    csuviper Moderator Staff Member

    Joined:
    Jan 6, 2014
    Member:
    #38
    Messages:
    17,283
    Gender:
    Male
    First Name:
    Brian
    Broomfield, CO
    Vehicle:
    2019 TRD Sport CM 5.7L 4X4
    Some Mods :) See build thread for details
    Here is my hack job:


    8u4asere_e4e00fc65b9bc481405c7ce3b952a84310265b05.jpg
    aqudades_3f39a7897ae0176d6506a880e78d26472012ebb8.jpg
    zeny4yna_ef307ad5ca0a57088bace217e54641d58b210f3b.jpg
    bezebama_f0bb4dc9c5e5fd32a0e5b8224d68f8539050cc6b.jpgu6uge9ad_c1efdfbb51435ed30b139734e12f48b9fe126ee0.jpg
     
  9. Mar 24, 2017 at 7:33 PM
    #9
    R-C

    R-C [OP] http://101financial.com

    Joined:
    Aug 9, 2016
    Member:
    #4151
    Messages:
    206
    Gender:
    Male
    First Name:
    Ryan
    Las Vega$
    Vehicle:
    2017 TRD Pro
    Got it !
    Thanks again for the pointers @BRNG ITT no more rubbing

    2n20170324_192623.jpg
     
  10. Mar 24, 2017 at 8:22 PM
    #10
    BRNG ITT

    BRNG ITT New Member

    Joined:
    Aug 1, 2016
    Member:
    #4055
    Messages:
    197
    Gender:
    Male
    San Antonio, Texas
    Vehicle:
    2016 CrewMax TRD PRO
    Looks good. I probably didn't respond back in time, but I left the hole on the end in order to use it as a mounting point. Made the orange cut vice the blue cut in your picture.

    IMG_0107.jpg
     
    equin likes this.
  11. Mar 24, 2017 at 8:26 PM
    #11
    BRNG ITT

    BRNG ITT New Member

    Joined:
    Aug 1, 2016
    Member:
    #4055
    Messages:
    197
    Gender:
    Male
    San Antonio, Texas
    Vehicle:
    2016 CrewMax TRD PRO
    And if you want to finish it off, a pair of snips or shears will make quick work of the red end cap pieces that now stick out.

    IMG_0108.jpg
     
    Mountun Goat, equin and R-C[OP] like this.
  12. Jun 28, 2017 at 9:30 AM
    #12
    Toeb

    Toeb Well! That escalated quickly!!

    Joined:
    Jun 15, 2017
    Member:
    #8152
    Messages:
    28
    Gender:
    Male
    First Name:
    Toby
    North Carolina
    Vehicle:
    2014 SR5 double cab
    2.5 leveled 20x10 -19 hostile sprockets w/ 305-55-20. And just getting started
    I just trimmed the bottom of it off and held the bottom in place with zip ties. I also have the chrome bumper caps, had to trim those back as well.
     
    equin likes this.
  13. Mar 3, 2018 at 9:13 PM
    #13
    TheBeast

    TheBeast The Beach

    Joined:
    Apr 27, 2016
    Member:
    #3246
    Messages:
    12,521
    Gender:
    Male
    SoCal
    Vehicle:
    2012
    good stuff. thanks
     
  14. Sep 6, 2018 at 6:46 AM
    #14
    wwinslett

    wwinslett New Member

    Joined:
    Jan 22, 2018
    Member:
    #12365
    Messages:
    133
    Gender:
    Male
    First Name:
    Will
    Birmingham AL
    Vehicle:
    2016 Tundra CM Magnetic Grey
    6112's Toytec Shackles Method NV on Ridge Grapplers 295/70/18
    Just want to get on here and say THANK YOU for the above!!! Made my life extremely easy after I put my level/wheels and tires on. Huge shout out for the diagram. Pics for reference below of my truck

     
    TS1794, Kerch71, Toyotoholic and 10 others like this.
  15. Dec 25, 2018 at 8:27 PM
    #15
    Tundrool

    Tundrool New Member

    Joined:
    Nov 30, 2018
    Member:
    #22414
    Messages:
    23
    Gender:
    Male
    Vehicle:
    18 cm trd silver sky
    Most helpful info I’ve seen on this issue, do not wanna do a hacky job, I was assured by mechanic all my new stuff would fit and not rub yet when I picked it up he had removed liners and said it did rub slightly, need to get em back in without butchering my new baby.... thank you!
     
    R-C[OP] likes this.
  16. Dec 28, 2018 at 3:34 PM
    #16
    R-C

    R-C [OP] http://101financial.com

    Joined:
    Aug 9, 2016
    Member:
    #4151
    Messages:
    206
    Gender:
    Male
    First Name:
    Ryan
    Las Vega$
    Vehicle:
    2017 TRD Pro
    How'd it turn out
     
  17. Dec 28, 2018 at 10:39 PM
    #17
    Tundrool

    Tundrool New Member

    Joined:
    Nov 30, 2018
    Member:
    #22414
    Messages:
    23
    Gender:
    Male
    Vehicle:
    18 cm trd silver sky
    I went back to the shop that put on my wheels and tires, They were hesitant to hack up my new well liners and they suggested I put a half inch spacer upfront and that would solve the problem without hacking or heating liners to avoid rub, I may just go that route, It’s a super minor modification to the suspension that I think I’m willing to live with
     
  18. Dec 28, 2018 at 11:11 PM
    #18
    Tundrool

    Tundrool New Member

    Joined:
    Nov 30, 2018
    Member:
    #22414
    Messages:
    23
    Gender:
    Male
    Vehicle:
    18 cm trd silver sky
    Also 2018 liners seem to be different than those in those pics that were so nicely highlighted and diagrammed by BRINGIT.... trying to maintain stock suspension with even a mild tire/wheel change proving tricky on 2018... 0 offset may have been where I blew it, looks awesome though!
     
  19. Dec 29, 2018 at 9:51 AM
    #19
    R-C

    R-C [OP] http://101financial.com

    Joined:
    Aug 9, 2016
    Member:
    #4151
    Messages:
    206
    Gender:
    Male
    First Name:
    Ryan
    Las Vega$
    Vehicle:
    2017 TRD Pro

    I believe there is/was some guys that were able to shim or add some washers to the front bumper mounts to give some extra room as well, its been awhile so my recollection isnt 100%. Just ginin ya some extra options before you drop the cash on spacers.
     
  20. Dec 29, 2018 at 9:59 AM
    #20
    Voyagermike

    Voyagermike New Member

    Joined:
    Feb 4, 2017
    Member:
    #6211
    Messages:
    685
    Gender:
    Male
    First Name:
    Mike
    California
  21. Dec 29, 2018 at 10:37 AM
    #21
    Tundrool

    Tundrool New Member

    Joined:
    Nov 30, 2018
    Member:
    #22414
    Messages:
    23
    Gender:
    Male
    Vehicle:
    18 cm trd silver sky
  22. Dec 29, 2018 at 10:37 AM
    #22
    Tundrool

    Tundrool New Member

    Joined:
    Nov 30, 2018
    Member:
    #22414
    Messages:
    23
    Gender:
    Male
    Vehicle:
    18 cm trd silver sky
    Thanks!!! May go that route
     
    Voyagermike likes this.
  23. Dec 31, 2018 at 12:18 AM
    #23
    georgiey22

    georgiey22 Moving to Idaho

    Joined:
    Nov 30, 2018
    Member:
    #22423
    Messages:
    857
    Gender:
    Male
    Vehicle:
    2019 Tundra | TRD Sport | Cavalry Blue | Crew Max
    I’m going to order the Coachbuilder 1/2” bumper shims. Have anyone else used these?

    I’ve seen folks use washers and other trim the front inner fender but I’d like this build to be a clean as possible.
     
  24. Dec 31, 2018 at 12:19 AM
    #24
    georgiey22

    georgiey22 Moving to Idaho

    Joined:
    Nov 30, 2018
    Member:
    #22423
    Messages:
    857
    Gender:
    Male
    Vehicle:
    2019 Tundra | TRD Sport | Cavalry Blue | Crew Max
  25. Dec 31, 2018 at 5:36 AM
    #25
    Toyotoholic

    Toyotoholic -4Life-

    Joined:
    May 17, 2017
    Member:
    #7754
    Messages:
    1,914
    Gender:
    Male
    First Name:
    Jmz
    Vehicle:
    17' MGM
    Pro suspension, sways
    I used the CB bumper shims and they work great. They provide a lot of room for such a simple mod.
     
  26. Dec 31, 2018 at 6:00 AM
    #26
    georgiey22

    georgiey22 Moving to Idaho

    Joined:
    Nov 30, 2018
    Member:
    #22423
    Messages:
    857
    Gender:
    Male
    Vehicle:
    2019 Tundra | TRD Sport | Cavalry Blue | Crew Max
    Great to hear, any chance you took photos of the install?
     
    Last edited: Dec 31, 2018
    Toyotoholic[QUOTED] likes this.
  27. Dec 31, 2018 at 6:09 AM
    #27
    Airfire06

    Airfire06 New Member

    Joined:
    Aug 24, 2018
    Member:
    #18561
    Messages:
    115
    Gender:
    Male
    Vehicle:
    2016 trd pro
    Nothing yet
    I jus got a heat gun a pushed mine back 295/70r18 with 1.5 spacer

    20D58804-30AA-461E-8408-A8B2AE7ECC19.jpg
    31B58C8C-CE6D-4074-A366-D7D90E402AE8.jpg
     
    Mountun Goat and georgiey22 like this.
  28. Dec 31, 2018 at 6:10 AM
    #28
    georgiey22

    georgiey22 Moving to Idaho

    Joined:
    Nov 30, 2018
    Member:
    #22423
    Messages:
    857
    Gender:
    Male
    Vehicle:
    2019 Tundra | TRD Sport | Cavalry Blue | Crew Max
    Thanks bud. Did you do a 1.5” bumper spacer or wheel spacer?
     
  29. Dec 31, 2018 at 6:15 AM
    #29
    Toyotoholic

    Toyotoholic -4Life-

    Joined:
    May 17, 2017
    Member:
    #7754
    Messages:
    1,914
    Gender:
    Male
    First Name:
    Jmz
    Vehicle:
    17' MGM
    Pro suspension, sways
    IMG_20180122_161845.jpg

    2 X .25 per side = .5" space
     
  30. Dec 31, 2018 at 6:22 AM
    #30
    georgiey22

    georgiey22 Moving to Idaho

    Joined:
    Nov 30, 2018
    Member:
    #22423
    Messages:
    857
    Gender:
    Male
    Vehicle:
    2019 Tundra | TRD Sport | Cavalry Blue | Crew Max
    Perfect. Thank you so much. I will order these parts today. Really appreciate the photo.
     
    Toyotoholic[QUOTED] likes this.

Products Discussed in

To Top