1. Welcome to Tundras.com!

    You are currently viewing as a guest! To get full-access, you need to register for a FREE account.

    As a registered member, you’ll be able to:
    • Participate in all Tundra discussion topics
    • Transfer over your build thread from a different forum to this one
    • Communicate privately with other Tundra owners from around the world
    • Post your own photos in our Members Gallery
    • Access all special features of the site
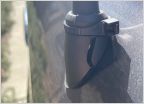
The definitive Steering Rack Thread - with solutions - Updated 10/2020 in first post

Discussion in 'General Tundra Discussion' started by papasmurf, Oct 25, 2018.

  1. Oct 25, 2018 at 9:51 AM
    #1
    papasmurf

    papasmurf [OP] Savage Fabrication

    Joined:
    Jan 11, 2017
    Member:
    #5911
    Messages:
    1,955
    Gender:
    Male
    First Name:
    Bruce
    San Diego
    Vehicle:
    2007 4x4 Tundra
    07 Silver Sky 4x4 | Total Chaos LT | 2.5 King Coil overs & Bypasses | Camburg Bed Cage | 3.0 King Bypasses | 2.0 King Bumps | Custom Deavers | Nitro 4.88's | ARB Locker | Demello Sliders | 17" Double Standards | BFGKO2 37's |
    Hello All,

    I like a lot of you have had the infamous steering rack failure (5 times personally and I've done almost 10 steering racks total to include helping my friends). This information applies to anyone from 07+...

    If the below process confuses you or you have questions please feel free to reach out to me. I'm always here to help

    The process to replace the Steering Rack.

    Yes, dropping the front diff (on 4x4 trucks) is the right way to do it. My self and @osidepunker did the entire job in about 5 hrs. You can install the rack as one unit. The job goes like this:

    Newest Part Number for most up to date rack (Oct 2020)
    Rack Revision 4: - 07-13' 44250-0C160
    14-20' 44250-0C131
    1. lock steering wheel (use a strap and wrap around the wheel and tie to the base of the driver's seat)
    2. remove two breather lines from diff
    3. disconnect actuator cable from the passenger side of the diff.
    4. unbolt ball joint cradles from top of the spindles/knuckles\
    5. disconnect driveshaft from the front diff
    6. disconnect outer tie rods from the rack and knuckles (first mark the threads where they were, count threads so you can get close when reinstalling the tierods on the new rack
    7. remove inner CV from diff
    8. unbolt and drop diff using a jack (Use a trans jack if you have one, makes it easy otherwise its a two-man job)
    9. disconnect steering shaft at the rack
    10. disconnect two hydraulic fittings at the rack (input and output)
    11. disconnect two hose brackets from the front of the rack
    12. unbolt two mounting bolts for the rack
    13. remove the rack by sliding through the frame hole on the passenger side a bit to clear the drive side inner tie rod, then pull driver side down and back to the rear of the truck in the open area where the diff was.
    14. remove bushings from the new rack by using a chisel under the lip of the metal sleeve
    15. install new poly bushings from Energy suspension
    16. install the new rack and replace the diff in reverse
    17. spin each tire and draw a line on the tread
    18. measure the distance on the front face of the tire (track width) and compare to the distance on the rear face of the tires
    19. set toe to 1/16th narrower on the front track width as compared to the rear
    20. get a professional alignment
    21. spend the $3k you saved by doing it yourself on some fun truck mods


    Below this is just some answers and information. All historical, new faster method posted above. Also here is my original thread on the TT forum. https://www.tundratalk.net/forums/t...initive-steering-rack-thread-solutions-2.html

    check-in the comments as well there for more information its only 2 pages so not too much reading.

    a few questions and answers
    1. Does it happen to lifted and non lifted trucks?
    A: Yes it does, the lift has a potential to cause earlier failure due to possible higher angles on the tie rods, however, most spindles provided with bracket/spindle lifts will relocate the outer tie rod to a higher mounting point to correct this issue. Also, stock trucks have the outer tie rod connect to the bottom of the spindle mount while aftermarket spindles will have you flip it so it sits on top. Also anyone with larger than stock tires could have this failure as the added weight and rotational mass adds force required to move and steer, with these racks operation at 12-1400psi they have a tendency to fail at the inner tie rod seals from excessive pressures developed when steering larger tires and lifts. And remember never go full lock to one side or the other, it helps save the rack.
    See this image
    11110767_10153195691224435_8004058973600_f76cc1140110d236728975c0dc455f21211ec81c.jpg

    2. what steering rack should I replace it with if mine goes bad??
    Rack Revision 1: 44250OC60
    Rack Revision 2: 44250OC80
    Rack Revision 3: 44250OC110
    Rack Revision 3: 44250OC100
    Rack Revision 4: there is now a new part number again 07-13' 44250-0C160
    14-20' 44250-0C131

    [​IMG]
    You can also purchase a re-manufactured rack for a 07/08 which were less prone to problems and maybe a cheaper option.

    3. Can I do the work myself?
    A. Yes, it takes 8-12 hours depending on your mechanical working knowledge of cars.
    Things to note. You can do it with simple hand tools and two sets of 3-ton jack stands. Although it does take longer with hand tools it can be done. You will need to drop your lift bracket from the cross member. (See image below), you will need a 35mm socket and a torque wrench that goes to 275ftlbs or higher for the main bolt that holds the bracket to the sub-frame. You will need to remove the steering gear box and hard lines off the steering rack to be able to pull it through the hole in the subframe out the driver or passenger side (i went passenger it was easier). Also, make sure your steering wheel is locked to avoid breaking the clock spring.
    this image shows the bracket dropped down for clearance of the rack bolts.
    11148585_10153195691779435_1208147736017_7f26da17d89ad05c9fa5515c10a6d04681076c40.jpg
    this image shows the two hard lines on the rack which need to be removed. ( you may be able to pull the rack without fully removing them, but they do need to be disconnected from the steering gearbox. )
    11162509_10153195691484435_7835082766021_8ea9adb79c5aaaf08af028157fac4cc7dd498473.jpg
    this image shows the hole in the sub-frame where the tie rods protrude and this is where you pull the rack out as well. Again you must remove the steering gearbox off the rack for it to slide right out.
    11162513_10153195691344435_4774260097877_f533bf5205bfc5af63cd6e3bae4361b520364754.jpg

    4. What about air in the system?
    A. The Toyota steering system is self-bleeding, once you reinstall everything and fill it up with fluid you need to turn the wheels while the truck is still lifted on jack stands. Turn left to right and right to left 10-20 times, this forces the air out of the lines, I also cycled the engine on for 5 sec then off again to cause the pump to cycle fluid through as well, you will need to check fluid levels each time you do this to ensure there is plenty of fluid in the resi. Once this has been done a few cycles you will have no air in the system.

    5. Do I need an alignment afterward?
    A. Yes of course anytime you do steering or suspension work always have the truck aligned afterward.

    6. Is there anything else I need to worry about?
    A. Yes, there are still two things not commonly mentioned about the steering racks and failures.
    The stock rubber mounts for the rack are also a week point as well as the inner tie rod seals. I found a solution to this issue. My shop where I take my truck fabbed derlin replacement bushings for the rack to improve steering feel and rack mounting stability. I suggest anyone who replaces the rack and who wheels their truck to replace the stock rubber bushings with derlin or urethane bushings.

    https://www.rogue-offroad.com/product-p/810107g.htm

    The stock out tie rod ends is weak. @Coachbuilder1 has developed new Heim joint tie rod ends for various applications of lifted trucks. Here is the one he made for BDS lifts. I suggest contacting him and getting a set while you are doing the steering rack replacement you should upgrade the outer tie rods with heim tie rods to ensure positive steering feel and avoid tie rod end failure that may occur from extreme joint angles at full droop on mid travel suspension setups.
    11196340_10153195748434435_3362195186695_80f8762aa374b0c84930460d04565a2a2318baaf.jpg
    If anyone has any questions please feel free to contact me. I replaced my steering rack my self in 10 hours in the driveway the first time with just hand tools and an electric impact. It's not difficult just daunting and there are a lot of small steps to remember. I did have my new rack have bushing failures which caused excessive steering wheel and tire play and bad alignment which led me to replace the rack a second time and have new rack bushings made to avoid the issue again.
    Hope this helps everyone. Happy wheeling!
    ~Bruce
     
    Last edited: Oct 8, 2020
  2. Oct 25, 2018 at 11:27 AM
    #2
    Tundracollector

    Tundracollector New Member

    Joined:
    Oct 3, 2016
    Member:
    #4751
    Messages:
    627
    Gender:
    Male
    Texas
    Vehicle:
    16 Dc trd pro, 04 Dc, 08 rcsb
    Good info :thumbsup:

    I wish Toyota would offer a faster rack option
     
    Mountun Goat and papasmurf[OP] like this.
  3. Oct 25, 2018 at 12:12 PM
    #3
    831Tun

    831Tun heartless Bastrd

    Joined:
    Jun 7, 2016
    Member:
    #3549
    Messages:
    11,580
    Gender:
    Male
    First Name:
    Warren
    Santa Cruz
    Vehicle:
    '16 CM limited
    TC long travel. Deaver 420 SU leaf packs.
    Thanks Bruce.
     
    joonbug and papasmurf[OP] like this.
  4. Oct 25, 2018 at 12:31 PM
    #4
    TheBeast

    TheBeast The Beach

    Joined:
    Apr 27, 2016
    Member:
    #3246
    Messages:
    12,521
    Gender:
    Male
    SoCal
    Vehicle:
    2012
  5. May 15, 2019 at 7:52 AM
    #5
    osidepunker

    osidepunker OsidePunker

    Joined:
    Oct 19, 2016
    Member:
    #4918
    Messages:
    2,998
    Gender:
    Male
    First Name:
    Alex
    SoCal
    Vehicle:
    2013 Tundra DC 4x4
    Full LT, full armor, fully self contained Speed Glamper
    Can you chime in on this thread? I'm about to swap my steering rack (again). The first time Bruce and I got it out the passenger side by removing the worm gear at the housing, two bolts.

    This time I want to try removing the front diff. Does that mean I can get it out the rear without removing the work gear???

    Do I really have to "lower the tcase and trans to gain room under the engine"?
     
  6. May 15, 2019 at 9:19 AM
    #6
    osidepunker

    osidepunker OsidePunker

    Joined:
    Oct 19, 2016
    Member:
    #4918
    Messages:
    2,998
    Gender:
    Male
    First Name:
    Alex
    SoCal
    Vehicle:
    2013 Tundra DC 4x4
    Full LT, full armor, fully self contained Speed Glamper
  7. May 16, 2019 at 10:30 AM
    #7
    Mooseknuckles

    Mooseknuckles New Member

    Joined:
    Apr 16, 2019
    Member:
    #29200
    Messages:
    20
    Gender:
    Male
    First Name:
    Randy
    How do you remove the gearbox while rack is disconected but still in place?
     
  8. May 16, 2019 at 10:35 AM
    #8
    papasmurf

    papasmurf [OP] Savage Fabrication

    Joined:
    Jan 11, 2017
    Member:
    #5911
    Messages:
    1,955
    Gender:
    Male
    First Name:
    Bruce
    San Diego
    Vehicle:
    2007 4x4 Tundra
    07 Silver Sky 4x4 | Total Chaos LT | 2.5 King Coil overs & Bypasses | Camburg Bed Cage | 3.0 King Bypasses | 2.0 King Bumps | Custom Deavers | Nitro 4.88's | ARB Locker | Demello Sliders | 17" Double Standards | BFGKO2 37's |
    There are two bolts that hold them together they are on the backside of the housing ... however a new update

    @osidepunker needs his rack replaced and I’m going to try a new way by dropping the front diff and pulling the whole rack out as a complete unit... so stand by for new pics soon we are doing the job the weekend June 1st
     
  9. May 16, 2019 at 10:36 AM
    #9
    osidepunker

    osidepunker OsidePunker

    Joined:
    Oct 19, 2016
    Member:
    #4918
    Messages:
    2,998
    Gender:
    Male
    First Name:
    Alex
    SoCal
    Vehicle:
    2013 Tundra DC 4x4
    Full LT, full armor, fully self contained Speed Glamper
    Two guys, 3 extension, 3 wobbles, 1 hour of your time, lots of beer and patience...

    This time we're gonna drop the front diff and pull it out without removing the gearbox
     
    Black Wolf, Sunnier and papasmurf[OP] like this.
  10. May 16, 2019 at 10:45 AM
    #10
    Sunnier

    Sunnier Pity the warrior that slays all his foes

    Joined:
    Aug 21, 2017
    Member:
    #9171
    Messages:
    12,267
    First Name:
    Sunny
    San Diego, CA
    Vehicle:
    2017 Inferno Tundra DC TRD & Longtravel 1st Gen, Banner/ HulkSmash build
    Lemme know if I can swing by and be your photographer + beer and tool pit crew.
     
  11. May 16, 2019 at 11:06 AM
    #11
    papasmurf

    papasmurf [OP] Savage Fabrication

    Joined:
    Jan 11, 2017
    Member:
    #5911
    Messages:
    1,955
    Gender:
    Male
    First Name:
    Bruce
    San Diego
    Vehicle:
    2007 4x4 Tundra
    07 Silver Sky 4x4 | Total Chaos LT | 2.5 King Coil overs & Bypasses | Camburg Bed Cage | 3.0 King Bypasses | 2.0 King Bumps | Custom Deavers | Nitro 4.88's | ARB Locker | Demello Sliders | 17" Double Standards | BFGKO2 37's |
    That would be awesome and extremely helpful since Alex is only gonna be at. 70% w his broken wing lol
     
    Black Wolf likes this.
  12. May 16, 2019 at 11:15 AM
    #12
    Sunnier

    Sunnier Pity the warrior that slays all his foes

    Joined:
    Aug 21, 2017
    Member:
    #9171
    Messages:
    12,267
    First Name:
    Sunny
    San Diego, CA
    Vehicle:
    2017 Inferno Tundra DC TRD & Longtravel 1st Gen, Banner/ HulkSmash build
    I'll hold the beer to his lips :D, whatever support is needed!
     
  13. May 16, 2019 at 11:27 AM
    #13
    osidepunker

    osidepunker OsidePunker

    Joined:
    Oct 19, 2016
    Member:
    #4918
    Messages:
    2,998
    Gender:
    Male
    First Name:
    Alex
    SoCal
    Vehicle:
    2013 Tundra DC 4x4
    Full LT, full armor, fully self contained Speed Glamper
    :eek:

    ^^that's me waiting for a drink like a baby bird
     
  14. May 16, 2019 at 11:29 AM
    #14
    Sunnier

    Sunnier Pity the warrior that slays all his foes

    Joined:
    Aug 21, 2017
    Member:
    #9171
    Messages:
    12,267
    First Name:
    Sunny
    San Diego, CA
    Vehicle:
    2017 Inferno Tundra DC TRD & Longtravel 1st Gen, Banner/ HulkSmash build
    I'll bring a baby bottle and an IV, evaluate when I get there. :p
     
    Black Wolf and papasmurf[OP] like this.
  15. May 16, 2019 at 11:52 AM
    #15
    Mooseknuckles

    Mooseknuckles New Member

    Joined:
    Apr 16, 2019
    Member:
    #29200
    Messages:
    20
    Gender:
    Male
    First Name:
    Randy
    That would be AWESOME! I would rather replace the rack all together and not have to attempt to re-assemble this one after i get the body back in. Thank you.
     
    papasmurf[QUOTED][OP] likes this.
  16. Jun 2, 2019 at 9:15 PM
    #16
    Ponkus

    Ponkus New Member

    Joined:
    Apr 14, 2019
    Member:
    #29092
    Messages:
    3
    Gender:
    Male
    @papasmurf just wondering if you guys got around to trying the diff drop method this weekend. I'm about to start this job tonight

    Also what else do you guys think could help prevent this in the future? I'm running 37's on icons at 3.5" up front, so I expect I might have this failure again in the future if something doesn't get beefed up or angles corrected. I was thinking maybe coach builder heim tie rod ends or the ReadyLIFTOff Road Steering Kit might alleviate some of the angle stresses when off-roading.


  17. Jun 3, 2019 at 4:54 AM
    #17
    osidepunker

    osidepunker OsidePunker

    Joined:
    Oct 19, 2016
    Member:
    #4918
    Messages:
    2,998
    Gender:
    Male
    First Name:
    Alex
    SoCal
    Vehicle:
    2013 Tundra DC 4x4
    Full LT, full armor, fully self contained Speed Glamper
    Yes, dropping the diff is the right way to do it. We did the entire job in about 5 hrs. You can install the rack as one unit. Job goes like this:

    lock steering wheel
    remove two breather lines from diff
    disconnect actuator cable
    unbolt ball joint cradles from spindles
    remove inner CV from diff
    unbolt and drop diff using a jack (two man job)
    disconnect inner tie rods from rack
    disconnect steering shaft at the rack
    disconnect two hydraulic fittings at the rack (input and output)
    disconnect two hose brackets from the rack
    unbolt two mounting bolts for the rack
    remove rack
    remove bushings from new rack by using a chisel under the lip of the metal sleeve
    install new poly bushings from Energy suspension
    install new rack and replace diff
    spin each tire and draw a line on the tread
    measure the distance on the front face of the tire (track width) and compare to the distance on the rear face of the tires
    set toe to 1/16th narrower on the front track width as compared to the rear
    get a professional alignment
    spend the $3k you saved by doing it yourself on some fun truck mods
     
  18. Jun 3, 2019 at 5:18 PM
    #18
    papasmurf

    papasmurf [OP] Savage Fabrication

    Joined:
    Jan 11, 2017
    Member:
    #5911
    Messages:
    1,955
    Gender:
    Male
    First Name:
    Bruce
    San Diego
    Vehicle:
    2007 4x4 Tundra
    07 Silver Sky 4x4 | Total Chaos LT | 2.5 King Coil overs & Bypasses | Camburg Bed Cage | 3.0 King Bypasses | 2.0 King Bumps | Custom Deavers | Nitro 4.88's | ARB Locker | Demello Sliders | 17" Double Standards | BFGKO2 37's |
    That :anonymous:
     
    osidepunker[QUOTED] and Ponkus like this.
  19. Jun 4, 2019 at 4:43 AM
    #19
    osidepunker

    osidepunker OsidePunker

    Joined:
    Oct 19, 2016
    Member:
    #4918
    Messages:
    2,998
    Gender:
    Male
    First Name:
    Alex
    SoCal
    Vehicle:
    2013 Tundra DC 4x4
    Full LT, full armor, fully self contained Speed Glamper
    You should add the instructions to the original post and maybe update the part numbers. Keep the old information in there too for posterity
     
    papasmurf[QUOTED][OP] likes this.
  20. Jun 4, 2019 at 6:44 AM
    #20
    papasmurf

    papasmurf [OP] Savage Fabrication

    Joined:
    Jan 11, 2017
    Member:
    #5911
    Messages:
    1,955
    Gender:
    Male
    First Name:
    Bruce
    San Diego
    Vehicle:
    2007 4x4 Tundra
    07 Silver Sky 4x4 | Total Chaos LT | 2.5 King Coil overs & Bypasses | Camburg Bed Cage | 3.0 King Bypasses | 2.0 King Bumps | Custom Deavers | Nitro 4.88's | ARB Locker | Demello Sliders | 17" Double Standards | BFGKO2 37's |
    i might just do that... or i dont and let people struggle. LOL
     
  21. Aug 1, 2019 at 1:46 PM
    #21
    agkleino

    agkleino New Member

    Joined:
    Feb 18, 2018
    Member:
    #12986
    Messages:
    19
    Gender:
    Male
    First Name:
    Aaron
    Arizona
    Vehicle:
    2014 Tundra Platinum
    @papasmurf , how can you tell when the steering is going out? My steering hasn't been right since this year's T2S. Don't know if steering is going, or its just harder due to my 37s.
     
  22. Aug 1, 2019 at 1:49 PM
    #22
    osidepunker

    osidepunker OsidePunker

    Joined:
    Oct 19, 2016
    Member:
    #4918
    Messages:
    2,998
    Gender:
    Male
    First Name:
    Alex
    SoCal
    Vehicle:
    2013 Tundra DC 4x4
    Full LT, full armor, fully self contained Speed Glamper
    It's harder to turn because of 37s
     
    papasmurf[OP] likes this.
  23. Aug 1, 2019 at 9:37 PM
    #23
    agkleino

    agkleino New Member

    Joined:
    Feb 18, 2018
    Member:
    #12986
    Messages:
    19
    Gender:
    Male
    First Name:
    Aaron
    Arizona
    Vehicle:
    2014 Tundra Platinum
    It's more than just a little harder to steer. Whining and groaning when turning. I basically need to be in motion for the steering to feel normal.
     
  24. Aug 2, 2019 at 4:58 AM
    #24
    osidepunker

    osidepunker OsidePunker

    Joined:
    Oct 19, 2016
    Member:
    #4918
    Messages:
    2,998
    Gender:
    Male
    First Name:
    Alex
    SoCal
    Vehicle:
    2013 Tundra DC 4x4
    Full LT, full armor, fully self contained Speed Glamper
    normal.
     
  25. Aug 26, 2019 at 9:42 PM
    #25
    matthew1992ya

    matthew1992ya New Member

    Joined:
    Aug 20, 2019
    Member:
    #34911
    Messages:
    32
    Gender:
    Male
    First Name:
    Matthew
    Louisiana
    Vehicle:
    2015 sr5 4x4 tundra
    Level sequoia wheels I like factory mods don't care to much for aftermarket
    When we get them leaking at the shop we replace the rack and pump flush the lines and fill it with ws trans fluid and never have a problem again
     
  26. Apr 2, 2020 at 4:37 PM
    #26
    Stap0607

    Stap0607 New Member

    Joined:
    Apr 2, 2020
    Member:
    #44599
    Messages:
    2
    Gender:
    Male
    Vehicle:
    2011 Black Rock Warrior CM
    @matthew1992ya so I was just told my steering rack is leaking. They said it would be $2800 to replace. How long can I ride like that? Is this something I should have taken care of right away?
     
  27. Jun 15, 2020 at 4:27 PM
    #27
    moosegofast

    moosegofast New Member

    Joined:
    May 30, 2020
    Member:
    #47296
    Messages:
    6
    Gender:
    Male
    Hey all,

    I was hoping my second post on this forum would be a new member intro, but due to a blown steering rack, this will have to do. Last week I had my 2010 DC down at Toytec for new 295/70-18s and had them install their new 2.0 Aluma series coilovers with 1.5 block and shocks in the rear. I am was very happy with how it turned out, until Sat. when the steering rack blew out. :(

    I have some questions about a replacement .
    • Is a new, OEM (latest revision) unit a better solution to a remanufactured unit with a lifetime warranty? I am less concerned about cost, I just don't want to have to do this again.
    • Is it advisable to replace the tie rod ends as well?
    I am debating on doing this myself as I am pretty handy, I recently replaced the CV axle needle bearing in the front diff with the ECGS part. I have some question about the latest procedure posted by OsidePunker. Apologies if some of these seem remedial, I still need to have the trunk towed down from our cabin, so I don't have a visual reference for some of these.

    • lock steering wheel
      • Assuming this just means turning off the ignition and turning the wheel until it locks?
    • unbolt ball joint cradles from spindles
      • Is this where the spindle bolts to the UCA?
    • disconnect inner tie rods from rack
    • spin each tire and draw a line on the tread
    • measure the distance on the front face of the tire (track width) and compare to the distance on the rear face of the tires
      • Measure to where?

    Thanks for any assistance,

    Mark


  28. Jun 16, 2020 at 6:18 PM
    #28
    osidepunker

    osidepunker OsidePunker

    Joined:
    Oct 19, 2016
    Member:
    #4918
    Messages:
    2,998
    Gender:
    Male
    First Name:
    Alex
    SoCal
    Vehicle:
    2013 Tundra DC 4x4
    Full LT, full armor, fully self contained Speed Glamper
    What up Mark!

    I would buy a new factory oem rack from Toyota. the one I installed last year has been working fine.

    Yes, unbolt the bottom of the spindle from the ball joint cradle. There are two large bolts, 22mm heads I believe, or maybe 24mm cant remember.

    You dont disconnect the inner tie rods from the rack. A new oem rack will come with new inner tie rods. You disconnect the outer tie rods from the inner. Super easy

    Dont worry about replacing tie rods unless yours have play in them

    Just run the seat belt through the steering wheel so you can make sure it doesn't get turned by accident.

    For the toe alignment, just google diy wheel alignment and you'll understand what Im talking about. You draw a line on the wheel by spinning the wheel and holding a marker to the tread. Then just measure the width between the wheels and compare the width between the fronts of the tires and the rears of the tires.

    Let me know if you have any other questions!
     
  29. Jun 17, 2020 at 8:39 AM
    #29
    moosegofast

    moosegofast New Member

    Joined:
    May 30, 2020
    Member:
    #47296
    Messages:
    6
    Gender:
    Male
    @osidepunker

    Thanks for the response. I have a OEM rack on order.

    Another question I have is if you drained the differential before dropping it, or just left what didn't drain after pulling the axles in there?

    Also, since I am dense, just want to make sure, you are able to remove the rack with the inner tie rods still attached?
     
  30. Jun 18, 2020 at 12:10 PM
    #30
    osidepunker

    osidepunker OsidePunker

    Joined:
    Oct 19, 2016
    Member:
    #4918
    Messages:
    2,998
    Gender:
    Male
    First Name:
    Alex
    SoCal
    Vehicle:
    2013 Tundra DC 4x4
    Full LT, full armor, fully self contained Speed Glamper
    If you are careful you wont lose much fluid when you pull the diff. Just full it like normal to replace what you lost. Or, if its time, you can do a drain and fill. Depends on if you want to spend the money on fluid and how old the fluid is

    Yes, the rack will come right out with the inners attached. Lots of room when you pull the diff. Slide it to the passenger side, then pull the drivers side to the rear of the truck and it'll come right out
     
    equin likes this.

Products Discussed in

To Top