1. Welcome to Tundras.com!

    You are currently viewing as a guest! To get full-access, you need to register for a FREE account.

    As a registered member, you’ll be able to:
    • Participate in all Tundra discussion topics
    • Transfer over your build thread from a different forum to this one
    • Communicate privately with other Tundra owners from around the world
    • Post your own photos in our Members Gallery
    • Access all special features of the site
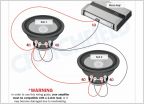
DSR1 compatibility

Discussion in 'Audio & Video' started by budjb, Dec 11, 2018.

  1. Dec 11, 2018 at 12:42 PM
    #1
    budjb

    budjb [OP] New Member

    Joined:
    Oct 22, 2018
    Member:
    #20827
    Messages:
    15
    Gender:
    Male
    I'm looking for responses from those who have used the DSR1 to add a system behind a JBL HU. I've seen info on what is retained using the DSR1, but I haven't seen much along the lines of what no longer works when using this product to replace the factory amp. What's been your experience?

    Asking because I thought I had a good idea of what wouldn't work using a Maestro RR and I was mistaken.
     
  2. Dec 13, 2018 at 8:55 AM
    #2
    dochanson

    dochanson New Member

    Joined:
    Oct 24, 2018
    Member:
    #20920
    Messages:
    69
    Gender:
    Male
    First Name:
    Gabe
    Vehicle:
    2018 1794
    I used the Rockford fosgate DSR-1 with an aftermarket amp.

    Everything still works on factory HU, I didn’t lose any factory functions.
     
    Sleeper16plat likes this.
  3. Dec 13, 2018 at 9:03 AM
    #3
    budjb

    budjb [OP] New Member

    Joined:
    Oct 22, 2018
    Member:
    #20827
    Messages:
    15
    Gender:
    Male
    @dochanson thank you! Do you have any issues with noise after the swap?
     
  4. Dec 13, 2018 at 11:09 AM
    #4
    dochanson

    dochanson New Member

    Joined:
    Oct 24, 2018
    Member:
    #20920
    Messages:
    69
    Gender:
    Male
    First Name:
    Gabe
    Vehicle:
    2018 1794
    Very little. If I’m at a standstill with motor off I hear a little hum. Definitely a non issue for me. I think hum is mostly dependent on amp. I used a Cadence 4.1 amp (not expensive) and it’s fine. I also don’t have gain levels maxed on amp...the higher the gain levels the louder the hum
     
  5. Dec 30, 2018 at 6:01 PM
    #5
    mongo7

    mongo7 New Member

    Joined:
    Dec 1, 2018
    Member:
    #22433
    Messages:
    7
    Vehicle:
    2018 Blue Tundra 1794
    Added Rear TRD Sway Bar
    I finished installing the DSR 1 today, and it has not gone well. Sound to FR, RR, RL doors is muddled, and the highs are not going through (Kappa 60 csx in both front and rear doors). Flashed the DSR 1 the other day, and will try again tomorrow, but this has not been a plug and play solution for a 2018 1794 (w. JBL) if you want to keep the head unit. I'll update if I get better results tomorrow.
     
  6. Jan 3, 2019 at 10:19 PM
    #6
    fireheadman

    fireheadman New Member

    Joined:
    Jan 3, 2019
    Member:
    #23914
    Messages:
    27
    Gender:
    Male
    Vehicle:
    1794 Tundra (2018)
    sub'd.... I just bought a 1794 (w/JBL).
    Ordered Focal 3-way (front), Focal 2-way (rear), JL 10" (sub), JL xd900/5v2 (amp), with the DSR1 (and T03 harness kit).

    Hoping for a positive install once everything arrives.
    @mongo7 how did your install end up?
     
  7. Jan 4, 2019 at 5:41 AM
    #7
    mongo7

    mongo7 New Member

    Joined:
    Dec 1, 2018
    Member:
    #22433
    Messages:
    7
    Vehicle:
    2018 Blue Tundra 1794
    Added Rear TRD Sway Bar
    Replacement DSR1 expected to arrive today. Will need to re-flash, but should be plug-and-play to see if issue resolved. Fingers crossed.

    If you have issues with flashing DSR1, customer support with iDatalink was great. Could not explain why flashing issues were occurring, but fixed it quickly. Problem is, they're only in on weekdays.

    I will write-up install and challenges when completed (hopefully by tomorrow if DSR 1 works). If DSR 1 does not work, I'll be shifting to AudioControl LCQ-1.

    Please let me know how you liked the JL 10" sub, and which model/box you used. Brackets on rear seat really limit box space behind seats. Thanks!
     
    afbatts likes this.
  8. Jan 4, 2019 at 6:28 AM
    #8
    fireheadman

    fireheadman New Member

    Joined:
    Jan 3, 2019
    Member:
    #23914
    Messages:
    27
    Gender:
    Male
    Vehicle:
    1794 Tundra (2018)
    Sounds good.

    As for the sub box, I templated with cardboard this weekend and spoke with JL Audio tech support. The 10tw3-d4 can live in 0.50cu ft with +/- 15%. I’m going +15% (0.57cu ft) to give more lower bass. Measurements are roughly 32”(L) x 11.5”(H) x 3.5”(d1) x 6”(d2). I’m hoping to transfer the factory brackets over or make some.
     
  9. Jan 4, 2019 at 6:31 AM
    #9
    Cfincke

    Cfincke Mall Crawler but capable

    Joined:
    Jul 7, 2016
    Member:
    #3797
    Messages:
    1,977
    Gender:
    Male
    First Name:
    Chris
    San Antonio
    Vehicle:
    2014 Tundra 1794 CM 5.7 4x4 sunset bronze
    5.29s, Auburn LSD, 37x12.50R18, Icon coilovers and shocks, SPC UCA's, Tech 12 Volts sound system, Enve Grill
    I have been running the DSR1 since may/june in my 1974 with JBL entune. I have 2 JL amps after it. I have not had an issue with the DSR1. It replaced the JL fix86 i had previously. Getting rid of the factory amp got rid of all the noise i had when running the fix86. Make sure you configure you amp gain to match your speaker impedance rating using a controlled test tone on a CD and a volt meter. My JL RD amd has a clipping light to make setup super easy, i verified the setting with the volt meter too and it was spot on.
     
    afbatts and West Texas Tundra like this.
  10. Jan 5, 2019 at 1:47 AM
    #10
    mongo7

    mongo7 New Member

    Joined:
    Dec 1, 2018
    Member:
    #22433
    Messages:
    7
    Vehicle:
    2018 Blue Tundra 1794
    Added Rear TRD Sway Bar
    DSR1 replaced last night. Working better, but something is still not right. I still need to adjust gain and tune the system (see more remarks and questions below on DSR1 setup). Thanks for feedback, Cfincke - appreciate any help you can offer on DSR1 questions below (have exhausted Crutchfield's tech support info on DSR1).

    System details: Went from Stock HU => iDatalink TO3 harness (removed factory amp) => Infinity Kappa Five amp => Infinity Kappa 60 csx component sets in front and rear doors + 10" Kicker Comp RT (w/ passive radiator). Pushed all signals for tuning through DSR1. Ran all new 14-gauge oxygen-free wire to all speakers (no stock wire used to run speakers). All items are new. This is probably my 10th system install, so I don't do it for a living, but I've done it well before and always been very satisfied with results.

    Sound Concerns while testing off CD last night:
    - FL door (driver) gets a really clean sound, but the rest of the doors sound different.
    - FR door (passenger) has no highs pushing from tweeters.
    - Rear doors get a little highs, but mostly mids. Mids also sound muddled.
    - Bass from Kicker is almost non-existent. Heavy bass still pushed to component sets but, like I said, I still have to setup/tweak the system today.

    Could be it just needs to be tweaked, could be amp issue, could be DSR1, could be crap Stock HU (I've read the posts on the Stock HU, but trying to keep it for stock look and functional simplicity...if that works).

    Questions for those who've used the DSR1:
    - Did you use the iDatalink TO3 harness?
    - When you connected former JBL amp wires to DSR 1, did you do that just using the plug-and-play wires for all speaker connections (no high-level inputs), or did you run high-level inputs/solder connections? I used the remote turn-on from DSR1 to remote the Kappa amp, but that's the only wire that was soldered. All else was plug-and-play. Perhaps others have obtained better results using another setup.
    - Any other specifics you could offer on DSR1 would be helpful.

    Thanks for the help, and will continue to update when more is known. Will do full write-up and links to some items that really helped install when finished.
     
  11. Jan 6, 2019 at 4:43 AM
    #11
    mongo7

    mongo7 New Member

    Joined:
    Dec 1, 2018
    Member:
    #22433
    Messages:
    7
    Vehicle:
    2018 Blue Tundra 1794
    Added Rear TRD Sway Bar
    Re-flashed and updated bluetooth on DSR1 three times yesterday, along with programming the Fosgate DSR1 update. Re-flashed three times because, twice, DSR1 randomly stopped working. Stereo keeps playing (CDs, FM, XM, BT), time ticks along on track, but no sound comes out of system. Amp shuts off (not going into protection mode - not even warm), then DSR1 starts flashing a green light about 6 times, followed by 1 white light. It went out last night for the last time at about 7 PM. This is the second DSR1 unit (Crutchfield already replaced the first one). I can't trust the DSR1 and will now just replace HU or try AudioControl LCQ-1 to process signal from HU and distribute to Kappa 5 amp.

    Problem with FR tweeter was a bad Kappa crossover. Crutchfield replacing that. 10 minute fix.

    Rear right doors sounded great with new, re-flashed DSR1 - until it quit (see 1st paragraph above).

    This will be my last post on the DSR1 unless something miraculous happens. Will update if I go with LCQ-1 and have better success. As always, Crutchfield has been fantastic backing its products.
     
  12. Jan 6, 2019 at 9:02 AM
    #12
    PNW_Husky

    PNW_Husky New Member

    Joined:
    Nov 11, 2017
    Member:
    #10905
    Messages:
    478
    Great Pacific Northwest
    Vehicle:
    2018 MGM CM Platinum
    I have the DSR1 installed with a JL RD900/5 and it sounds flipping amazing. Sorry to hear you are having troubles.
     
  13. Jan 6, 2019 at 6:02 PM
    #13
    fireheadman

    fireheadman New Member

    Joined:
    Jan 3, 2019
    Member:
    #23914
    Messages:
    27
    Gender:
    Male
    Vehicle:
    1794 Tundra (2018)
    @mongo7
    ....Try this, maybe it can help some...?

    I programmed my DSR1 yesterday evening, Did the firmware flash, bluetooth flash, then DSR1 firmware flash.
    While it was still plugged into my computer I attempted to connect via bluetooth on iPad (PerfectTune app) and noticed I could not get any version info on it and bluetooth would disconnect.

    Today I took the DSR1 to the Tundra and connected the T-Harness between the factory connectors (1x-blue and 2x-white) to the DSR1 (vehicle/input)
    No amp is connected at this point.
    Then turned the ignition on and made sure the radio would show the volume changing....
    I opened up the PerfectTune app and was now able to see version info for the DSR1 (PC vs Vehicle outputs a different voltage to allow bluetooth to work)
    At this point... when I moved any input/volume control in the PT app, I would notice the DSR1 light rapidly blind, validating the connection to the HU was good.

    I'm still waiting on my amp and speakers to arrive next week, then can finish validating.

    You should have these on your version info:

    DSR1
    Hardware version: 3.1.8
    Firmware version: 1.8.1
    Bootloader version: 1.0.0

    Maestro
    Firmware version: ADS-AR-DC-T01-256
    Hardware version: 1.31.0
    Firmware version: 1.1.0
    Bootloader version: 1.0.0
     
    betotundra likes this.
  14. Jan 12, 2019 at 4:12 AM
    #14
    mongo7

    mongo7 New Member

    Joined:
    Dec 1, 2018
    Member:
    #22433
    Messages:
    7
    Vehicle:
    2018 Blue Tundra 1794
    Added Rear TRD Sway Bar
    Well, it works. After much more troubleshooting, we determined it was the TO3 harness wires and not the DSR1 that was the problem. To keep it short, the "plug and play" TO3 harness had lose wire connections in the harness and after securing them better, the system has worked flawlessly for 5 days. Crutchfield sent me a new TO3 harness, and I've had zero issues since. System sounds excellent, especially since I replaced the crossover on the FR door, which got the tweeter firing. For comparison purposes, I did a very similar install on a 2006 Sequoia several years back, replacing the head unit with Pioneer that had 3, 24-bit DACs, Kappa components, Kappa sub, etc. The two systems sound equally good and that should tell you that the DSR1 did a good job converting the 2018 1794 (JBL) stock HU signals and cleaning them up before distributing to the amp.

    Thanks for all the help and suggestions over the last couple weeks. Has not been fun, but I've learned a lot about the 2018 1794. I'll do a full write-up in the coming weeks, but I need a little detox from discussing car audio. (and then I decided to ramble the following info, hoping it helps someone avoid the challenges I encountered).

    System configuration for anyone who's interested: Stock Head Unit (JBL) => Fosgate DSR1 => Infinity Kappa 5 amp => (4 channels) Infinity Kappa 60 csx in front and rear doors (crossovers secured center console) => (5th channel) Kicker CompRT 10" Loaded Enclosure (with radiator), and new speaker wire to all speakers (left stock wiring in place and zip tied it).

    Some interesting information about the install: Crutchfield tells you the Kappa 60 CSX do not fit in front or rear with the problem being the mounting height. They fit fine in both with a very slight modification. On the front and rear doors, Toyota puts a goofy, thick plastic ring on the door to cover the speakers on the inside of the door panel. Makes no sense to me. Once you trim that plastic ring off with a Dremel tool or Roto-Zip (used disc cutting wheel on Roto-Zip), you don't have mounting height issues any more that Crutchfield talks about. Without cutting off this ring, the ring will hit the speakers and prevent the door from snugging up against the metal. I also sanded down the remaining inside panel after cutting off the ring (80 then 200 grit), just so there were no sharp, plastic areas inside the door. Since this plastic ring is on the inside of the door, you cannot see any mods from the cab. You'd never know there was a mod to the door or that the speakers are different. Just the way I wanted it.

    Now, on the front door, the speaker brackets provided by Crutchfield suck and were cheap. You had to use them with the stock speaker bracket to make it work. ********* has a bracket that is better and "plug and play" with the Kappa 60 csx (they said it was plug and play - I did not verify). For about $80 for those brackets, I probably would have saved 3 hours of time and looking back, would have been worth it. Otherwise you spend time cutting the plastic ring off the inside of the door, and then figuring out how to make clean, sturdy connections with the stock bracket and crappy bracket provided by Crutchfield.

    One of the hardest parts of the install, and most risky, was installing the new speaker wire to all speakers. Pretty easy on the front doors once you remove the rubber grommets between the door and cab. ********* also had a nice video on this where the guy did a great job walking you through this exact process on the front and rear doors (https://www.youtube.com/watch?v=0RjiqacMOdo). For the rear doors, you have to drill through a bracket while the wires are in the bracket. Not fun stuff when you think "I just paid $40K+ for this truck and am within a 1/4-inch of making my rear doors unusable." That being said, I was very careful and held a piece of metal between the drill and existing wires to ensure I did not hit the existing wires. Still was tight to get the new wire through, but we made it work.

    More to come later. Thanks again for all the help and good MOJO.
     
    Sleeper16plat and phogallen like this.
  15. Jan 13, 2019 at 9:26 AM
    #15
    fireheadman

    fireheadman New Member

    Joined:
    Jan 3, 2019
    Member:
    #23914
    Messages:
    27
    Gender:
    Male
    Vehicle:
    1794 Tundra (2018)
    @mongo7, very happy to see your install progress!

    I started friday on my install for my 1794, wondering if your fingers are as sore as mine are at this point? Think I am over 18 hours in at this point!

    Stripped out all of the interior and installed fatmat 50mil deadner on the floor boards, in the doors and partial door surrounds (nothing like the video has... that seems overkill).
    Had to fish a wire up the dash for the 3-1/4 focal and through the door grommet. (Still have to figure out how to mount those...looks like some dash trimming will be involved).
    Still have an amp board to fabricate, will be using a piece of textured, black polypropylene.

    On the DSR1 and its harness...
    I used a pinout for the JBL stereo https://tnstatic.net/attachments/2018-tundra-jbl-wires-r1-jpg.126407/
    This sped things up determining the correct speaker wires to use, then used a OHM meter the verify them. In the end I de-pinned 4 speaker wires from the harness to clean up the harness (removed from t-harness wires for "Input 3|4|7|8"). If you have some cloth tape (https://www.amazon.com/gp/product/B07KGHHTY5/), wrap the harness up to protect it.

    To help verify the polarity on woofers I bought this tool/cd kit (https://www.amazon.com/gp/product/B01N75I030), believe track 3 plays to pop noise and you press the "test" button on the remote directly in front of the woofers, it will show a green led if it is in the correct phase.

    Back to the DSR1,
    I took my truck to the mall parking lot at night so I didn't blast my neighbors out to tune this thing...
    I went through the crutchfield guide to properly adjust gains on my amp (https://www.crutchfield.com/S-lSQNx...und-system-part-3-adding-a-4-channel-amp.aspx)
    This is where I have a little more to learn and am curious of your thoughts/experiences and others on here.
    It appears the DSR1 does not want to use the "Basic Tuning", it says the Master Equalizers is disabled because it is flashed for vehicle specific firmware, so we would use the Treble/Mid/Bass controls on the headunit.

    ....However, you can launch the "Advanced Tuning" section.
    I set my Crossover in this section to:
    Filter Type=High Pass
    Filter Slope=12dB/Oct
    High Pass Frequency=80Hz

    You must do this for each channel unless you hit the "Speakers" icon on top right and link left to right channel for front and left to right for rear channel...
    I missed this initially so it only set the front right channel.

    I have not messed with Trim Level or Time Alignment sections.
    Equalizer will be the most complex to set as these apply to each speaker (unless you link them as previously stated)
    The really nice thing is, once you get your settings goto Home screen in the app --> Setup --> Manage Presets --> "+" and save your configuration.
    From here you could share your configuration via text/email or upload to another DSR1.
     
    Bigolbaddy likes this.
  16. Jan 15, 2019 at 6:03 AM
    #16
    mongo7

    mongo7 New Member

    Joined:
    Dec 1, 2018
    Member:
    #22433
    Messages:
    7
    Vehicle:
    2018 Blue Tundra 1794
    Added Rear TRD Sway Bar
    I used the basic tuning features on the DSR1 EQ. I just wanted to make sure I had a good baseline sound, and then figured I would start tweaking a couple weeks down the line. I disabled using the EQ in the head unit to force the dsr1 and my amp to do all the processing. Sorry I don't have any tips for you. Please let me know if you discover anything interesting regarding time alignments or anything else.
     
  17. Jan 15, 2019 at 12:58 PM
    #17
    fireheadman

    fireheadman New Member

    Joined:
    Jan 3, 2019
    Member:
    #23914
    Messages:
    27
    Gender:
    Male
    Vehicle:
    1794 Tundra (2018)
    Here's a couple things I noticed on my setup.
    DSR1, assuming when you went through the flashing/firmware phase you specified your specific vehicle (which requires the A03 t-harness)
    When you connect the PerfectTune app, go into the Setup Device section --> (top right, click cog wheel w/vehicle icon) --> select Maestro (T-Harness) and go through the rest of the settings.
    I believe you are still set to "Universal Harness".... because when the T-Harness is selected you are no longer allowed to use the "Basic Tuning" section. It will tell you the master equalizer is now disabled in the app and to use the treble/mid/bass on the headunit.

    You will still be able to use the advanced tuning section... which is where I am tinkering around with right now.

    Another good thing to do is check if your AMP manufacturer provides optimal gain settings/guide. I was previously using the Crutchfield guide and ditched that after reading about my amp's setup guide (JL Audio XD700/5v2). For JL Audio amps, use this method (find your amp in the charts): https://jlaudio.zendesk.com/hc/en-us/articles/204374120-Amplifier-Level-Setting-Guide
    ...This requires downloading 2 files (50hz=sub and 1khz=fullrange/mid) to a usb stick and playing through the HU as you tune.
    Side NOTE: Make sure the Master Vol and Sub Vol are at max level. Put the Punch Vol are at half way (9.0dB) level --> This allows you to pull back or increase additional bass if needed.

    The one thing that tripped me up on this was my gain moved 1/2 of the way so I contacted JL Audio support about this.
    As I was told, this is a good thing and shows that DSR1 is producing a very clean/high signal to the amp. I was skeptical of this but everything sounds really good, clean and doesn't distort at all. NOTE: There is a tolerance of +10% to +15% that can be added to the voltage specs when tuning as JL Audio amps are underrated. I opted to increase the signal +15% on each channel (gains).


    For bluetooth disconnects (I was getting this condition when attempting to save my configuration in "Manage Presets"). If your phone/ipad/android has the screen timeout, this will cause the app to disconnect. If I closed the app and relaunched it I could save the profile. FYI: Tuning with an ipad is really nice!!! (all the controls are on a single screen).


    Hope this info helps.


    UPDATE: Spoke with Rockford Support (800-669-9899, #2) about the DSR1 since they maintain the PerfectTune App.

    The amount of options/flexibility is blowing my mind (information overload). There are 2 routes to take:
    Easy route: Keep the Advanced Settings EQ flat (0dB), in this case you will use your HU controls for treble/mid/bass.... The drawback is flexibility to tuning your system perfectly, but this is very easy to make small adjustments quickly.

    Advanced route: Keep your HU controls flat (in the middle) and spend some time in the Adv Settings EQ. There are preset options available in the Manage Presets menu, however you have to upload to device to switch, it is not a very quick method while driving.

    Side Note: When tuning amp gains using voltages with HU at 3/4 volume... If you end up using the Advanced route this will affect the voltages of each channel, so be sure to re-check the output and re-adjust the gains again.
     
    Last edited: Jan 15, 2019
  18. Jan 15, 2019 at 2:17 PM
    #18
    fireheadman

    fireheadman New Member

    Joined:
    Jan 3, 2019
    Member:
    #23914
    Messages:
    27
    Gender:
    Male
    Vehicle:
    1794 Tundra (2018)
    I'll see if I can upload some screenshots from my ipad soon of the various sections.
     
  19. Jan 15, 2019 at 5:18 PM
    #19
    mongo7

    mongo7 New Member

    Joined:
    Dec 1, 2018
    Member:
    #22433
    Messages:
    7
    Vehicle:
    2018 Blue Tundra 1794
    Added Rear TRD Sway Bar
    It's been set to T Harness and I can use Basic. Don't know.

    You getting a hiss at low volume? Want to get rid of that and the engine whine. Engine whine was in stock system before mods and think it's coming from right dash speaker.
     
  20. Jan 15, 2019 at 8:53 PM
    #20
    fireheadman

    fireheadman New Member

    Joined:
    Jan 3, 2019
    Member:
    #23914
    Messages:
    27
    Gender:
    Male
    Vehicle:
    1794 Tundra (2018)
    Wondering if when you flashed (DSR1 connected to PC) that it was selected as Universal Harness?.... and then in the App it allows you to select T-Harness? (maybe that is how Basic tuning is available?)

    BTW: I do not have any hissing noise in my setup.... I grounded my amp under the passenger front seat... when I did this I took a wire wheel and removed the paint to expose bare metal. A good ground a good starting point.
    I'm running 1.5 foot stinger 4000 series interconnects (3x of them).

    Here is a picture of the amp mounted (DSR1 is on a small piece of board velcrow'd to the carpet):
    The ground point is under the carpet on the right side of the amp.... there should be 2 sets of brown wires, I used the bolt already present to attach.


    This is a 1/2" piece of polypropylene (cutting board)


    Here are some screenshots of my setup:
    This is showing the T-Harness configured


    Main page...


    In the bluetooth menu, click the Info to get versions


    Because T-Harness is flashed and also selected in the App, I am unable to use the Basic Tuning function... This is an option when the DSR1 is connected to the PC and it is flashed


    When inside the Advanced Tuning, you have to select each speaker set (I link my channels together to make it easier)


    Low pass Crossover settings


    Full Range Crossover settings (My Focals can handle 65hz)
    The front and rear are the same settings
    NOTE: I also have my High Pass setting on the AMP at 65hz.


    After tuning the AMP, I use this to even out any volume difference between front to rear instead of using a fader control at the headunit
    NOTE: I muted the channel not being used


    Have not started messing with this yet.... lot of options to research (GAIN vs Q vs FREQ)


    Time Alignment.... did this tonight.
    Sat in driver's seat with tape measure and inputted to the nearest inch.
    There is a tape measure tool on top right... this is broken, you will notice if you use this and save it will jack up the settings on this screen.... so just use the slider and fine tune with -/+ buttons
     
    Last edited: Jan 15, 2019
    Sleeper16plat likes this.
  21. Jan 22, 2019 at 6:45 PM
    #21
    fireheadman

    fireheadman New Member

    Joined:
    Jan 3, 2019
    Member:
    #23914
    Messages:
    27
    Gender:
    Male
    Vehicle:
    1794 Tundra (2018)
    Bought a calibrated mic this week and used a RTA (real time analyzer) app from iTunes. Downloaded a 15min pink noise track onto a USB stick and went through the tuning phase on the advanced EQ as well as tweaked the time alignment and crossover.

    The end result... I wasn't happy at all with the sound. There was very little bass and the highs were tingy.
    I read a lot in the forums about tuning with pink noise and RTA VS tuning by ear.
    I would have to say, if you are highly scientific and wish to see a "flat" RTA spectrum based on pink noise... then go that route....

    Being that I listen to a lot of alternative/metal/rock/classic rock, I found a 14 band metal EQ example online and did my best to mimic that format on the 31 band EQ (filling in the gaps) and then tweaked it by ear. So far it sounds good enough and I still have most of my hair in the end. There's just too much flexibility in this device to have a definitive guide on how to tune it (everyone has their likes/dislikes).
     
  22. Jan 23, 2019 at 4:56 PM
    #22
    Shark Bait

    Shark Bait Not new anymore

    Joined:
    Jan 21, 2019
    Member:
    #24892
    Messages:
    173
    Gender:
    Male
    First Name:
    David
    Vehicle:
    2019 Platinum
    The Perfect Tune app will not open on my iPad Pro 12.9. Has anyone else ran into this? It’s the newest 12.9. The app will show full screen for about a half a second then go back to the iPad screen.
     
  23. Jan 30, 2019 at 1:16 AM
    #23
    PNW_Husky

    PNW_Husky New Member

    Joined:
    Nov 11, 2017
    Member:
    #10905
    Messages:
    478
    Great Pacific Northwest
    Vehicle:
    2018 MGM CM Platinum
    I have the same set up minus the C1’s in the dash. What are you running those off of? How’d you wire them up? Center channel and dash speakers?
     
  24. Jan 30, 2019 at 8:10 AM
    #24
    PNW_Husky

    PNW_Husky New Member

    Joined:
    Nov 11, 2017
    Member:
    #10905
    Messages:
    478
    Great Pacific Northwest
    Vehicle:
    2018 MGM CM Platinum
    Hmm. The JBL HU doesn’t have speaker outputs, only the non-JBL does. With the JBL HU, the output is from the stock or aftermarket amp. Now I’m really curious.
     
  25. Jan 30, 2019 at 12:07 PM
    #25
    budjb

    budjb [OP] New Member

    Joined:
    Oct 22, 2018
    Member:
    #20827
    Messages:
    15
    Gender:
    Male
    PWMDMD likes this.
  26. Mar 11, 2019 at 1:59 PM
    #26
    West Texas Tundra

    West Texas Tundra 2016 Bronze Beast

    Joined:
    Feb 3, 2019
    Member:
    #25539
    Messages:
    461
    Gender:
    Male
    First Name:
    Leo
    Odessa, Tx
    Vehicle:
    2016 Sunset Bronze
    20 inch CECO wheels Drop in K&N air filter 2 inch front leveling kit
    Hey did you try the dsr1 without changing the amp to see what it sounded like?
     
  27. Mar 11, 2019 at 3:18 PM
    #27
    Cfincke

    Cfincke Mall Crawler but capable

    Joined:
    Jul 7, 2016
    Member:
    #3797
    Messages:
    1,977
    Gender:
    Male
    First Name:
    Chris
    San Antonio
    Vehicle:
    2014 Tundra 1794 CM 5.7 4x4 sunset bronze
    5.29s, Auburn LSD, 37x12.50R18, Icon coilovers and shocks, SPC UCA's, Tech 12 Volts sound system, Enve Grill
    I did not change my amps when I replaced the Fix86 and factory amp with the DSR1.

    Fix setup
    Headunit -->factory amp -->fix86-->JL Amps-->speakers

    Dsr1 setup
    Headunit -->DSR1-->JL Amps-->speakers
     
  28. Mar 11, 2019 at 3:22 PM
    #28
    West Texas Tundra

    West Texas Tundra 2016 Bronze Beast

    Joined:
    Feb 3, 2019
    Member:
    #25539
    Messages:
    461
    Gender:
    Male
    First Name:
    Leo
    Odessa, Tx
    Vehicle:
    2016 Sunset Bronze
    20 inch CECO wheels Drop in K&N air filter 2 inch front leveling kit
    Cool man. What made the most difference when you upgraded? Speakers or amp or whatever
     
  29. Mar 11, 2019 at 3:45 PM
    #29
    Cfincke

    Cfincke Mall Crawler but capable

    Joined:
    Jul 7, 2016
    Member:
    #3797
    Messages:
    1,977
    Gender:
    Male
    First Name:
    Chris
    San Antonio
    Vehicle:
    2014 Tundra 1794 CM 5.7 4x4 sunset bronze
    5.29s, Auburn LSD, 37x12.50R18, Icon coilovers and shocks, SPC UCA's, Tech 12 Volts sound system, Enve Grill
    The DSR1 got rid of the frustration I had when running the fix86 and factory amp. The fix86 cannot decode the signal from the JBL headunit, so it grabs the output from the factory amp, but the factory amp add a ton of noise. The fix86 could clean up a lot of the noise, but not all of it. I had my gains and master volume turn to 50% or less to reduce the noise.

    The dsr1 can decode the signal from the JBL headunit, so no need for the factory amp. I was able to set the gains on the amps to just below the point when clipping occurs.

    Before I did amps and speakers, I did full dynamatting throughout the truck, that actually improved the sound of the factory setup a lot more than I expected.

    My 1st gen was fully dynamatted, mainly because the exhaust was droning bad. To hear the audio difference of dynamatting was impressive
     
  30. Mar 11, 2019 at 3:52 PM
    #30
    West Texas Tundra

    West Texas Tundra 2016 Bronze Beast

    Joined:
    Feb 3, 2019
    Member:
    #25539
    Messages:
    461
    Gender:
    Male
    First Name:
    Leo
    Odessa, Tx
    Vehicle:
    2016 Sunset Bronze
    20 inch CECO wheels Drop in K&N air filter 2 inch front leveling kit
    Hey thanks for this man!
    Question tho, when you said the dsr1 removes the need for the factory amp, does that mean that the dsr1 is taking over the signal processing completely and the amp is strictly for power output to the speakers?

    The dsr1 doesn’t have any powering capability right?
     
To Top